A successful metal roof installation isn't just about following steps—it starts with understanding exactly why you're making this choice in the first place. This isn't just slapping some panels on your house. You're choosing a material known for its incredible resilience, proven energy efficiency, and a lifespan that leaves traditional options in the dust. Getting your head around that value is the real first step to a roof that performs for decades.
Why a Metal Roof is Worth the Effort
Before a single tool comes out of the truck, let's talk about the "why." Grasping the reasons behind choosing a metal roof turns the job from a simple construction task into a smart, long-term investment for your property. When you understand the benefits, you start to appreciate why every cut, every screw, and every piece of trim matters.
The appeal of metal roofing goes way beyond its clean, modern look. The real advantages are tangible ones that you'll feel in your wallet and your peace of mind.
Built to Withstand Almost Anything
The number one reason people switch to metal is its sheer strength. We've all seen asphalt shingles crack, curl up, or get torn off by the wind. Metal panels, on the other hand, are engineered to take a beating from Mother Nature. They're designed to stand up to high winds, heavy snow, and even hail.
I've seen properly installed metal roofs handle wind speeds up to 140 mph. In areas that get serious storms, that kind of protection isn't a luxury; it's a necessity. It basically turns your roof into a fortress.
A Smart Move for Energy Bills
Metal is also a superstar when it comes to energy efficiency. Many modern panels come with special reflective coatings that bounce solar heat away from your home. This "cool roof" effect means your air conditioner doesn't have to run full-blast all summer, which translates directly into lower energy bills.
The market backs this up. The global metal roofing market is already valued at around $22.55 billion and is expected to climb to $32.83 billion by 2032. A big reason for that growth is the potential to cut energy use by up to 40% in hot climates. It’s a clear sign that people are moving toward smarter, more sustainable building materials. You can find more insights on these metal roofing trends and what they mean for homeowners.
Of course, any solid building project, whether it's a roof or a whole house, starts from the ground up. The same principles of careful planning and prep work apply. To get a better sense of these foundational steps, it's worth reading up on site preparation for building construction.
Ultimately, this initial groundwork is about shifting your perspective. Realize that every step in this guide contributes to a single goal: creating a durable, efficient, and valuable asset for your property. That mindset is the true foundation for a job well done.
Gathering Your Essential Tools and Materials
A smooth metal roofing job depends entirely on having the right gear before you even think about climbing the ladder. Think of this as your pre-flight checklist. Skipping a single item can send you scrambling to the hardware store mid-project or, worse, lead to costly mistakes that compromise your brand-new roof.
This is a whole different ballgame than asphalt shingles. The tools and materials for metal roofing are specialized, and using the wrong ones can cause some serious, irreversible damage. Let's get everything assembled so you can work safely and efficiently from the moment you start.
H3: The Right Tools for the Job
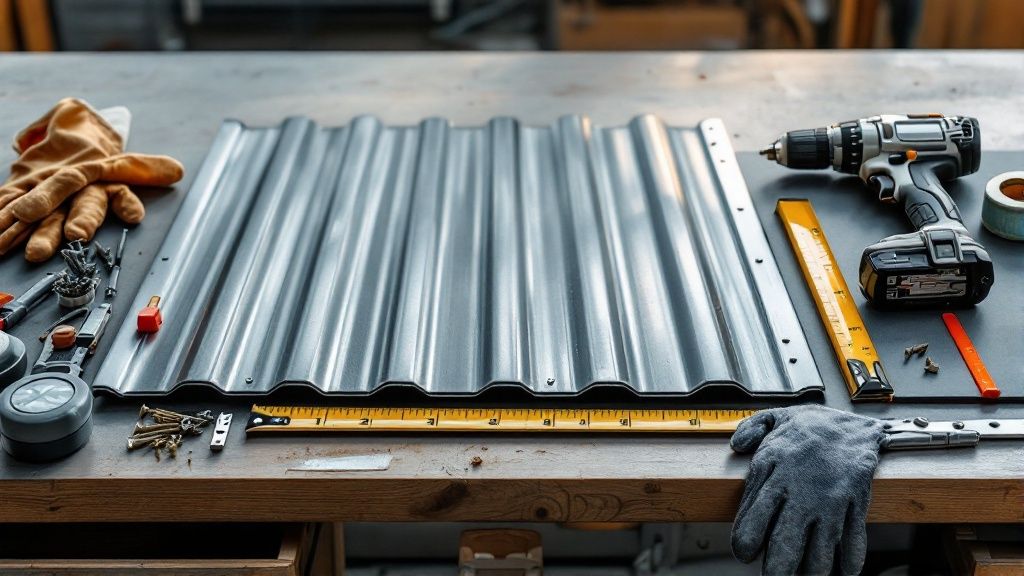
Your most critical decision here is how you're going to cut the metal panels. Get this wrong, and you can void the material warranty and set your roof up for a short, rusty life.
The biggest rookie mistake? Grabbing an abrasive saw or grinder. The sparks and intense heat these tools throw will literally burn off the galvanized and painted coatings along the panel edge. That exposed steel is an open invitation for rust to set in and spread like a cancer.
You have to use tools designed to cut metal cold. Here are the must-haves:
- Electric Metal Shears: These are your go-to for making long, straight cuts down the length of a panel. They slice through the metal cleanly and quickly, leaving the protective coating perfectly intact.
- A Nibbler: Ever wonder how pros make those perfect circular cuts around vent pipes? This is the secret. A nibbler punches out tiny "crescents" of metal, letting you create precise curves and intricate shapes without warping the panel.
- Tin Snips (Aviation Snips): You'll need a good set of left-cut, right-cut, and straight-cut snips for all the small, quick trimming tasks. They are absolutely non-negotiable for any detail work.
Beyond cutting tools, you'll need a screw gun with an adjustable clutch—this is key to prevent over-driving the screws and crushing the washers. Also, have a quality tape measure, a chalk line for snapping perfectly straight runs, and a caulk gun for your sealant.
H3: Materials That Make or Break the System
The quality of your materials is just as important as the quality of your work. Every single component, from the underlayment to the last screw, plays a critical role in creating a leak-proof roof that lasts for decades.
Remember, a roof is only as strong as its weakest link. Spending a few extra bucks on premium materials isn't an upsell; it's an investment. A cheap $5 tube of sealant can easily lead to thousands of dollars in water damage repairs down the road.
Start with a high-temperature synthetic underlayment. Don't even think about using traditional felt paper. It just can't handle the intense heat that builds up under metal panels and will dry out and crack over time. A good synthetic underlayment provides a crucial secondary barrier against moisture.
Next up, the fasteners. Only use the screws recommended by the panel manufacturer. They must have a bonded EPDM washer. This little rubber-like washer is a huge deal—it compresses as you drive the screw, forming a tight, waterproof gasket around the screw head that stays flexible as the metal expands and contracts.
Finally, you’ll have a whole collection of metal trim and flashing pieces—eave trim, ridge caps, valley flashing, and more—all designed to match your specific panel profile. You'll also need rolls of butyl tape to create a watertight seal at panel overlaps and between trim pieces. Get every single piece on-site before you start. It’s the only way to ensure a smooth workflow and a truly professional finish.
Having the right gear on hand before you start is half the battle. Nothing kills momentum faster than having to stop and run to the store for a tool or a box of screws you overlooked. I've put together this detailed checklist to help you stage your project like a pro.
Metal Roofing Installation Tool and Material Checklist
| Category | Item | Purpose and Key Considerations |
|---|---|---|
| Safety Gear | Hard Hat, Gloves, Safety Glasses | Essential for personal protection. Metal edges are sharp, and debris is common. |
| Roofing Harness & Safety Rope | Non-negotiable for any roof with a steep pitch. Always prioritize fall protection. | |
| Soft-Soled Boots | Provides grip without scratching or denting the new metal panels. | |
| Layout & Measuring | Tape Measure (25' or 30') | For accurate measurements of panels, trim, and roof dimensions. |
| Chalk Line & Chalk | Snapping straight lines for panel alignment and trim placement is critical for a professional look. | |
| Carpenter's Square / Speed Square | Ensures perfectly square cuts and alignment at hips, valleys, and eaves. | |
| Cutting Tools | Electric Metal Shears | The primary tool for long, straight cuts. Cuts without heat, preserving the panel's coating. |
| Nibbler | For curved or intricate cuts around pipes, vents, and chimneys. | |
| Tin Snips (Left, Right, Straight) | For small notches, trimming, and detail work where shears won't fit. | |
| Fastening Tools | Screw Gun (Variable Speed/Clutch) | An adjustable clutch prevents over-tightening screws, which can damage the EPDM washer. |
| Hand Seamer / Bending Tool | Used for bending and locking hems on trim pieces like rake and ridge cap. | |
| Materials | Metal Panels & Trim | The primary roofing material, including ridge caps, valley flashing, eave trim, and gable trim. |
| High-Temp Synthetic Underlayment | A critical moisture barrier designed to withstand high heat under metal. | |
| EPDM-Washered Screws | The only approved fastener. Must match the panel color and be the correct length. | |
| Butyl Tape & Sealant | Creates waterproof seals at panel overlaps and under trim pieces. Use a high-quality, non-curing sealant. |
Take the time to double-check this list against your project plans. Once you're confident you have everything, you're ready to move on to the crucial first step: preparing the roof deck.
Preparing the Roof Deck for Installation
The long-term success of your metal roof all comes down to what's underneath it. You can have the best panels in the world, but if the deck isn't solid, you're building on a faulty foundation. Getting this part right isn't just a preliminary step; it's what ensures your investment lasts for decades.
Before a single panel or even a roll of underlayment touches your roof, you have to play detective. A thorough inspection of the existing structure is non-negotiable. This is your one chance to find and fix any hidden issues that could sabotage the entire project down the line.
Uncovering Hidden Problems in the Roof Deck
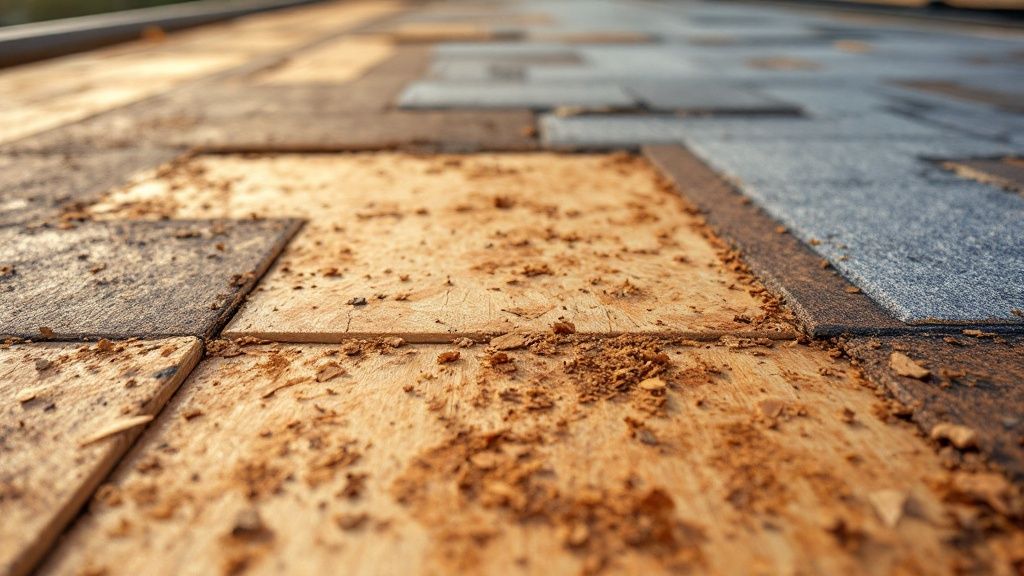
Start with a slow, careful walk across the entire roof. You're feeling for any areas that seem spongy, soft, or bouncy under your boots. Those are the classic red flags for rotted sheathing or even compromised rafters. Pay extra attention to the usual trouble spots where water loves to hang out: valleys, around chimneys, and near vent pipes.
Next, get your eyes on the sheathing itself. Look for dark stains, any sign of delamination where plywood layers are separating, or obvious signs of an active leak. It’s also a great idea to pop into the attic and look up. Can you see water stains, mold, or little pinpricks of daylight?
Any sheathing that’s compromised needs to be cut out and replaced with new material of the same thickness. It might seem tempting to ignore a small soft spot, but that's how you get fastener pull-outs and major leaks later on.
After repairs, the deck needs a good cleaning to ensure a smooth, ready surface. For stubborn grime, a comprehensive guide to diesel pressure cleaners can show you some powerful options for getting the job done right.
The Critical Tear-Off Versus Overlay Decision
With a structurally sound deck confirmed, you’ve hit your first major fork in the road: do you tear off the old shingles, or do you install the new metal roof right over them? Both have their place, but the right choice depends entirely on your specific situation.
An overlay might work if:
- You only have one, single layer of asphalt shingles on the roof.
- The existing shingles are lying perfectly flat, without any major curling or damage.
- Your local building codes give you the green light for an overlay.
Why a full tear-off is almost always the better call:
- It’s the only way to get a 100% complete inspection of the roof deck.
- It gives you a perfectly flat and clean surface for your new underlayment.
- It significantly reduces the total weight load on your home’s structure.
I'll be blunt: a full tear-off is the superior method. Overlays can save you a bit on labor costs upfront, but you're essentially burying any potential problems. Investing in a tear-off buys you peace of mind, knowing your roof’s foundation is perfect.
The U.S. roofing industry is a massive $56.7 billion market, and a lot of that growth—about 0.7% annually—is driven by homeowners demanding tougher materials like metal. People are investing in premium roofing for its resilience against hail, wind, and fire. Protecting that investment starts with ensuring the structure underneath is flawless.
Installing High-Performance Synthetic Underlayment
Once the deck is repaired and prepped, it's time for the next crucial layer of protection: the underlayment. For a metal roof, a high-temperature synthetic underlayment isn't just a suggestion—it's the only real choice. Old-school asphalt felt simply can't handle the intense heat that radiates off the back of metal panels and will break down in a hurry.
This synthetic layer does two critical jobs. First, it’s your secondary water barrier, the last line of defense against moisture from extreme weather or damage. Second, it acts as a slip sheet. This is huge. It lets the metal panels expand and contract with temperature changes without grinding against the roof deck.
Start rolling the underlayment out horizontally, beginning at the bottom eave. You'll want to secure it with cap fasteners, following the manufacturer's pattern—usually every 12-24 inches. Every row you add needs to overlap the one below it by at least six inches. This ensures you have a continuous, watertight barrier protecting your home.
This layer is absolutely vital, and you can learn more about what roof underlayment is in our detailed article. Don't cut corners here; meticulous installation is a must.
Installing Panels, Trim, and Flashing
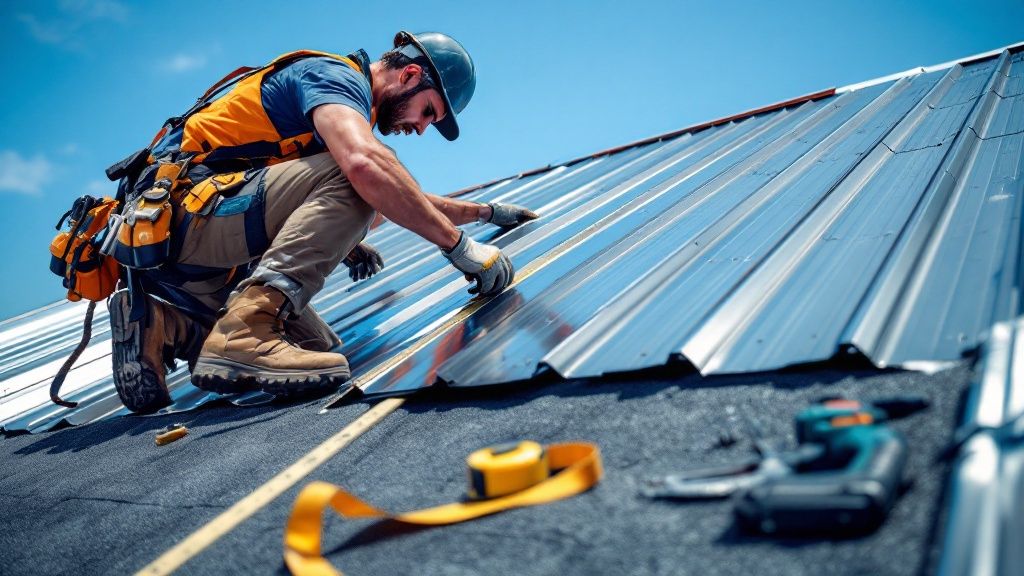
With a perfectly prepared roof deck, you’ve set the stage for success. This is where all that meticulous planning starts to pay off. Installing the metal panels, trim, and flashing is a methodical process, one that turns a bare deck into a durable, weather-tight shield. Your attention to detail is what will make all the difference here.
One of the biggest secrets in the trade is getting that very first panel perfectly square. I can't stress this enough. If that initial panel is even slightly off, every single panel that follows it will be skewed. The result is a misaligned, unprofessional-looking roof. The trick is to establish a precise starting line that's perfectly parallel to the eave. Never trust the eave itself to be straight—always measure and snap a fresh chalk line.
Squaring the First Panel: A Trade Secret
Starting right is everything when it comes to a metal roof. Before you even think about laying a full panel, you'll install the eave trim (often called a drip edge) along the bottom edge of the roof. This crucial piece is designed to kick water away from your fascia board and direct it cleanly into the gutters.
Once your eave trim is secure, measure up from the eave at both ends of the roof—use the manufacturer's recommended distance—and snap a chalk line between these two points. This line is your true guide, not the eave. Align the bottom edge of your first panel with this chalk line, making absolutely sure it's perpendicular to the eave.
Mastering Pro-Level Fastening Techniques
How you fasten the panels is just as important as how you align them. The whole point is to secure the panel tightly without breaking the watertight seal of the fastener’s washer. A screw gun with an adjustable clutch is non-negotiable for this job; it lets you set the perfect torque to drive every screw to the exact same depth.
You're looking for that sweet spot where the EPDM washer compresses just enough to create a seal, but not so much that it bulges out or gets crushed. Over-tightening is a rookie mistake. It can destroy the washer and even dimple the metal around the screw, creating a tiny basin where water can sit and cause trouble down the road.
The fastening pattern is also critical. Your manufacturer will provide a diagram showing you exactly where to place the screws. Most of the time, screws are driven into the flat part of the panel, right next to the major ribs. This spot offers the strongest holding power and minimizes any chance of leaks.
A common mistake I see is driving screws into the high ribs of the panel. It might seem like a good idea, but it actually provides less holding power and can allow the panel to "chatter" or lift in high winds. Always stick to the recommended pattern in the flats.
The Art of Installing Watertight Flashing
Flashing is, without a doubt, the most critical part of a leak-proof roof. These custom-shaped metal pieces are all about directing water away from the most vulnerable spots—anywhere the roof is interrupted by valleys, vents, chimneys, or walls. An improper flashing job is the culprit behind over 90% of all roof leaks.
Every type of flashing has a specific job and its own installation method. Getting to know them is key.
Common Metal Roofing Flashing Types and Applications
Flashing is your roof's primary defense in its most complex areas. Below is a quick guide to the most common types and where they go.
| Flashing Type | Primary Location | Key Installation Tip |
|---|---|---|
| Valley Flashing | Where two sloped roof sections meet to form a "V" | Always install this before the main panels. Use butyl tape under the flashing edges and ensure panels overlap it by at least 6-8 inches. |
| Gable/Rake Trim | Along the sloped edges of the roof on the gable ends | This trim piece covers the exposed ends of the panels and should be installed with sealant and fasteners along the fascia and top surface. |
| Ridge Cap | At the peak of the roof where two slopes meet | A vented ridge cap is often used to allow attic ventilation. It must be sealed with closure strips that match the panel profile to block wind-driven rain. |
| Pipe Boot/Vent Flashing | Around plumbing vents, exhaust pipes, and other roof penetrations | The boot should be placed over the penetration with the upper flange slid under the uphill panel and the lower flange over the downhill panel. |
| Chimney Flashing | Around the base of a chimney or where a roof meets a vertical wall | This is a multi-part system including base flashing, step flashing, and counter-flashing to create a multi-layered barrier against water intrusion. |
When you're installing any flashing, the golden rule is to think like water. Every piece has to be layered so that water running down the roof is always directed over the top of the piece below it. Butyl tape and high-quality roofing sealant are your best friends here, used to create failsafe seals at every seam and overlap.
This graphic gives a great overview of getting the underlayment down, which is the foundation for everything that follows.
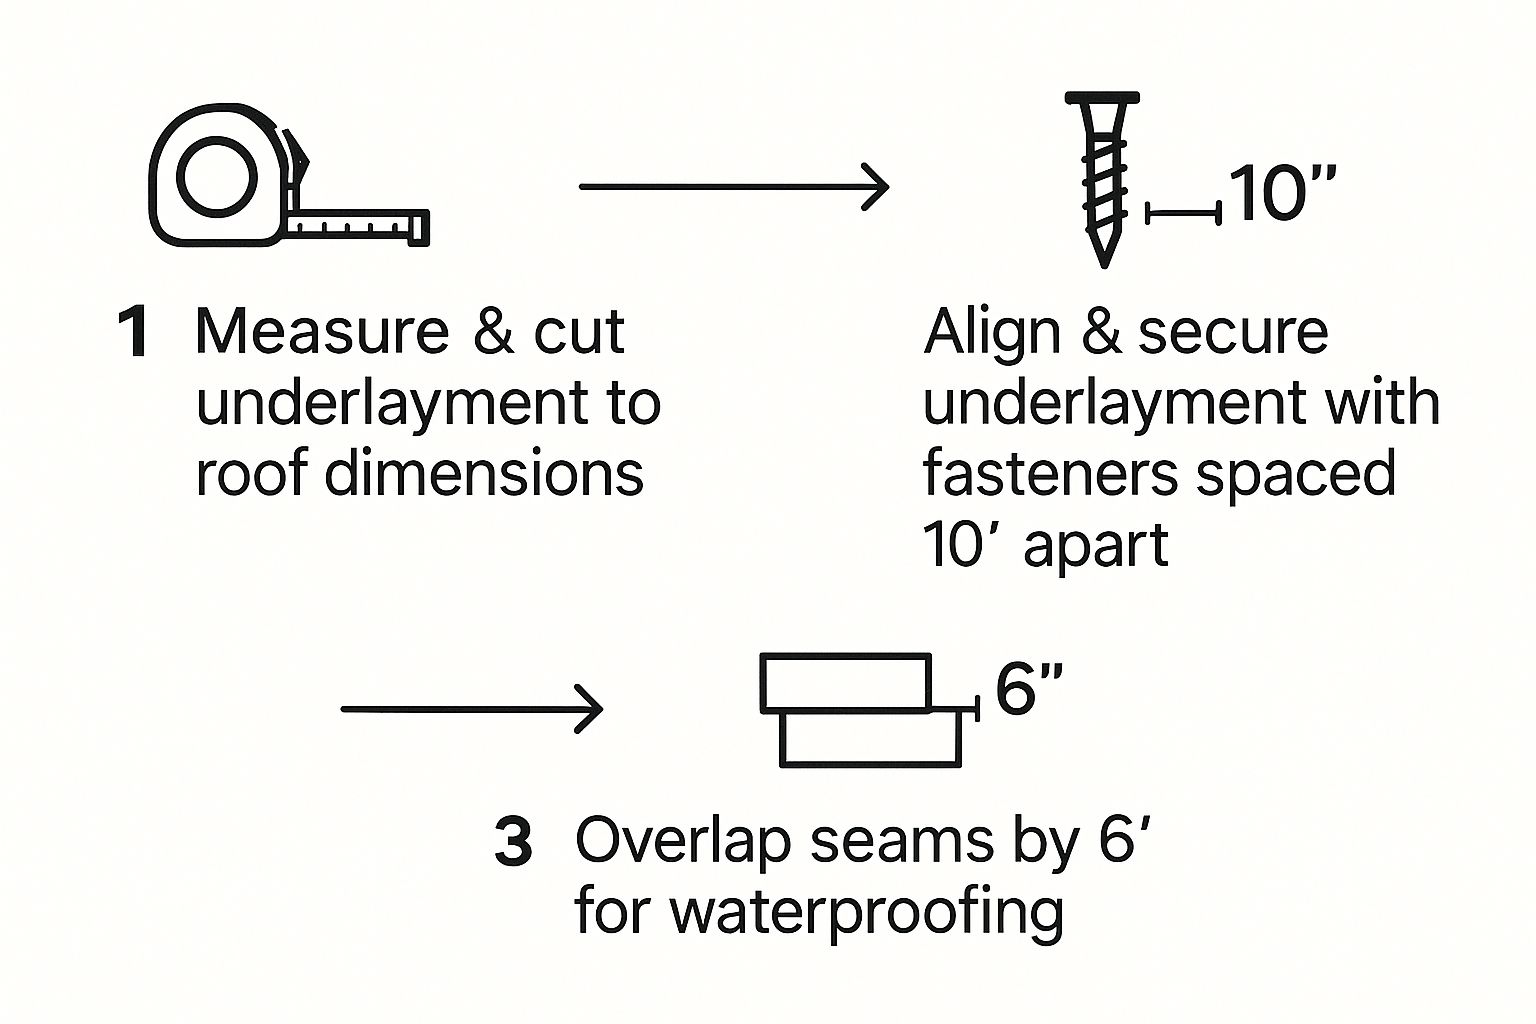
The image really emphasizes precise measurements, secure fastening, and proper overlapping—principles that hold true for every single step of this project.
Successfully navigating these intricate details is what guarantees the integrity of your new roof. If you find the complexity of trim and flashing work daunting, it's often wise to consult professionals. You can find more details on what's involved in a comprehensive new roof installation to better understand the full scope of the job. This methodical approach is what separates an amateur job from a professional one that will last for decades.
Mastering Safety on a Metal Roof
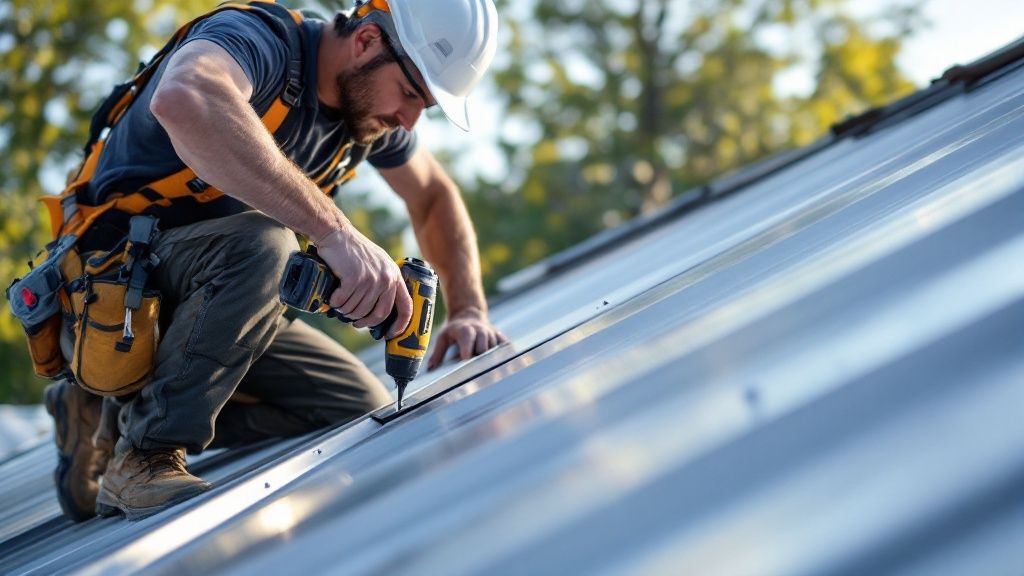
Working on any roof is serious business, but metal surfaces bring their own unique set of challenges. That sleek finish can be incredibly slick, especially with a bit of morning dew or after a light rain. A simple misstep can become a dangerous situation in a split second. Think of this part of our guide as your non-negotiable safety briefing—the stuff you absolutely have to get right to finish the job in one piece.
Your first line of defense is your gear, starting from the ground up. Those trusty work boots you wear for every other job? They won't cut it here. You need soft-soled, high-traction footwear designed to grip the metal without scratching or denting the new panels. They’re like specialized tires for your feet, giving you the stability you need up there.
Personal Protective Equipment Essentials
Before you even think about setting up the ladder, let's run through the essential gear. Having the right equipment isn't just a suggestion; it’s what minimizes risk and prepares you for the unexpected.
- Fall Protection System: If your roof has any significant pitch, a safety harness connected to a solid anchor point is not optional. It’s your lifeline. A fall from that height is no joke, and this system is the one thing that can save you.
- High-Traction Footwear: I mentioned it before, but it bears repeating. Soft-soled boots are a must. They prevent slips and protect the investment you’re about to install.
- Gloves and Safety Glasses: Freshly cut metal edges are razor-sharp. A good pair of leather gloves will save your hands from nasty cuts, while safety glasses are crucial for shielding your eyes from tiny metal filings when you’re cutting and fastening panels.
Ladder safety is just as critical. Always place your ladder on firm, level ground and make sure it extends at least three feet above the roofline. This gives you something secure to hold onto as you step on and off the roof. And remember the rule: always maintain three points of contact when you're climbing.
The most overlooked hazard is often right above you. Before you even raise a ladder or start moving long metal panels, always look up. Check for overhead power lines. Metal is an excellent conductor of electricity, and this simple awareness check is a life-or-death one.
Navigating the Roof and Handling Materials
Once you're on the roof, every movement needs to be deliberate and cautious. Maneuvering those long, unwieldy metal panels on a sloped surface requires a mix of strength and smarts. Always plan your path before you start moving. If you can, get a helper on the ground to assist with lifting the panels up to you—it makes a world of difference.
While we're focused on metal roofing today, this safety-first mindset applies to any project you might tackle up there. For instance, many homeowners who install a durable metal roof later consider adding solar. If that's in your future, you might find this guide to self-install solar panels a useful starting point.
Ultimately, safety boils down to preparation and respecting the environment you're in. If the pitch feels too steep, the wind picks up, or conditions just don't feel right, don’t hesitate to call it a day. Sometimes, the smartest and safest decision is knowing when to call in a professional. Understanding how to choose a roofing contractor can be just as valuable as knowing how to do the job yourself.
Answering Your Top Installation Questions
Even the best-laid plans run into snags. When you're up on the roof, questions are going to come up—it’s just part of the process. Getting a handle on these common issues beforehand can save you a ton of frustration and help you avoid some classic, costly mistakes. Let’s walk through some of the things people ask about most.
Can I Just Put a Metal Roof on Top of My Old Shingles?
This is probably the number one question I get, and the short answer is: maybe. In many cases, you absolutely can install a new metal roof right over a single layer of asphalt shingles. It's often called a "roof-over" or an "overlay," and it's a popular way to save big on the labor and disposal costs of a full tear-off.
But hold on—it's not a free-for-all. Before you even think about it, you have to check your local building codes. Some towns flat-out prohibit overlays. Next, you need to get up on that roof and do a serious inspection. Walk every square foot and feel for soft spots, which are a dead giveaway for rot in the roof deck. If you find any, the shingles have to come off so you can replace the bad wood.
If the deck is solid and the shingles are lying relatively flat, you're likely good to go. You’ll still need to roll out a quality synthetic underlayment over the old shingles. This creates a vital moisture barrier and gives the new metal panels a smooth surface to expand and contract on.
What's the Right Way to Cut Metal Roofing Panels?
Getting this right is non-negotiable, because a bad cut can lead directly to rust. Here’s the golden rule: never use a tool that creates a lot of heat. That means your standard abrasive circular saw or an angle grinder is out. The sparks they throw are actually tiny bits of molten metal that will burn off the panel’s protective coating, leaving the raw steel edge to rust in a matter of months.
Instead, you need tools that make a "cold cut." Here’s what’s in my tool bag:
- Electric Metal Shears: This is your workhorse for long, straight cuts down the length of a panel. They slice through the metal cleanly, like a pair of high-powered scissors, with no heat.
- A Nibbler: For tricky curved cuts—like fitting a panel around a vent pipe—a nibbler is perfect. It works by punching out tiny crescents of metal, giving you amazing control.
- Tin Snips: You'll need a good set of aviation snips (left-cut, right-cut, and straight) for a lot of small notches and quick trim work.
And it should go without saying, but always wear safety glasses and good gloves. Those freshly cut edges are razor sharp.
A critical takeaway from professionals is this: the longevity of your roof's finish depends heavily on how you cut it. A clean, cold cut preserves the factory coating right to the edge, which is your first line of defense against corrosion.
How Should I Fasten and Seal Everything?
Your roof is only as good as its fasteners. A truly leak-proof installation all comes down to using the right screws and putting them in correctly. The industry standard is self-tapping screws that have a built-in EPDM washer. That little rubber washer is the hero here; it compresses to form a tough, watertight seal that stays flexible as the metal expands and contracts with the temperature.
The trick is getting the tension just right—not too tight, not too loose. If you overtighten, you'll crush the washer and cause it to fail early. If it's too loose, it won't seal. You want it snugged down just enough that the washer is compressed but not bulging out the sides. This is why a screw gun with an adjustable clutch is an absolute must-have. Always follow the manufacturer’s fastening pattern, which typically has you drive the screws into the flat "pan" area next to the ribs for the best seal and holding power.
How Do I Keep Condensation from Forming Underneath?
Ah, "roof sweating." It’s a real concern with metal. Condensation forms when warm, moist air from inside your house rises and hits the cool underside of the metal panels. Left unchecked, that moisture will drip down and can cause mold, mildew, and rot in your roof structure.
Fortunately, preventing it is straightforward and relies on a two-part strategy:
- Good Ventilation: Your attic needs to breathe. A balanced system with intake vents (usually in your soffits) and exhaust vents (like a ridge vent) allows air to flow freely. This constant circulation helps keep the temperature of the roof deck closer to the outside air temperature, which is the key to stopping condensation before it starts.
- A Vapor Barrier: This is another reason why a high-quality synthetic underlayment is so crucial. It acts as a vapor barrier, blocking the warm, moist air from your living space from ever making contact with the cold metal.
Combine proper ventilation with a solid underlayment, and you've built a system that actively manages moisture and protects your home.
Navigating the specifics of a metal roof installation can feel complex, but having the right partner makes all the difference. With over 25 years of experience, we have provided expert guidance and top-quality installations. If you're ready for a roof that offers lasting durability and peace of mind, contact us for a free estimate.