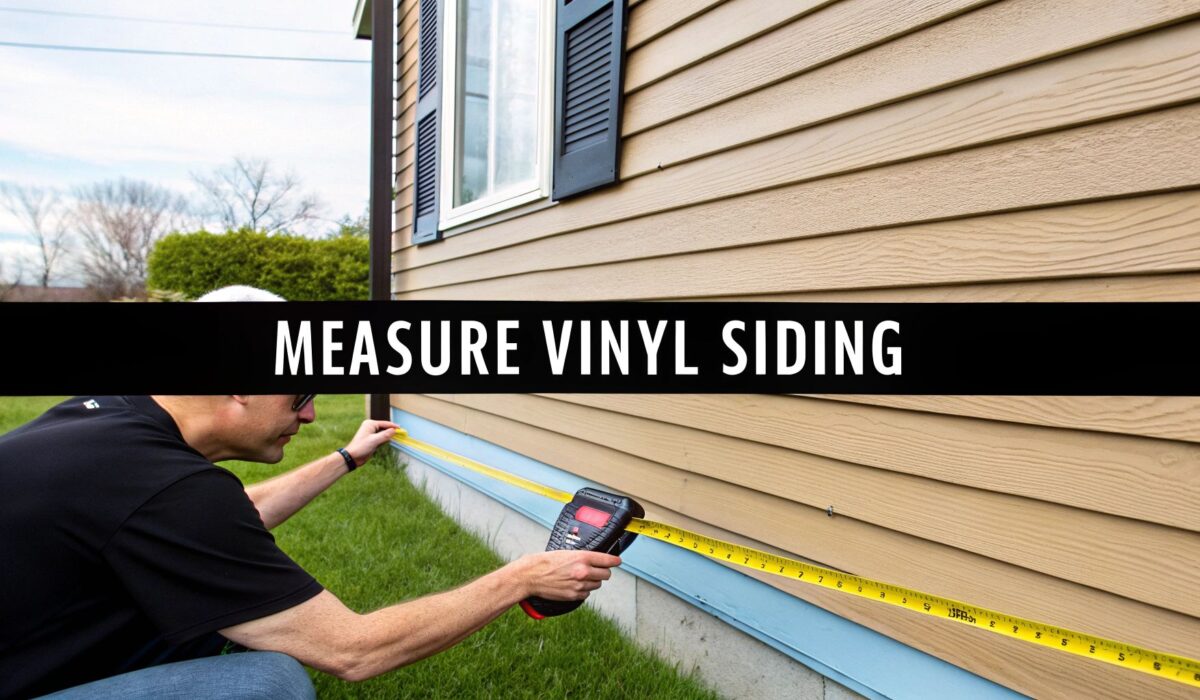
Before you can even think about installation, getting your measurements right is the single most important part of any vinyl siding project. It's what separates a smooth, budget-friendly job from one that's a mess of last-minute store runs and wasted cash. Getting the numbers wrong can mean over-ordering hundreds of dollars in material or, even worse, coming up short with one wall left to go.
Think of it this way: you're creating a precise map of your home's exterior. Every single wall, window, door, and odd architectural detail needs to be on that map. Putting in the work upfront makes everything that follows—from buying the materials to the final installation—so much easier.
Your Blueprint for a Flawless Siding Project

When it comes to measuring for new vinyl siding, close enough isn't good enough. Precision is everything. A small error on one wall can easily snowball, leaving you a full box short when you're just a few feet from the finish line.
The main goal is simple: figure out the total square footage of your home's exterior that needs to be covered. It's not just one big calculation, though. It’s a process.
- Measure Each Wall Individually: Treat every wall like its own mini-project.
- Don't Forget the Gables: Those triangular areas under the roof peaks need to be calculated separately.
- Subtract the Openings: You're not siding over windows and doors, so their area needs to come out of your total.
- Factor in the Waste: Always, always add a buffer for cuts, mistakes, and tricky angles.
Getting the Right Tools for the Job
Before you start, gathering a few essential tools will make the entire process faster and far more accurate. You don't need a professional-grade workshop, but having the right gear on hand is non-negotiable.
Here’s a quick checklist of what I recommend having before you even unroll the tape measure.
| Tool | Primary Use | Pro Tip |
|---|---|---|
| 25-Foot Tape Measure | The workhorse for all your length and height measurements. | A wider tape (1" or more) is easier to extend without buckling, which is a lifesaver when you're measuring long walls by yourself. |
| Laser Measure | Quickly captures long, hard-to-reach distances. | Great for measuring the height of second-story walls or gables without needing a ladder. Just be sure to hold it steady! |
| Notepad & Pencil | Your command center for recording all your numbers. | Digital apps are fine, but nothing beats a simple notepad for sketching out your house and jotting down measurements right on the drawing. |
| Calculator | For all the multiplication and addition ahead. | Use the one on your phone, but double-check your math. A simple typo can throw off your entire order. |
| Step Ladder | Safely reaching eaves and the tops of windows and doors. | Make sure it’s on stable, level ground. Never overreach—it's better to move the ladder than to risk a fall. |
Having these items ready to go means you can focus on the task at hand without stopping to find something you forgot.
Breaking Down the Math
The core of this whole process is getting the total exterior wall area right to minimize waste and buy the correct amount of material. You’ll start by measuring the length and height of each wall section on its own.
For example, say a wall is 40 feet long and 10 feet high. Its total area is 400 square feet (40 x 10).
But what about the windows and doors? You have to measure those separately and subtract them. If that same wall has a window that’s 3 feet by 5 feet, that's 15 square feet you need to remove. Your new total for that specific wall is 385 square feet. You’ll do this for every single wall and opening on the house. You can find more info on vinyl siding market and its sizing standards to get a feel for how products are sold.
After you've calculated the square footage for every wall (minus the openings), add it all together. Then, add a "waste factor" to that final number.
Pro Tip: Before you measure anything, grab that notepad and sketch a simple "bird's-eye view" of your house. Label each wall (e.g., "Front," "Garage Right," "Back Patio"). As you measure, write the numbers directly on your drawing. This little visual map is a lifesaver for keeping things organized.
Finally, you’ll want to add a waste factor of 10-15% to your grand total. This covers all the material you'll lose to cuts, angles, and the occasional "oops" moment. It’s a critical step that ensures you won't be scrambling to find a matching color lot at the last minute.
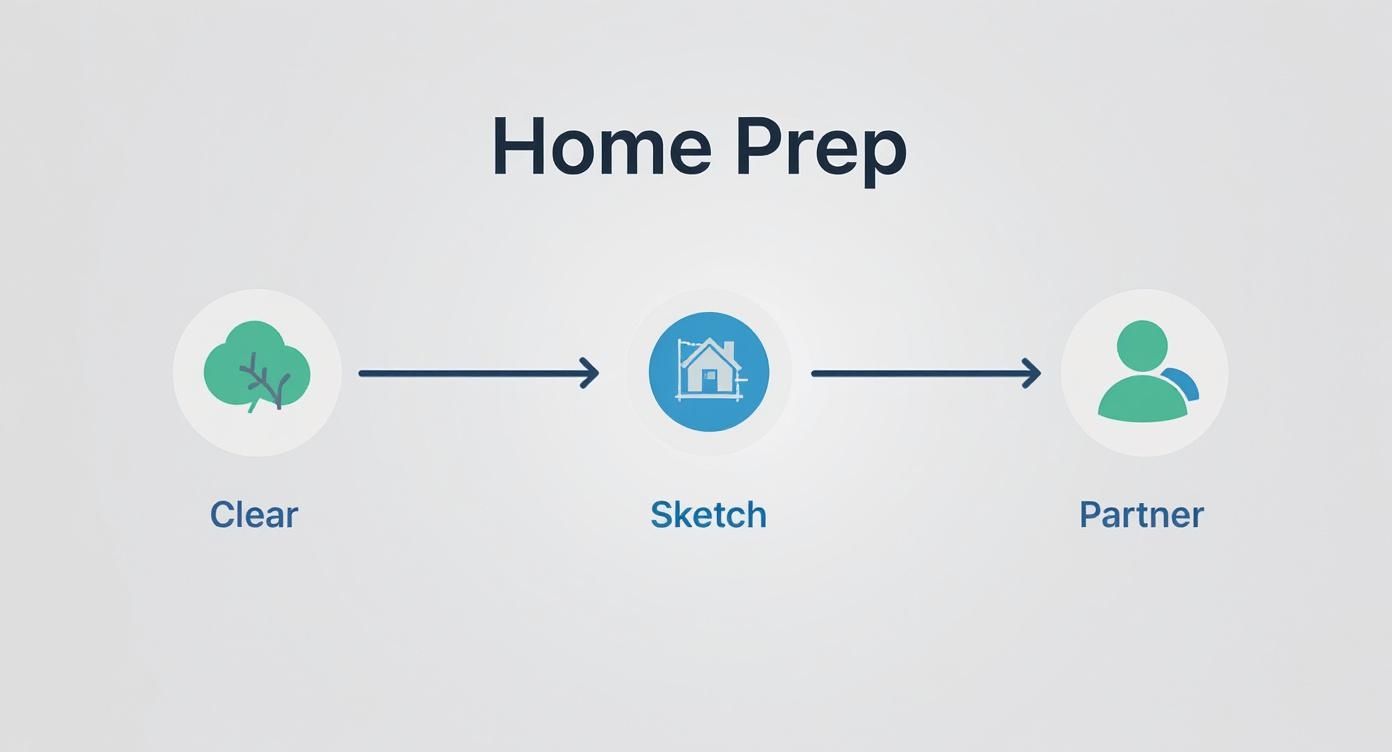
Getting Your Home Ready for an Accurate Siding Measurement
Before you even think about unspooling that tape measure, you need to prep your house. Think of it like a painter taping off a room—skipping this step is a surefire way to get messy, inaccurate results. Little miscalculations caused by an overgrown bush or a loose piece of trim can add up surprisingly fast.
First things first, clear the decks. You need an unobstructed line of sight and a clear path along every wall you plan to measure. That means it's time to get friendly with your landscaping. Trim back any shrubs, bushes, or low-hanging tree limbs that are hugging the side of your house. You're looking for a straight, clean shot from one corner to the next.
While you're out there, give your home's exterior a quick once-over. Are there any loose shutters, dangling light fixtures, or pieces of trim that could throw off your tape measure? Secure them tightly. Your goal is to measure the actual wall, not a piece of trim that’s hanging off by an inch. This is also a great time to peek at your drainage system; our guide on how to clean downspouts and gutters can walk you through a quick check-up.
Sketch a Rough Blueprint
Don't worry, you don't need an architecture degree for this. Just grab a notepad and pencil and draw a simple, bird's-eye view of your home's footprint. This isn't about creating a masterpiece; it's about making a functional worksheet to keep your numbers straight.
This little hand-drawn map will be your best friend. Give each wall its own clear label.
- Front Wall
- Garage Right Side
- Back Patio Wall
- Second Story Left Side
As you get your measurements, you’ll jot them down right on the corresponding wall in your sketch. This simple visual trick prevents the all-too-common (and costly) mistake of mixing up the numbers for the front of the house with the back.
A visual reference is a game-changer. It transforms a jumble of numbers into a clear, actionable plan. It’s the best way to make sure you don't measure a window twice or, even worse, forget a wall entirely.
Why You Should Grab a Partner
Let's be real: measuring a house is not a one-person job, especially if you have long walls or a second story. Having a helper is one of the smartest things you can do for both your safety and your accuracy.
With a partner, one person can hold the tape measure firmly at the starting corner while the other pulls it taut to the end. This simple bit of teamwork completely eliminates tape sag, a sneaky culprit behind inaccurate readings. It's especially crucial for vertical measurements—juggling a ladder, a tape measure, and a notepad on your own is a recipe for disaster. A second pair of hands makes the whole process faster, safer, and far more precise.
Mastering Wall and Gable Measurements
Alright, with the prep work out of the way, it's time to grab your sketch pad and start pulling some numbers. This is the heart of the project—getting the dimensions for your home's largest surfaces. We’ll kick things off with the easy part, the main walls, and then tackle those tricky triangular gables.
For any standard rectangular or square wall, the math is straightforward. Just measure the total length and the total height, then multiply them together to get your square footage. So, if you've got a wall that's 40 feet long and 9 feet high, you're looking at 360 square feet (40 x 9). Go ahead and jot that number down on the right wall in your sketch.
Make sure you do this for every single flat wall section. It's best to treat each one as a separate little project; this methodical approach keeps you from accidentally missing a spot.
The infographic below really drives home how important that initial prep work is for getting this measurement phase right.
As you can see, clearing the area, having a solid sketch, and bringing in a helper are the bedrock of accurate results. Don't skip these steps.
Calculating Gable Areas
Gables—those triangular bits of wall tucked under the roof peaks—can seem a bit intimidating, but the formula is actually a piece of cake. You only need two numbers: the base (the gable's total width at the bottom) and the height (from the center of the base straight up to the peak).
Here’s the simple formula you’ll use: (Base x Height) ÷ 2 = Gable Area
Let's walk through a real-world example. Say you have a gable that's 20 feet wide along the bottom and 8 feet tall from the base to the peak.
- First, multiply the base and the height: 20 ft x 8 ft = 160
- Now, just cut that number in half: 160 ÷ 2 = 80
- That gable comes out to 80 square feet.
Mark that down on your sketch right where the gable is. If your house has multiple gables that are all the same size, you can just multiply. If they're different, you'll need to repeat this quick measurement for each one.
The Evolution of Measurement Tools
It's interesting how siding measurement has changed over the years. As the market grew, so did the need for better methods. While a good old-fashioned tape measure is still perfect for most DIY jobs, technology has definitely made things easier. Since the early 2000s, laser distance meters have become a common sight, offering a level of speed and accuracy that manual tapes can't match on complex jobs. A professional installer using digital tools can now measure an entire single-family home in under two hours, a job that used to eat up a good chunk of the day. You can find more details on the growth of the vinyl siding market in the full research from CustomMarketInsights.com.
A quick tip from the field: Don't forget about dormers! If you have them, they often have their own tiny walls and gables. Measure them using the same exact formulas, treating each face of the dormer as its own rectangle or triangle. Add these small totals into your main calculations.
By breaking the house down—rectangles first, then triangles—you turn what feels like a massive job into a series of simple, manageable steps. Getting these wall and gable measurements right is the biggest piece of the puzzle, and you're well on your way.
Accounting for Windows, Doors, and Other Openings
Alright, you've got the total square footage for your walls and gables. That's the big number, but it's not the right number just yet. We need to refine it. After all, you're not going to put siding over your windows and doors, so we need to subtract those areas to get an accurate material order. This is the step that keeps you from over-ordering and wasting money.
The good news is, you already know how to do this. It’s the same simple math you used for the walls, just on a smaller scale.
Grab your tape measure and go to every single opening on your house. For each one, measure the height and width of the frame. A standard window might be 3 feet wide by 5 feet tall—that gives you an area of 15 square feet (3 x 5).
Jot down the area for every window, every entry door, that big sliding glass door out back, and even any small utility access panels. Keep a running tally on your sketch pad.
Creating Your Deduction Total
Once you have the area for every single opening, it’s time to add them all up. This final number is what I call the 'deduction total.' It’s the grand total of all the space on your walls that siding won't cover.
Let's walk through a quick example. Say your house has:
- Ten windows, each at 15 sq. ft. (150 sq. ft.)
- Two entry doors, each at 21 sq. ft. (42 sq. ft.)
- One sliding door at 48 sq. ft. (48 sq. ft.)
Add those together, and your deduction total comes out to 240 square feet. This is the number you’ll subtract from your gross wall area. Getting this right is what separates a smooth, well-planned project from one that ends in frustration and leftover materials.
Taking the time to measure openings is also a great opportunity to assess their condition. If you're thinking about replacements, learning more about modern windows can give you a better idea of how they’ll tie in with your new siding for a seamless look.
Don't Forget the Trim Measurements
Now, while you’re at each window and door, there’s one more crucial measurement to take. You've calculated the area to subtract, but you also need to measure the perimeter of each opening. This measurement isn't for siding; it's for J-channel.
J-channel is the trim piece that frames every opening, giving the siding a clean, finished edge to butt up against. Without it, the job looks unfinished and is vulnerable to water intrusion.
To figure out how much you need, just add up the lengths of all four sides of each window and door. That same 3-foot by 5-foot window we measured earlier would require 16 linear feet of J-channel (3+5+3+5). This is a completely separate calculation from your square footage, but doing it now, while you're already at the window, will save you a ton of time later.
Key Takeaway: For every opening, you're doing two separate things. First, find the area (height x width) to subtract from your total siding needs. Second, find the perimeter (add up all the sides) to figure out how much J-channel you'll need.
Once you get the hang of measuring openings for a siding project, you'll see how the same basic principles apply elsewhere. For instance, learning how to measure window screen size uses a similar methodical approach to ensure a perfect fit. It’s all about being precise and accounting for every part of the project.
Calculating Your Final Siding Order
You've got your net square footage—the hardest part is over. Now, let's turn that number into a real-world material order. This final step is all about making sure you buy the right amount of siding, so you don’t find yourself making a panicked trip back to the supplier mid-job or stuck with a garage full of leftovers.
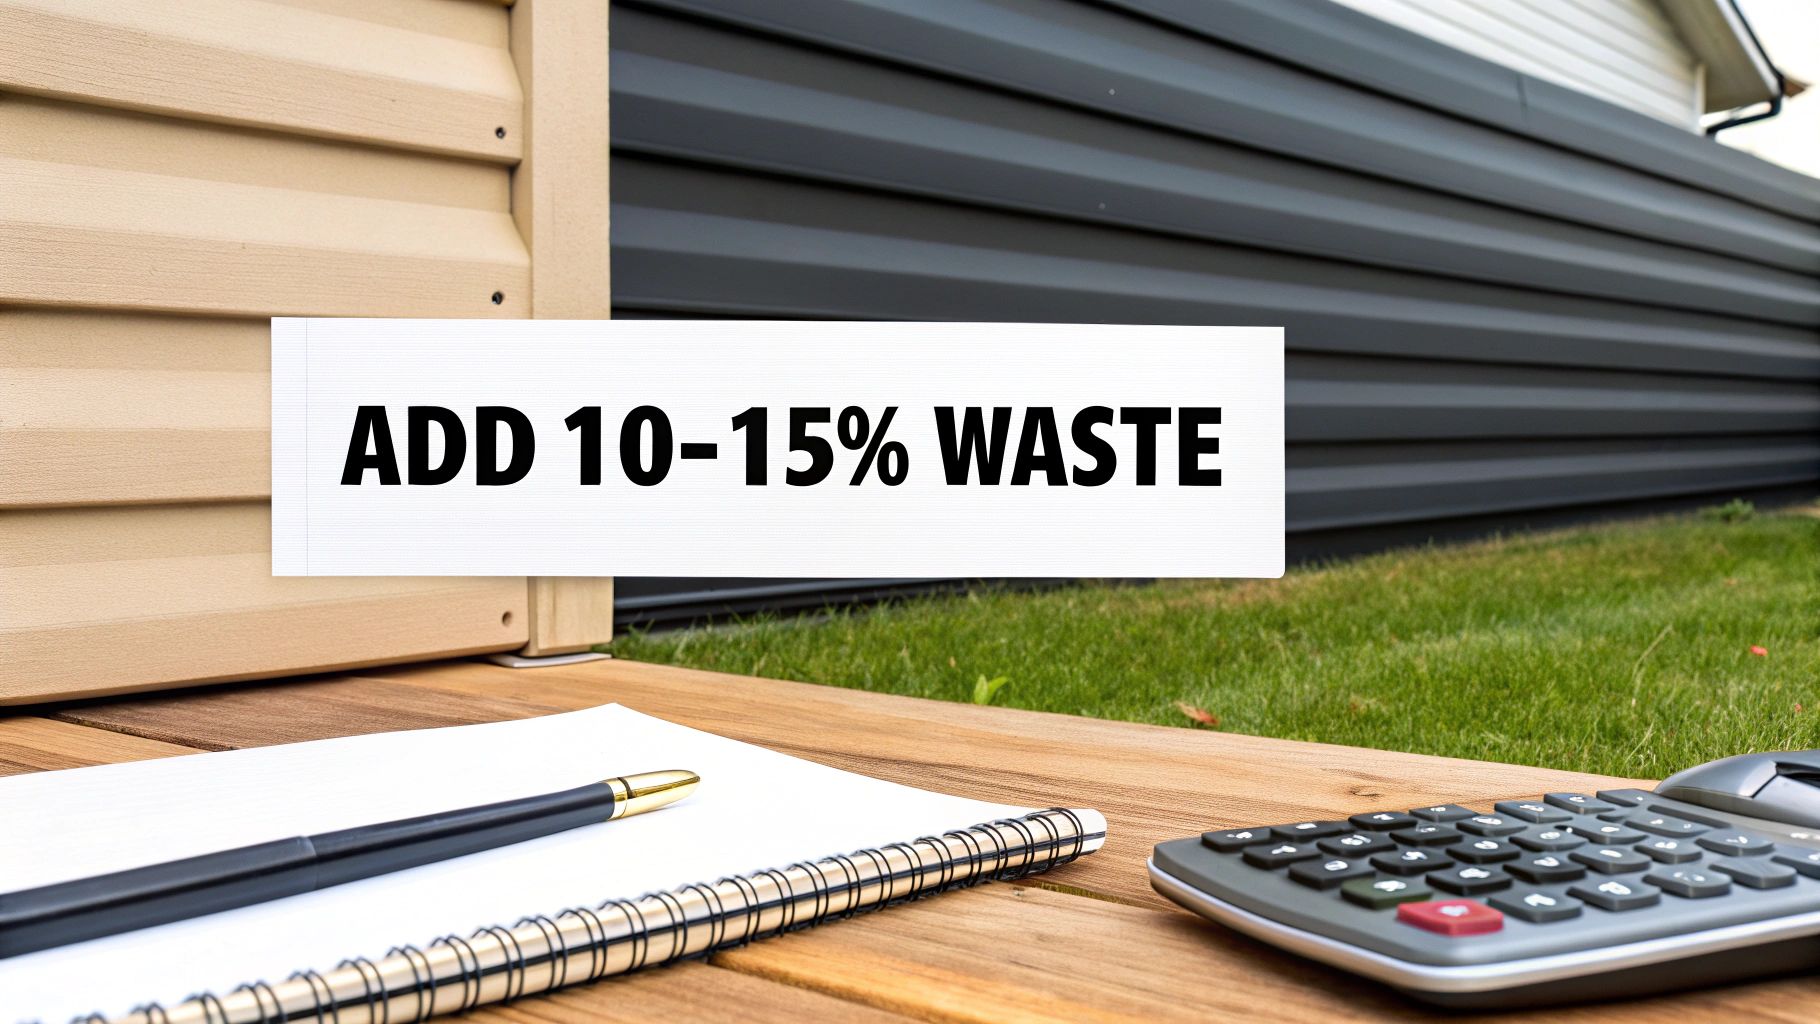
The number you have right now is your baseline, the total area of your walls minus all the doors and windows. But that’s not the number you'll use to place your order. First, you need to account for one of the most important (and often overlooked) parts of any siding project: the waste factor.
The Importance of the Waste Factor
Let's be realistic—no project is perfect. You’re going to be making angled cuts for gables, trimming small pieces to fit around outdoor faucets, and maybe even botching a cut or two. It happens to everyone. That’s exactly what the waste factor is for. Think of it as a built-in buffer for all the material lost to cuts, mistakes, and tricky angles.
As a rule of thumb, add 10-15% to your net square footage. If you're working on a pretty standard, boxy house, 10% should be plenty. But if your home has a lot of gables, dormers, or other complex architectural details, playing it safe with 15% is the smart move. It might feel like you're overbuying, but trust me, this little bit of overage is the best insurance you can get against project delays.
Let's say your net measurement is 2,000 square feet. You wouldn't just order that amount.
- A 10% waste factor means ordering 2,200 square feet (2,000 x 1.10).
- A 15% waste factor means ordering 2,300 square feet (2,000 x 1.15).
Don't be tempted to skip the waste factor to save a few dollars. The cost of running out of material—and potentially not being able to find the exact same color lot—is far greater than the cost of having a few extra panels on hand.
Miscalculating can have a real financial impact. Industry research shows that 10-15% of siding material can be wasted from cutting errors or breakage alone. In a market worth nearly USD 7.4 billion, that's a lot of material. By carefully measuring and including this overage, you're following the same best practices professionals use to keep waste and costs down. You can dig into more of the data on siding material usage in the full report from FactMr.com.
Putting It All Together in a Final Calculation
So, what does this look like in practice? Let's walk through a quick example to see how all the numbers come together for your final order.
The table below breaks it down, taking you from your initial raw measurements to the final number you'll give your supplier.
Final Siding Calculation Example
| Calculation Step | Example Measurement | Result |
|---|---|---|
| 1. Calculate Gross Wall Area | Walls: 2,400 sq. ft. Gables: 250 sq. ft. | 2,650 sq. ft. |
| 2. Calculate Total Deductions | Windows & Doors: 350 sq. ft. | -350 sq. ft. |
| 3. Find Your Net Square Footage | 2,650 sq. ft. – 350 sq. ft. | 2,300 sq. ft. |
| 4. Apply the Waste Factor | 2,300 sq. ft. x 1.10 (10%) | 2,530 sq. ft. |
Based on this example, your final siding order would be for 2,530 square feet. This is the magic number that ensures you have enough material to get the job done right, without any last-minute headaches.
Answering Your Siding Measurement Questions
Even with the best plan, you're going to run into some head-scratchers when you start measuring your home. Every house has its own quirks. Let's walk through some of the most common issues that come up so you can keep your project on track.
How Do I Handle Uniquely Shaped Windows?
So, what do you do with those arched or octagonal windows? The secret is to stop seeing them as complex shapes and start breaking them down into simple rectangles and circles.
For a classic arched window, just think of it as two pieces. You've got the main rectangular part below (measure its height and width) and a half-circle on top. For that arch, find the radius—that’s just half the window's total width. The area is (π x radius²) ÷ 2. Add that to the rectangle's area, and you've got your total deduction.
For other funky shapes, the easiest and safest method is to just "square them off." Find the widest point and the tallest point of the window or feature and multiply those two numbers. Sure, you'll overestimate the deduction a tiny bit, but this builds in a little buffer and ensures you won't come up short on your trim pieces.
My Two Cents: Snap a quick photo of these tricky spots with your phone. When you're inside later, trying to make sense of your notes, having a picture to look at is a lifesaver. It jogs your memory and helps you visualize exactly what you were measuring.
Do I Need to Measure for Soffit and Fascia Separately?
Yes, one hundred percent. Don't even think about lumping these in with your wall siding calculations. They are completely different animals and are sold differently, too.
- Soffit: This is the stuff underneath your roof's overhang. You'll need to find its total square footage. Just measure the length of the overhang and how far it sticks out from the house (the width).
- Fascia: This is the vertical board that caps the end of your rafters, right where the gutters hang. You need a linear foot measurement for this. Just run your tape along the entire edge of the roofline.
Keeping these numbers separate from the get-go will make building your materials list a whole lot easier and more accurate.
What If My House Has Multiple Stories or Is on a Slope?
For a multi-story home, the only way to do it right is to measure each floor as a separate section. It's rare for a second story to have the exact same footprint as the first, so treat them as individual projects.
If your house sits on a hill, a single height measurement from top to bottom is going to be wrong. To get it right, you need to find an average. Measure the wall height at a few different spots—at the high corner, the low corner, and somewhere in the middle. Add them up, divide by the number of measurements you took, and use that average height for your calculation. This is absolutely a two-person job for safety. A laser distance measurer is your best friend here; it's much safer and more accurate than fumbling with a tape measure on a ladder.
Should I Remove the Old Siding Before I Measure?
In a perfect world, yes. Getting your tape measure right on the bare wall sheathing is the only way to get a truly precise number. Old siding, especially lapped styles, can easily add an inch or more to the wall, which can really skew your final material order.
But let's be realistic—sometimes tearing everything off before ordering just isn't practical. If you have to measure over the old stuff, just be aware that your numbers will be slightly inflated. You have to be extra careful with your measurements. When you do it, make sure to press the end of your tape measure firmly against the wall to get as close to the real surface as possible.
Getting your siding measurements right can feel like a big job, but breaking it down makes it a straightforward and even satisfying part of the process. If you decide you'd rather leave the details to a seasoned pro, our team has the experience to get it done perfectly. Contact us today for a free, no-obligation estimate!