Replacing a single shingle isn't rocket science, but it does require a bit of finesse. The basic idea is to gently loosen the shingles around the damaged one, pry out the old nails, slide the new shingle into place, and then secure it with four properly placed roofing nails. To finish it off, a dab of roofing cement under the tabs creates a seal that’s watertight and ready for the next storm.
Your Guide to a Lasting Shingle Repair
Seeing a curled or missing shingle can be unsettling, but knowing how to fix it yourself is empowering. This guide will walk you through patching your asphalt shingle roof, helping you turn a small problem into a non-issue before it escalates.
Handling these minor fixes on your own not only saves you the cost of a professional call-out but also prevents water from seeping in and causing real structural damage. Consider this your go-to playbook for a solid, lasting repair that keeps your home protected and your roof in good shape for years to come.
Why Asphalt Shingles Need Patching
There’s a good reason you see asphalt shingles on nearly every street. They cover a huge portion of homes, accounting for around 82% of the North American market share because they're affordable and they get the job done.
But their popularity also means they're the material most often in need of repair. They take a beating from hail, high winds, and the sun's relentless UV rays. It's no wonder so many homes eventually need a patch job. If you're interested in the nuts and bolts of the industry, you can dig deeper into roofing market trends over at Data Insights Market.
This guide will take you step-by-step through the whole repair, starting where every successful DIY project should: with proper preparation.
A successful shingle patch is more than just a quick fix; it's a critical maintenance task that restores your roof's first line of defense against the elements. Getting it right ensures your home stays dry and secure.
First up, we'll cover the essential tools and materials you'll need. Having everything laid out and ready to go before you climb that ladder makes the entire job smoother, safer, and a whole lot less frustrating.
Gathering Your Essential Repair Toolkit
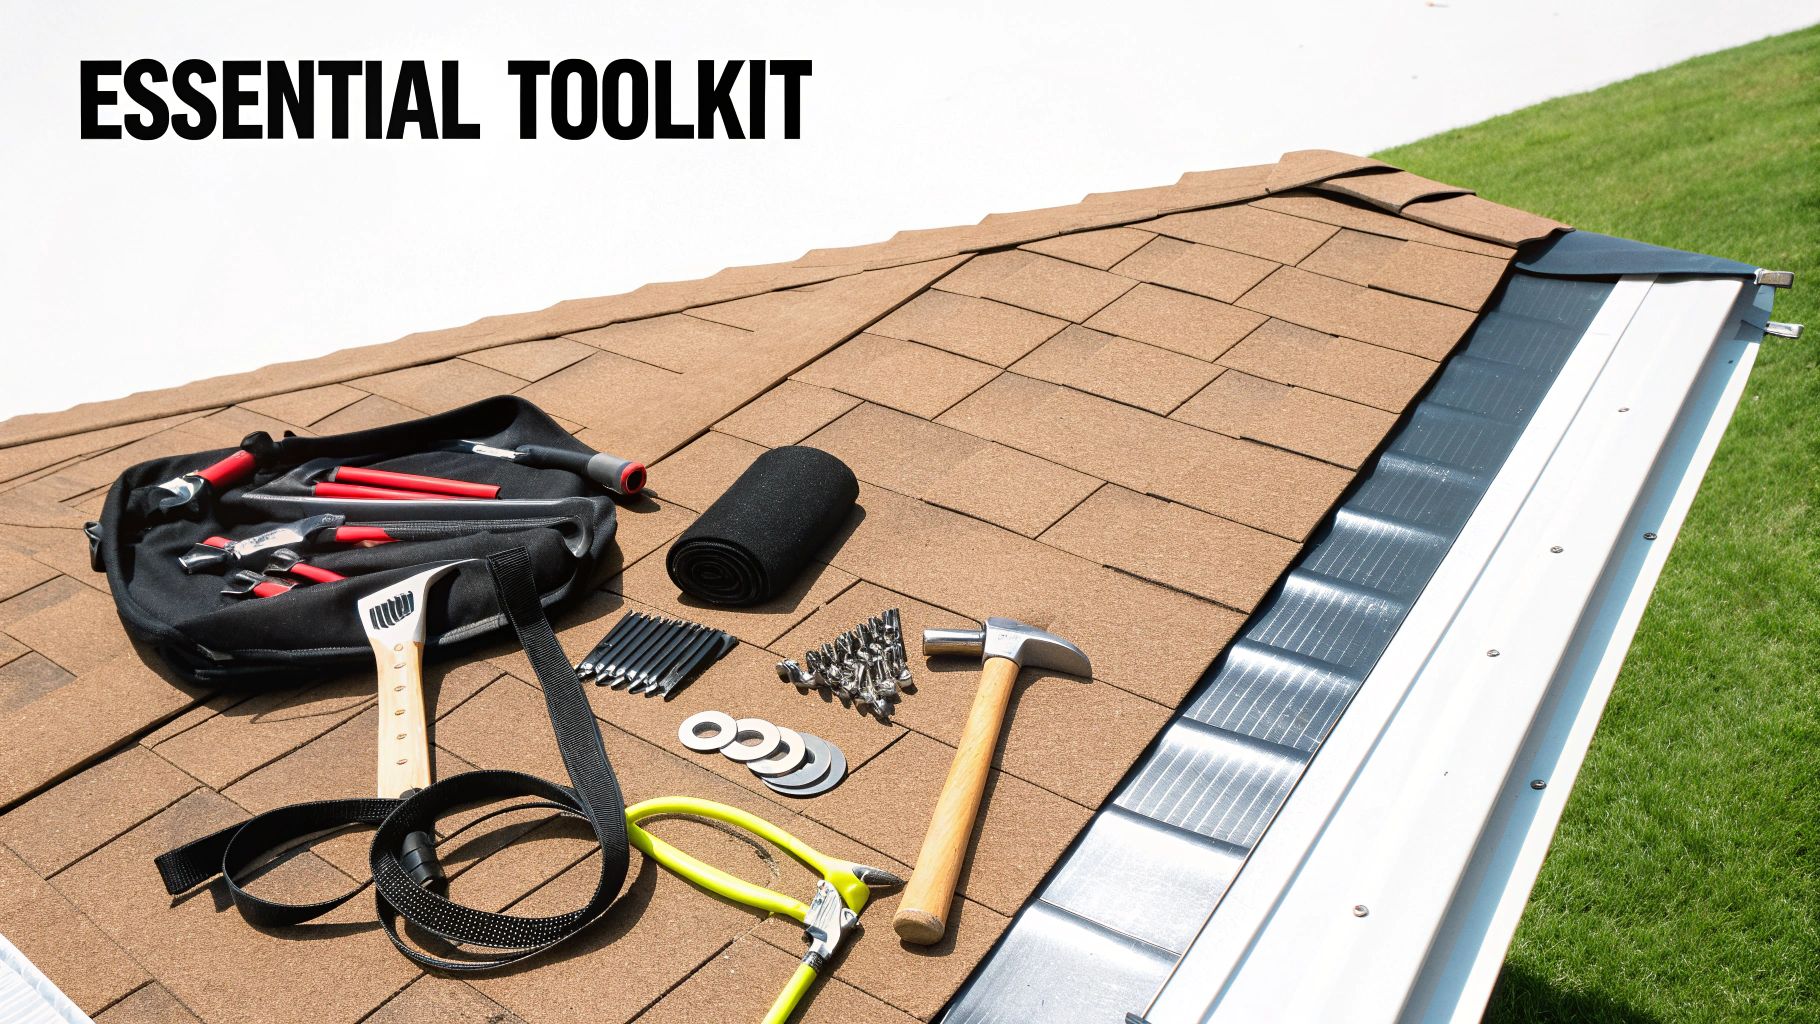
Before you even think about setting foot on your roof, getting your tools and materials in order is step one. I can't stress this enough: a well-stocked toolkit is what separates a quick, clean repair from a frustrating weekend project gone wrong. It's not just about getting the job done faster—it's about doing it right and keeping yourself safe.
There's nothing worse than getting halfway through a job only to realize you're missing the right nails or forgot the sealant, forcing you to make another trip to the hardware store. Let's run through everything you'll need to patch that shingle like a pro.
To make it even easier, I've put together a comprehensive checklist of every single item you'll want to have on hand. Think of this as your pre-job shopping list.
Essential Toolkit for Patching Shingles
| Category | Item | Purpose and Key Features |
|---|---|---|
| Safety Equipment | Sturdy Extension Ladder | Must extend 3 feet above the roofline for safe entry and exit. Ensure it's on stable, level ground. |
| Safety Harness & Rope | A non-negotiable for steep roofs. This is your lifeline if you slip. | |
| Heavy-Duty Gloves | Protects your hands from the rough, abrasive surface of asphalt shingles. | |
| Non-Slip Footwear | Soft-soled boots or work shoes with excellent grip are crucial for maintaining traction. | |
| Removal & Installation Tools | Flat Pry Bar | The key to gently lifting shingle tabs and breaking old seals without damaging adjacent shingles. |
| Hammer or Roofing Nailer | A standard hammer is fine for a small repair. A nailer is overkill unless you're doing a larger section. | |
| Utility Knife with Hook Blade | The hook blade is designed to slice through shingles cleanly and accurately. A straight blade can work but is less efficient. | |
| Caulking Gun | For applying roofing cement with precision right where you need it. | |
| Chalk Line (Optional) | Helpful for ensuring your new shingle course is perfectly straight, though less critical for a single patch. | |
| Repair Materials | Replacement Shingles | Must match your existing roof in color, size, and style for a seamless, weatherproof repair. |
| 1 ¼-inch Roofing Nails | Galvanized nails are a must to prevent rust and ensure a long-lasting hold. | |
| Asphalt Roofing Cement | Creates a waterproof seal under the shingle tabs, which is critical for preventing leaks. |
With these items ready to go, you can tackle the repair with confidence, knowing you have the right tool for every part of the process.
A Few Words of Experience on Your Gear
Let's break down why some of these items are so important.
Your safety gear is your first line of defense. A good, solid ladder is essential. Make sure it extends at least three feet above the edge of the roof; this gives you something stable to hold onto as you get on and off. And if your roof has any significant pitch, don't even consider getting up there without a safety harness. It's simply not worth the risk.
When it comes to the tools, the flat pry bar is your most valuable player.
I’ve seen countless DIYers try to use the claw of their hammer to pry up shingles. Big mistake. A flat bar spreads the pressure out, letting you slide under the shingle and gently break the old seal without snapping the shingles above it, which you definitely want to keep intact.
For materials, getting the shingle match right is crucial. Take a broken piece of your damaged shingle with you to the supply store. Holding it up against the new ones is the only way to get a good match for both color and texture. An odd-colored shingle will stick out like a sore thumb and screams "amateur repair." Also, make sure you're using 1 ¼-inch galvanized roofing nails—anything else will rust out or won't hold properly.
Getting the Old Shingles Out the Right Way
Alright, you've got your gear and you're safely on the roof. Now comes the part that separates a pro-level patch from a sloppy one: getting the bad shingle out without wrecking the ones around it.
Honestly, this is where most DIY repairs go wrong. People get impatient, start yanking, and end up with a much bigger mess than they started with. The key is to be methodical. Think of it less like demolition and more like careful surgery on your roof.
First, Break the Seal
The shingle you need to replace is tucked underneath the row above it, held down by a sticky asphalt seal. Your first job is to break that bond.
On a hot day, this sealant can be gummy and cooperative. But if it's cool out, it gets brittle and stubborn.
Grab your flat pry bar and gently slide it under the edge of the shingle directly above the one you're removing. Don't just jam it in there. Work it in slowly from one side, applying a little upward pressure until you feel the seal pop free. It’s more of a gentle persuasion than a forceful prying.
- A Cold Weather Trick: If the shingles are stiff, a hairdryer on a low setting can be your best friend. A little bit of warmth will soften that sealant right up, making it much easier to separate the shingles without cracking them.
You’ll need to do this for every shingle tab that's overlapping the damaged one.
Seriously, take your time here. Snapping one of the good shingles above is the number one rookie mistake. A slow, steady hand prevents a simple patch from turning into a multi-shingle replacement project.
Now, Tackle the Nails
Once the seals are broken, you can gently lift the tabs of the upper shingles to see the nails holding your target shingle in place. You should find about four nails per shingle.
Slide your pry bar under the damaged shingle until the notch hooks a nail head. Don't try to rip it out in one go. Instead, apply steady leverage to work it up. You might need to pry a little, reposition the bar for a better angle, and pry again.
Once the first nail is out, the shingle will have a bit more wiggle room. This usually makes it easier to get at the others. Pull the remaining nails the same way. With all the nails gone, the old, damaged shingle should slide right out.
What if you pull the shingle and find a nasty surprise? If you see dark stains, wet spots, or the wood decking underneath feels soft and spongy, stop what you're doing. That’s a clear sign of a deeper leak that has gotten past the underlayment. A simple patch won't cut it, and you'll need to address the rot before putting a new shingle on top of it.
Putting in the New Shingle for a Watertight Seal
With the old shingle out of the way, you’re ready for the most satisfying part of the job. This is where it all comes back together, creating a seamless, waterproof patch that makes your roof whole again. It’s not just about slapping a new shingle in place—getting the alignment, nailing, and sealing just right is what makes a repair that truly lasts.
The main goal here is to slide the new shingle into the gap without bending or creasing it. You'll need to gently lift the tabs of the shingle in the row just above it (the same ones you unsealed earlier) and carefully work the replacement shingle into position.
Aligning and Nailing It Down
Proper alignment is everything. It's crucial for both how the roof looks and how it performs. Your new shingle needs to line up perfectly with the shingles on either side, keeping that course line straight. Its top edge should slide neatly under the row above, stopping just below where the nails are for that upper course.
Once you’re happy with the alignment, it’s time to nail it down. This is the most critical step for making sure your patch stays put.
- Where to Nail: Drive your roofing nails about ¾ of an inch above the cutouts of the shingle tabs. This placement ensures they'll be covered by the overlapping shingle from the row above.
- How Many Nails: For most roofs, four nails per shingle is the industry standard.
- For High-Wind Areas: If you live somewhere known for high winds or if your roof has a really steep pitch (anything over 21:12), go with six nails per shingle for extra holding power.
Make sure to drive the nails straight and flush with the shingle. If you drive them in too deep, you can tear the shingle. If you don't drive them in far enough, they'll create a bump that wears out the shingle above it over time.
A classic mistake I see is nailing too high. This completely misses the shingle below, creating what we call a "high nail" that offers almost no holding power. The nail has to go through both the new shingle and the top edge of the shingle in the row underneath it.
Applying the Final Seal
The last step is to recreate that waterproof seal you broke earlier. Grab your caulking gun and apply a quarter-sized dab of asphalt roofing cement under each tab of the shingles you had to lift. This includes the tabs of the shingle sitting directly above your new patch.
Press each tab down gently to spread the cement and create a solid bond. This adhesive is what stops wind from getting under the shingles and driving rain inside. It's the final touch to make your patch just as secure as the rest of the roof. If you're curious about how these layers work together to protect your home, you can learn more about what is roof underlayment in our detailed guide.
This simple infographic gives you a good visual of the removal process, which is the essential first step before you can even think about installation.
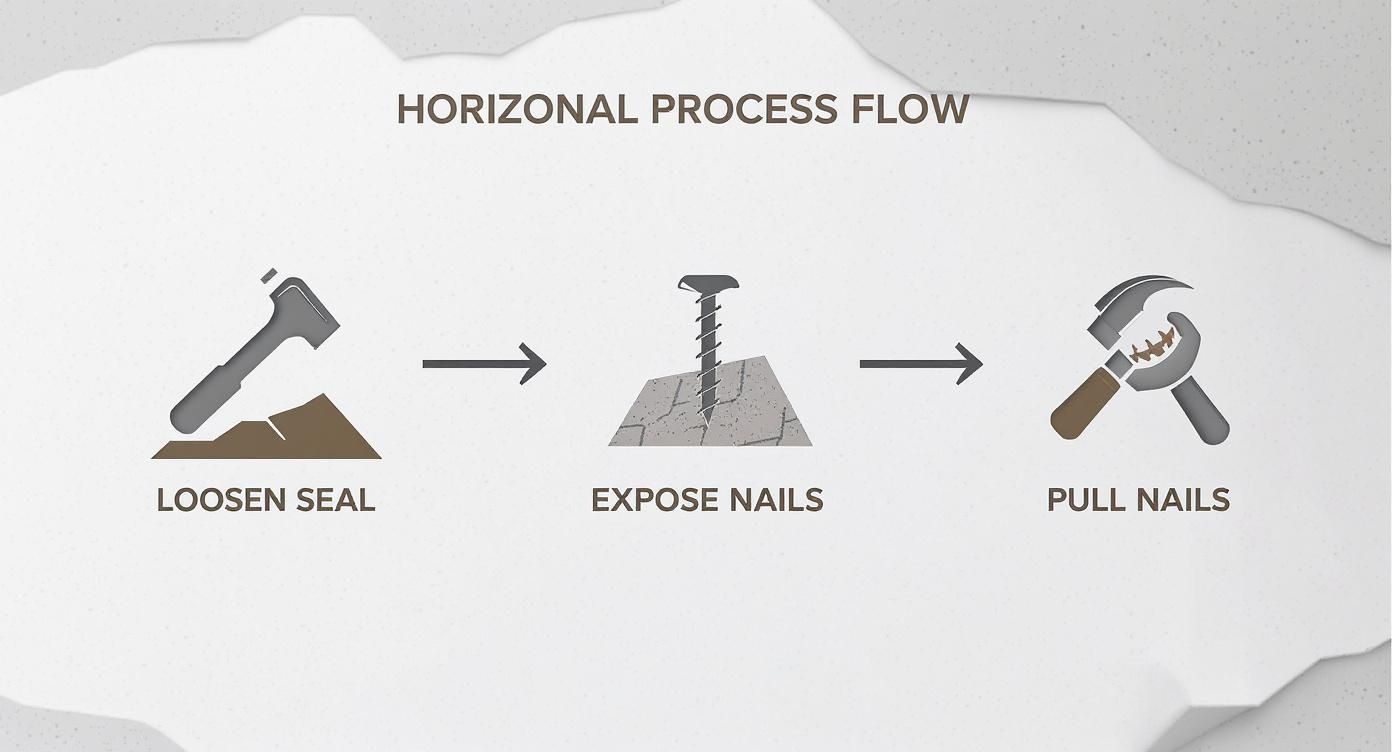
As you can see, a successful repair really starts with a clean removal of the old shingle.
Learning to patch in a new shingle is a fantastic skill. It protects your home from leaks and can extend your roof's life by an estimated 5 to 10 years. With the global roofing market valued at over $132 billion, proper maintenance is how you protect that massive investment in your home. You can find more insights on the growing residential roofing market over at Fortune Business Insights.
Common Shingle Repair Mistakes to Avoid
Even a seemingly simple shingle patch can go sideways if you fall into a few common traps. Honestly, knowing what not to do is just as critical as following the right steps. A good DIY repair is one that lasts, and that means sidestepping the blunders that create new leaks or cause even more damage down the road.
One of the biggest mistakes I see is people getting impatient when pulling up the old shingle. If you just rip it out, you're almost guaranteed to damage the shingles around it. Suddenly, your one-shingle fix becomes a three-shingle headache. Take your time and work that pry bar gently.
Using the wrong fasteners is another classic error. It’s tempting to just use whatever nails are in your toolbox, but you absolutely need to use 1 ¼-inch galvanized roofing nails. Anything else will rust out in a year or two, leaving behind a tiny hole that will start a whole new leak.
Overlooking Sealant and Flashing Details
When it comes to making the repair watertight, proper sealing is everything. A rookie move is to glob on way too much roofing cement, thinking more is better. It’s not. All you really need is a dab about the size of a quarter under each tab of the new shingle.
Here's a pro tip: Slathering on too much cement can actually trap moisture underneath, leading to wood rot. You end up creating the very problem you were trying to solve. It’s a perfect example of where a little finesse goes a lot further than brute force.
Likewise, completely ignoring the flashing is a huge oversight. If your repair is anywhere near a chimney, vent, or valley, you have to inspect the metal flashing. Is it bent? Is the old sealant cracked? Damaged flashing is one of the most common leak sources, and no amount of new shingles will fix that problem. If you're not entirely sure what you're looking for, our guide on what is roof flashing is a great place to start.
The Pitfalls of a DIY Mindset
While tackling a shingle patch yourself can be incredibly satisfying, it's important to recognize the potential pitfalls and 'the dark side' of DIY projects. Sometimes you get up on the roof and realize the problem is bigger than you thought, or you might be tempted to cut a corner on safety. Don't.
Here are a few other common mistakes to watch out for:
- Settling for a Bad Match: Using a shingle that's the wrong color or style looks awful, but it can also cause performance issues if the dimensions are different.
- Nailing Too High: Driving nails too high up on the shingle means they miss the shingle below. That leaves the lower shingle's edge loose and ready to be ripped off by the next big gust of wind.
- Working in Bad Weather: Don't try this in the dead of summer or the middle of winter. Extreme heat makes shingles floppy and easy to damage, while cold makes them brittle and nearly impossible to seal properly.
Avoiding these simple errors makes all the difference. With the global roofing shingles market growing, homeowners are getting smarter about doing these kinds of small, cost-effective repairs to extend the life of their roofs. It’s a great way to save money and reduce waste. By doing it right, you ensure your hard work actually adds to your home's integrity instead of taking away from it.
Knowing When a Patch Just Won't Cut It
Learning how to pop in a new shingle is a great skill for handling isolated damage, but a truly savvy homeowner knows when to put the hammer down. Sometimes, you have to step back and recognize when a simple patch isn't the answer. Think of it as a spot treatment—it’s not a cure for a roof that’s sick all over.
What might look like one bad shingle can easily be the tip of the iceberg, a symptom of a much larger, hidden problem. If you start seeing the same kind of damage repeating across different areas of your roof, that’s a huge red flag telling you that a simple patch is just delaying the inevitable.
Red Flags That Mean Bigger Trouble
Keep your eyes peeled for these tell-tale signs. Catching them early can save you a world of hurt and a boatload of cash down the road.
- Widespread Curling or Cracking: Are shingles curling up at the edges or showing deep cracks on multiple parts of the roof? That's not isolated damage; that's usually a sign of an aging roof where the materials are failing system-wide.
- Major Granule Loss: A few granules in the gutter is normal wear and tear. But if you’re looking up and seeing large, dark, bald-looking patches on your shingles, their protective layer is gone. They're at the end of their useful life.
- Spongy or Soft Spots: This is a big one. As you carefully walk on the roof, if you feel any areas that seem soft, bouncy, or spongy under your feet, stop immediately. It’s a serious warning that moisture has penetrated the shingles and is rotting the underlying wood deck.
If you spot any of these issues, it's time to pause the DIY mission. These problems point to a systemic failure, and patching one spot is like putting a band-aid on a broken arm—it just doesn't work.
For a really thorough look, especially if you're not sure how bad things are, modern tools like drone roofing inspection software can give you a remarkably detailed view of your roof's overall health.
If you think a stubborn leak is at the heart of the problem, our guide on finding a roof leak can help you play detective. Ultimately, knowing your limits and calling a pro when you see these warning signs is the smartest move you can make to protect your home.
A Few Common Questions About Shingle Repair
When you're learning how to patch in shingles, a few questions always come up. Here are some quick answers to the things homeowners ask us most, so you can tackle the job with confidence.
How Many Shingles Can I Realistically Replace Myself?
For most DIY projects, it's best to keep your repairs small and manageable. Think one to three shingles in a single area.
If you start seeing damage that's more widespread than that, it's usually a red flag. Large patches of missing or damaged shingles often signal a deeper problem—like issues with the underlayment or decking—that a simple patch won't fix. That's when you need a pro to get up there and see what's really going on.
What's the Ideal Weather for This kind of Work?
You're looking for a "Goldilocks" day: not too hot, not too cold. The sweet spot is a mild, dry, and preferably overcast day.
Extreme heat is a problem because it makes asphalt shingles soft and gummy, and you can easily cause more damage just by walking on them or trying to lift them. On the flip side, cold weather makes them brittle and prone to cracking. More importantly, the sealant and adhesive strips won't bond properly when it's cold, meaning your patch won't be watertight. Definitely stay off the roof if it's rainy or still wet with morning dew.
How Long Can I Expect a Shingle Patch to Last?
If you do the job right and use quality materials, that patch should last a good long while. In many cases, it will hold up for the remaining lifespan of the rest of your roof.
The key factors are the overall condition of your roof, the weather in your area, and of course, how carefully you did the work. A well-executed, properly sealed patch isn't just a temporary fix; it's a long-term solution.
After taking a look, if you realize the damage is a bit more than you bargained for, or you’d just feel better having an expert handle it, don't hesitate to reach out. The team at Penn Ohio Roofing & Siding Group is always ready to give you a free, no-pressure estimate and make sure your roof is solid. You can find out more at https://pennohiorc.com.