When you find a damaged shingle, the fix is usually pretty straightforward. It’s all about carefully lifting the shingles around the bad one, pulling out the old nails and the shingle itself, then sliding a new one in. A few new nails and a bit of roofing cement, and you’re done. Taking care of this small task can save you a world of headache and money from water damage later on.
Your Quick Guide to a Lasting Shingle Patch
A single bad shingle is like leaving a window open during a rainstorm. It’s an open invitation for water to get in, which can lead to serious and expensive problems with your home's structure. Catching these issues early is your best line of defense against leaks and wood rot.
Identifying Shingles That Need Attention
So, what should you be looking for? Before you can patch a shingle, you need to spot the ones that are failing. From the ground or a safe vantage point, scan your roof for these tell-tale signs:
- Cracked or Curling Shingles: If you see shingles that are cracked or have their edges curling up, they've become brittle and can't do their job anymore.
- Missing Shingles: This is the most obvious sign. High winds can rip shingles right off, leaving a glaring gap in your roof's protection.
- Significant Granule Loss: Notice any dark, smooth patches? That means the shingle has lost its protective granules, which is its first layer of defense against the sun and rain.
A proactive approach is key here. What looks like a tiny crack today can easily become a major leak during the next downpour, turning a simple weekend fix into a much bigger, more expensive problem.
To give you a clearer picture, here's a quick rundown of the whole process.
The Shingle Patching Process at a Glance
| Stage | Key Action | Primary Goal |
|---|---|---|
| Preparation | Gently lift the shingles above the damaged one. | Gain access without causing more damage. |
| Removal | Use a pry bar to remove the old nails and the bad shingle. | Cleanly remove the compromised shingle. |
| Installation | Slide the new shingle into place. | Position the replacement correctly. |
| Securing | Fasten with four roofing nails and seal with roofing cement. | Create a durable, weatherproof seal. |
This table simplifies the task, showing that with the right approach, it's a manageable job.
The core of the repair is to swap out the old shingle without messing up its neighbors, get the new one in place, and seal it up tight. As a homeowner who tackles DIY projects, you know how one repair often leads to another. If you find yourself working on other home systems, guides like these Expert Gas Stove Repairing Tips for Austin Homeowners can be incredibly helpful for keeping everything running smoothly.
Getting Your Gear Together Like a Pro
There’s nothing more frustrating than getting up on the roof only to realize you’re missing a critical tool. Heading into a repair without the right equipment can turn a simple patch job into an all-day headache, or worse, an unsafe mess.
Before you even think about setting up the ladder, let's walk through what you'll need. This isn't just about a hammer and some nails; a few specific items will make the job much cleaner and ensure your repair holds up against the weather. For example, a flat pry bar is non-negotiable—it's the only way to gently break the seals on surrounding shingles without cracking them.
What You'll Need for the Patch
First things first, let's talk materials. The goal is to make your patch invisible, and that starts with finding the right shingle.
- Replacement Shingles: The best-case scenario is having a few spares left over from when the roof was installed. If you don't, take a piece of the damaged shingle with you to the hardware store to get the closest possible match in color and style.
- Roofing Cement: You'll want a tube of asphalt roofing cement. This is what you’ll use to seal the new shingle down, creating that factory-tight, waterproof bond.
- Galvanized Roofing Nails: Be specific here. You need 1 ¼ inch galvanized roofing nails. Their wide, flat heads are designed to secure the shingle firmly without punching right through it.
The Tools of the Trade (and Staying Safe)
Once you have the materials, you need the right tools to get the old shingle out and the new one in without causing more problems.
A quick word of advice from someone who’s seen it happen: don't cut corners on safety. A fall from even a single-story roof can change your life.
This means you absolutely need to have the right gear. Good-fitting work gloves will save your hands from cuts, and safety glasses are a must to protect your eyes from flying debris and grit.
Your choice of shoes is also surprisingly important. Wear soft-soled shoes that have excellent grip—they'll help you stay stable and avoid scuffing up or damaging the surrounding shingles as you work.
Finally, round out your toolkit with a sturdy ladder, a hammer, a sharp utility knife, and that flat pry bar I mentioned earlier. With this setup, you’re ready to tackle the job properly.
Inspecting Damage and Prepping the Repair Area
Before you even grab a tool, the first—and most critical—part of any shingle repair is a solid inspection. A good patch starts with good prep, and that means really understanding what you're dealing with up there. Often, one obvious problem is just the tip of the iceberg.
Get up there and look beyond the glaringly obvious cracked or missing shingle. You’re hunting for the subtle stuff, too. Keep an eye out for things like blistering or heavy granule loss, which shows up as dark, smooth spots. Those little granules are what protect your shingles from the sun and elements, so when they’re gone, the shingle is on its last legs. Catching these problems early can save you a much bigger headache down the road.
Getting the Area Ready for Repair
Once you’ve pinpointed all the trouble spots, it’s time to clean up. Gently sweep away any leaves, dirt, or loose granules from the damaged shingle and the ones around it. You need a clean surface to make sure your patch or sealant creates a watertight bond. Any trapped debris will compromise the seal.
And let's talk about safety, because it's everything on a roof. Your ladder needs to be on solid, level ground and extend at least three feet above the roof's edge for a safe transition.
I always tell people to follow the three-points-of-contact rule. That means either two hands and a foot, or two feet and a hand, are always firmly on the ladder or roof. No exceptions.
Know Your Shingles
Part of your prep work is knowing what you're patching. Chances are, you’re working with asphalt shingles. They’re by far the most common roofing material in the country, covering over 70% of homes. This makes learning how to handle a basic repair a really valuable skill for most homeowners.
Taking the time to inspect and prep correctly isn't just busywork; it's what makes the difference between a quick fix and a lasting, reliable repair that keeps your home protected.
The Art of Removing and Replacing a Shingle
Alright, with your prep work out of the way, it’s time to get your hands dirty. The real secret to replacing a shingle without causing a bigger mess is patience. If you rush this part, you're almost guaranteed to crack a good shingle, and then you’ve got two problems instead of one.
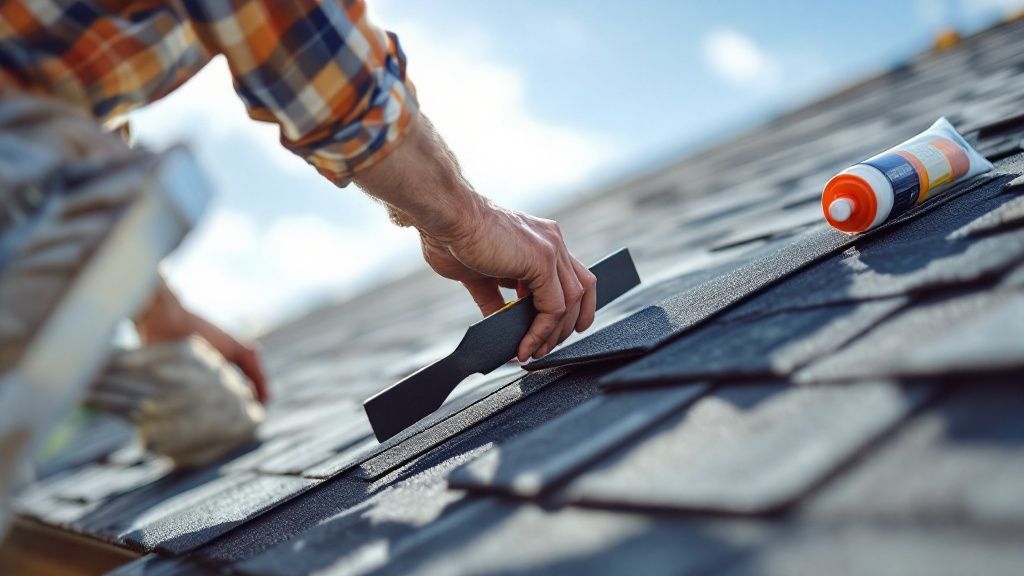
Your first move is to carefully break the seal on the shingles in the row above the one you need to replace. The sun essentially bakes these shingles together over time, creating that critical watertight seal. You'll need to gently work a flat pry bar between them to separate that adhesive bond. Be slow and deliberate here.
Once you’ve lifted the shingle above, you'll see the nails holding your damaged shingle in place. You should find about four nails in a standard shingle. Use your pry bar to gently lift the damaged shingle just enough to slide the bar's claw under the nail heads, then carefully pry them out. After the nails are gone, the old shingle should slide right out.
This is a great visual breakdown of the process from start to finish.
From finding the problem to finishing the repair, you can see how each step sets you up for the next, leading to a secure and watertight patch.
Positioning and Securing the New Shingle
Here comes the satisfying part. Slide your new shingle right into the gap. It needs to align perfectly with the shingles on either side of it. The bottom edge should be completely flush with its neighbors, and the top part should tuck neatly under the row above it.
This is also your moment to play detective. If you see any torn felt paper or exposed wood decking, you have to deal with that before covering it up. That layer is your roof's last line of defense. If you're not sure why it matters so much, our guide on what is roof underlayment is a must-read.
With the new shingle sitting pretty, it's time to lock it down. Getting the nailing right is everything.
- The Pattern: Stick to four galvanized roofing nails per shingle. Put one nail about an inch in from each side, then space the other two evenly between them.
- The Placement: This is where people mess up. The nails go just above the self-sealing tar strip but below the bottom edge of the shingle that overlaps it from above. This is crucial because it means the shingle above will cover the nail heads, protecting them from rain and sun.
- The Depth: Drive the nails in straight so the head is flush with the shingle's surface. If it’s sticking up, it’ll tear the shingle above it. If you drive it too deep, you’ve just broken the shingle’s surface and created a new potential leak.
Pro Tip: A proper nailing pattern isn't just a suggestion; it’s what keeps your shingle from turning into a frisbee in the next big storm. Getting this right is fundamental to a patch that will actually last.
For the final touch, apply a small dab of roofing cement under the tabs of your new shingle and press it down firmly. Don’t forget to do the same for the shingles in the row above that you had to lift. This re-creates that factory seal you broke earlier.
This last step ensures everything is truly locked down and waterproof, finishing the job right. It’s this kind of detail-oriented work that's becoming more critical, especially with storm repairs driving demand. The global asphalt shingles market was valued at USD 6.81 billion in 2024 and is projected to grow to USD 8.49 billion by 2032, showing just how many homeowners are tackling these kinds of fixes.
Putting on the Finishing Touches and Avoiding Common DIY Mistakes
Once you've nailed in the new shingle, you might think you're done, but hold on. The final touches are what really make the difference between a quick fix and a repair that will actually last. The most important last step is resealing any of the neighboring shingles you had to lift up.
Think of it this way: the factory puts a tar strip on each shingle for a reason. You need to replicate that seal. Just apply a small dab of roofing cement under the corners of each shingle you disturbed. This keeps them from catching the wind and ripping off later. It’s a simple thing, but it’s amazing how many people skip it, and it’s often the reason a small repair fails.
Given that residential roofing accounts for 56.2% of the massive $129.62 billion global market for roofing materials, getting these details right is a big deal for homeowners. You can dig deeper into roofing material market trends if you're interested in the bigger picture.
Common Repair Pitfalls to Sidestep
Knowing how to fix a shingle is one thing; knowing what not to do is just as important. I’ve seen plenty of well-meaning DIY repairs go south because of a few common, easily avoidable mistakes.
The goal here is to solve one problem, not create three new ones. When you rush a roof repair, you often end up damaging the good shingles around the problem area, turning a tiny patch job into a much bigger headache.
Keep an eye out for these classic blunders:
- Driving Nails Too Deep: This is a huge one. If you overdrive the nail, you'll actually fracture the shingle mat around the nail head, creating a perfect little funnel for water. The nail head should sit completely flush with the shingle—no deeper.
- Using the Wrong Sealant: Whatever you do, don't grab that tube of silicone caulk from your bathroom. It’s not made for this. Silicone breaks down fast under the constant UV rays and temperature swings on a roof. You need to use actual roofing cement.
- Tearing Good Shingles: When you're using your pry bar to break the old seal, be patient. If you just yank it, you're almost guaranteed to tear the edge of the shingle above it. Go slow and work it loose gently.
While you're up there, take a moment to look at the flashing around your chimney, vents, and valleys. Damaged flashing is one of the biggest culprits behind serious roof leaks, so it pays to understand what roof flashing is and what to look for.
Still Have Questions About Shingle Repair?
Even with a good guide, tackling a roof repair for the first time can leave you with a few nagging questions. It's totally normal. Let's walk through some of the most common things people wonder about so you can get the job done right.
Can I Patch Shingles in the Winter?
This is a big one. Technically, yes, you can. But should you? Probably not, unless it's an emergency.
Shingles get incredibly brittle in the cold. Trying to lift one up to slide a new one underneath often results in more cracking and more problems. If you absolutely have to do the repair, try to wait for the warmest, sunniest part of the day when the sun has had a chance to soften them up a bit.
How Long Will My Patch Job Last?
If you do it right, your patch should last just as long as the rest of the shingles on your roof. The secret is getting a perfect seal and using a shingle that matches not just in color, but in age and wear. That's why it's always a good idea to hang onto any leftover shingles from your last roofing job.
What if I Can't Find a Matching Shingle?
It happens, especially with older roofs. For a quick, temporary fix to stop a leak, you can carefully slide a piece of metal flashing under the damaged shingle. Use a good amount of roofing cement to seal around the edges and keep water out.
Heads Up: This is a stop-gap measure, not a permanent solution. Its only job is to prevent water from getting in right now. You'll want to find a proper replacement shingle as soon as you can to protect the integrity of your roof.
Can't I Just Slap Some Roofing Cement on a Crack?
For a tiny, hairline crack, a dab of roofing cement might get you by for a little while. But it's a band-aid at best. The cement will eventually dry out and crack itself, leaving you right back where you started. A full replacement is always the better, more durable option.
If you're dealing with more widespread damage, it might be worth looking into your coverage options by understanding your existing homeowners insurance policy. Sometimes what starts as a small repair can point to a larger issue that your policy may cover.