Tackling an ice dam is a two-pronged attack. First, you have to deal with the immediate problem—the ice itself—and then you need to fix what caused it in the first place, which is almost always heat escaping from your house. The safest ways to get rid of the ice involve clearing snow with a roof rake or using calcium chloride to melt channels through the dam, giving trapped water a way to escape before it backs up under your shingles.
Why Ice Dams Are Showing Up on Your Roof
Those massive icicles hanging off your gutters might look impressive, but an ice dam is a serious warning sign. It’s a billboard screaming that your home is bleeding heat where it shouldn't. If you understand how they form, you’re already halfway to solving the problem for good. It’s really just a simple, predictable cycle caused by a temperature imbalance.
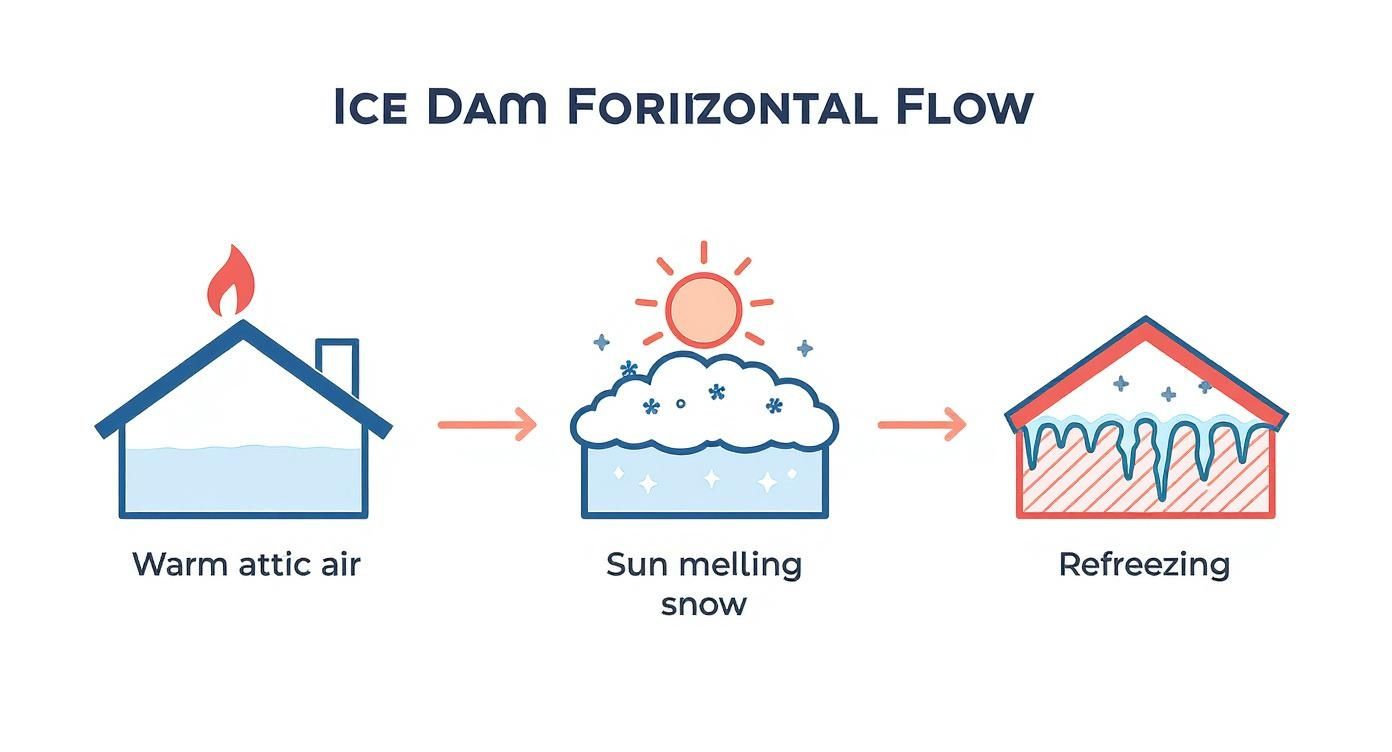
It all starts inside your home. Heat rises. If your attic isn't properly sealed and insulated, that warm air gets trapped up there and bakes the underside of your roof. This warms the roof deck enough to melt the snow sitting on top, even when the air outside is freezing cold.
The Melt-and-Freeze Cycle
Once that snow starts melting, the water runs down the roof. But when it gets to the eaves and gutters—the parts of the roof hanging out past the walls of your house—it hits a cold spot. There's no warm attic underneath the eaves, so they stay at the same freezing temperature as the air.
As soon as the meltwater hits that cold edge, it refreezes, forming a small ridge of ice. That little ridge is the start of your dam. Now, any new meltwater coming down the roof gets stuck behind it. Day after day, this cycle repeats, and that dam just gets bigger and bigger.
Here's the real kicker: the ice itself isn't the main threat. It's the pond of water pooling up behind it. That water has to go somewhere, and its easiest path is up and under your shingles, seeping through nail holes and into your attic, ceilings, and walls.
The Main Culprits Behind Ice Dams
A few key issues are usually responsible for the heat loss that starts this whole mess. Figuring out which one is happening at your house is the secret to a permanent fix.
- Not Enough Attic Insulation: This is problem number one, far and away. If your attic insulation is thin, old, or compacted, it's just not stopping the heat from your living space from getting to the roof. A lot of older homes are seriously under-insulated by today's standards.
- Bad Attic Ventilation: A properly ventilated attic pulls in cold outside air through soffit vents and pushes it out through ridge or gable vents. This constant airflow keeps the roof deck cold and prevents snow from melting from the bottom up. If those vents are blocked, warm air gets trapped.
- Air Leaks into the Attic: Think of all the little gaps in your ceiling—around can lights, bathroom fans, the attic hatch, and pipes. Each one is a tiny chimney funneling warm, moist air directly into your attic. You'd be shocked how much heat these small leaks can add up to. For more on how different parts of your roof system are meant to seal out water, it's worth taking a minute to understand what roof flashing is and the critical job it does.
At the end of the day, an ice dam is just a symptom. Once you realize it’s all about escaping heat, you can stop focusing on just breaking up the ice and start looking at the real source of the problem: your home's insulation and ventilation.
Safe DIY Ice Dam Removal Techniques
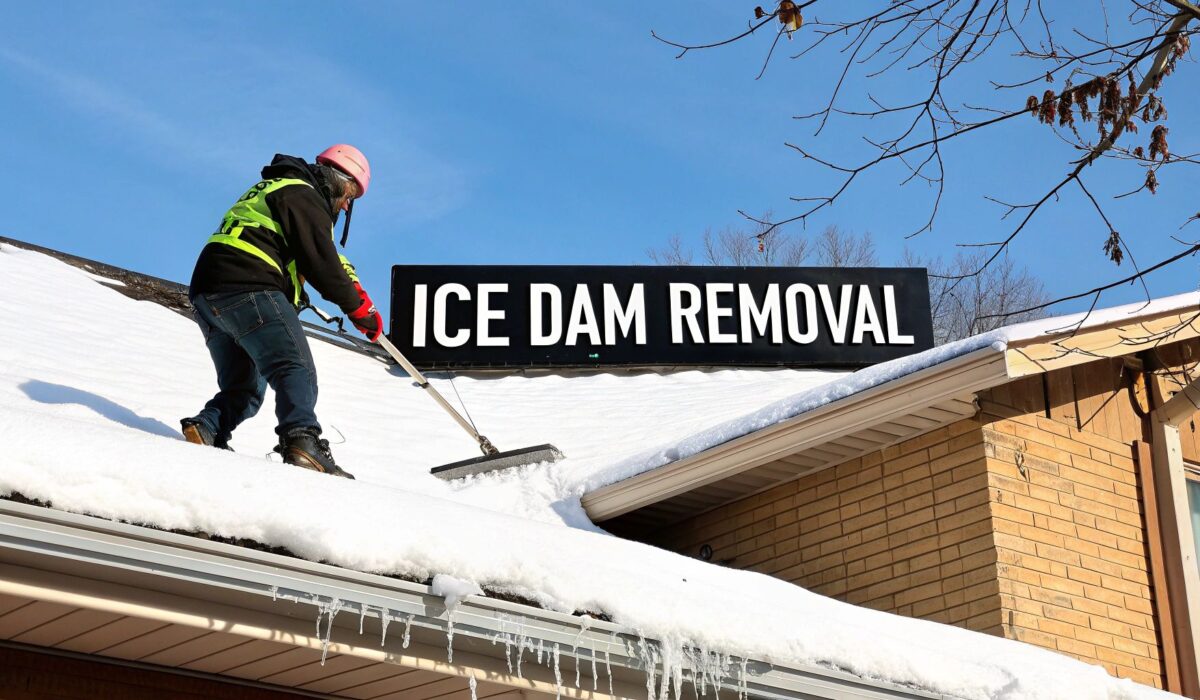
When you see that thick ridge of ice forming at the edge of your roof, it’s a sign to act fast. A small ice dam can quickly turn into a major headache, forcing water back under your shingles and into your home. If you catch it early and can safely reach the area from the ground, there are a few solid DIY methods you can try. Forget the horror stories of people taking hammers or pressure washers to their roof—we’re talking about smart, safe techniques that actually work.
Your main goal isn't to blast away every chunk of ice. Instead, you're trying to create channels for the trapped water to escape. This is what relieves the pressure that causes leaks. To really get it, you have to understand why the dam formed in the first place.
This whole mess starts when heat escapes your attic, melting the snow on your roof. That water runs down to the cold edge of your roof and—bam—it refreezes. Seeing this cycle makes it clear that removing the ice is just a temporary fix. The real solution lies in stopping that heat loss from happening at all.
Using A Roof Rake The Right Way
A long-handled roof rake is your best friend for prevention, but only if you use it correctly. The idea is to pull snow down and off the roof edge, which starves the ice dam of its fuel. You should never, ever use it to chip or hack at the ice itself. You'll just tear up your shingles.
My advice? Get a rake with small wheels or plastic bumpers on the blade. They're a game-changer. Those little wheels keep the blade just off the shingle surface, so you can pull snow without scraping away the protective granules.
Always use the rake while standing firmly on the ground—never on a ladder. Work in manageable sections, pulling the snow straight down. Your goal is to clear the first four to five feet of snow from the eaves up. This creates a cold buffer zone where any meltwater won't have a chance to refreeze.
The Calcium Chloride Sock Method
If you already have a small or moderate ice dam, this is a surprisingly effective trick. It’s a low-cost way to use a chemical de-icer to melt vertical channels right through the dam, giving that backed-up water a way out.
Here’s the rundown:
- Choose the right chemical: Grab calcium chloride pellets. Do not use rock salt (sodium chloride), as it's incredibly corrosive and will wreck your gutters, flashing, and even the nails holding it all together.
- Make the "socks": Fill an old pair of pantyhose or a tube sock with the calcium chloride and tie off the end. Pantyhose work great because the porous material lets the chemical dissolve slowly and evenly.
- Place them strategically: Carefully lay the socks vertically across the ice dam, so they run up and down, perpendicular to the gutters. Space them out every few feet.
As the calcium chloride slowly dissolves, it will melt a path through the ice, and the trapped water will finally be able to drain.
Crucial Safety Precaution: The runoff from calcium chloride isn't great for plants, siding, or concrete. Before you put the socks up, throw a plastic tarp over any landscaping or decking below. And remember, this won't do much good if your gutters are clogged. You can review our guide on how to clean downspouts and gutters to make sure the water has a clear path once it's free.
To help you decide which approach is right for your situation, here's a quick comparison of these common DIY methods.
Comparing DIY Ice Dam Removal Methods
| Method | Best For | Risk Level | Key Tip |
|---|---|---|---|
| Roof Rake | Preventing ice dams by removing snow from roof edges. | Low (from ground) | Get a model with wheels to avoid damaging shingles. |
| Calcium Chloride Socks | Melting channels through small, existing ice dams. | Low (from ground) | Use calcium chloride, NOT rock salt, to prevent corrosion. |
| Hammers/Chisels | Never recommended. | Very High | Don't do it. You will cause severe damage to your roof. |
| Warm Water/Pressure Washer | Never recommended. | Very High | Introduces more water and can refreeze, making it worse. |
As you can see, the right tool for the job is all about prevention and careful intervention. Aggressive methods almost always cause more problems than they solve.
Non-Negotiable Safety Rules
Look, DIY removal should only be an option for single-story homes with a low roof pitch where you can do everything safely from the ground. Your safety is always the top priority.
- Stay off ladders. An icy, snowy ladder is a recipe for disaster. While you might consider using a roof hook ladder extension for other tasks, it has no place in ice dam removal. Keep your feet on the ground.
- Watch for power lines. Always be aware of your surroundings, especially overhead electrical wires, when you're maneuvering a long-handled roof rake.
- Know when to fold 'em. If the ice is thick, covering a huge area, or on a second story, it’s not worth the risk. That’s the time to pick up the phone and call a professional.
Common Removal Mistakes That Damage Your Roof
When you see a menacing ice dam hanging off your roof, it's natural to want it gone—fast. But in the rush to solve the problem, many homeowners accidentally cause thousands of dollars in new damage. Knowing what not to do is just as critical as knowing the right way to handle things.
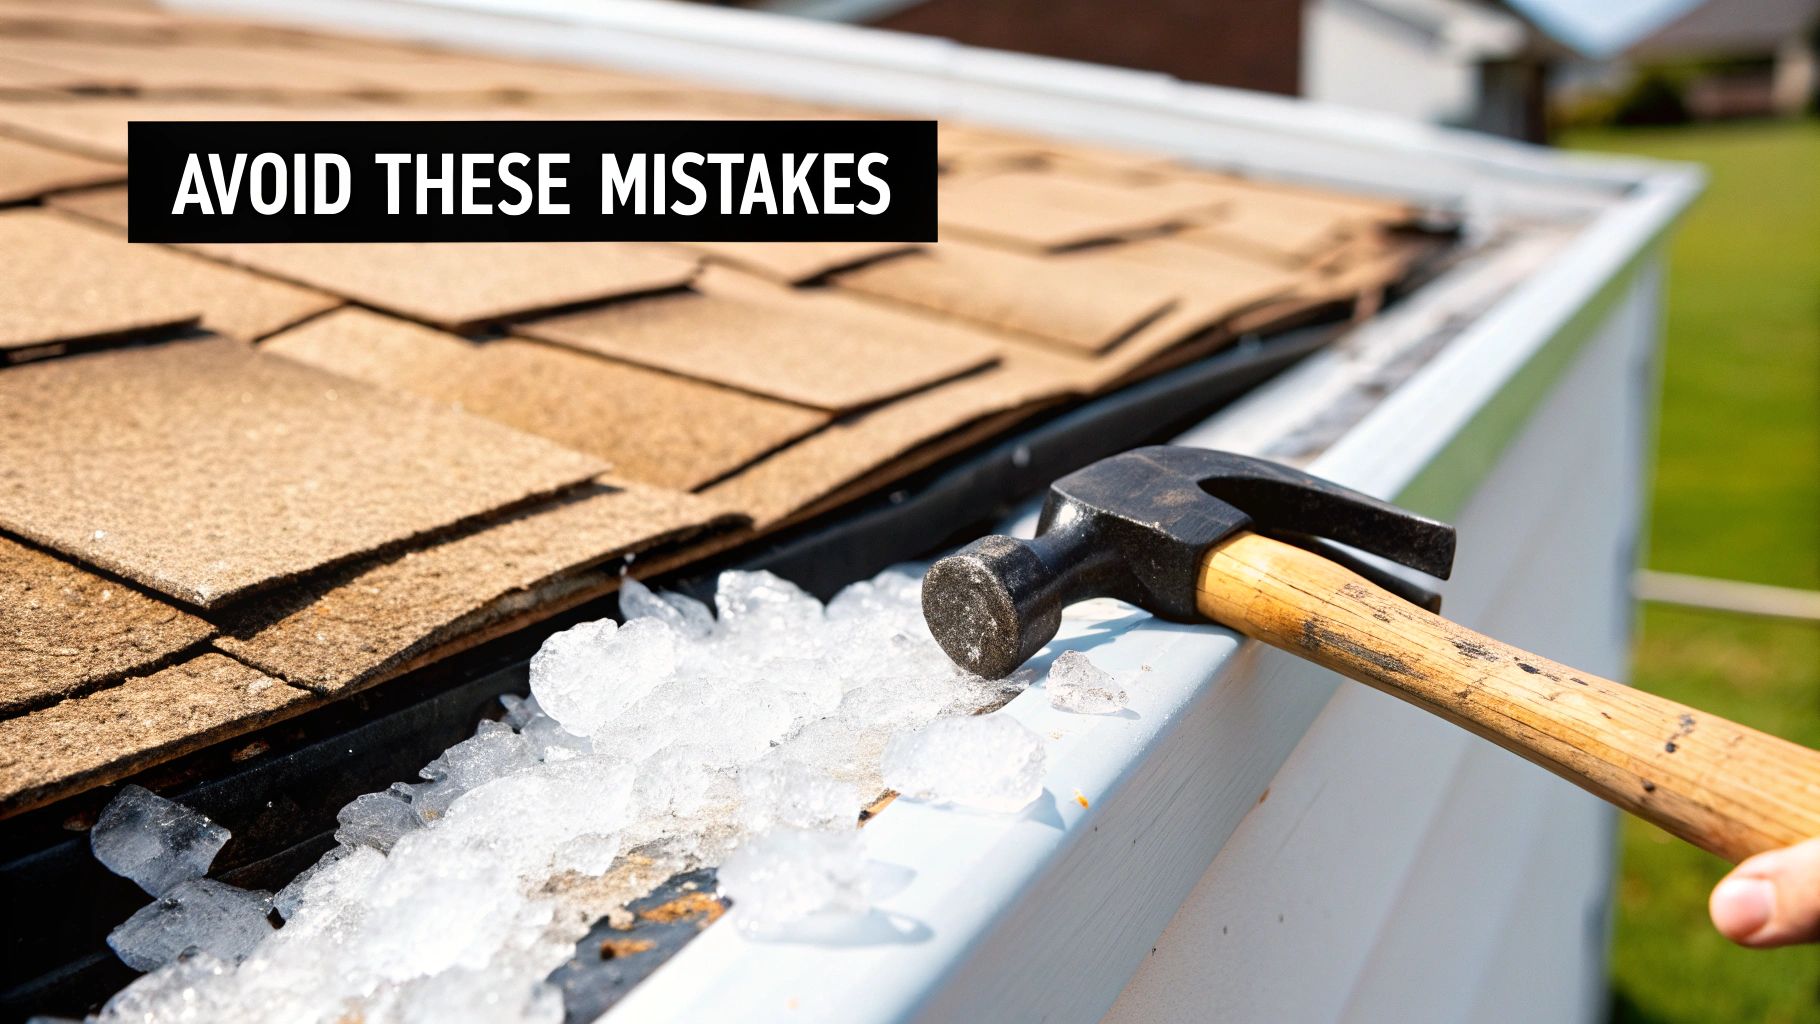
Let's talk about the biggest and most common mistake: grabbing a hammer, axe, or chisel and trying to smash the ice into oblivion. I get it, it's tempting. But it's also the fastest way to wreck your roof. In the dead of winter, your asphalt shingles are incredibly brittle. A solid whack with a hammer won't just chip the ice; it will crack, shatter, or puncture the shingle right underneath.
This kind of brute-force attack almost always ends in tears. You're left with broken shingles, dented gutters, and torn flashing—creating a whole new set of leaks that are often far worse than the original ice dam.
The Hidden Dangers of The Wrong Chemicals
Another go-to "fix" that backfires is using the wrong de-icing chemical. Many people grab a bag of rock salt (sodium chloride) because it's cheap and works on sidewalks. This is a massive mistake for your roof. Rock salt is incredibly corrosive.
Here’s the long-term damage you can expect from using it:
- It eats away at metal flashing around your chimney, vents, and valleys, opening up new pathways for water to get in.
- It corrodes the nails and fasteners holding your roof system together, which can compromise its structural integrity over time.
- The salty runoff is poison for your landscaping. It will kill the grass, shrubs, and garden beds below the eaves and can stain concrete or siding.
If you must use a chemical, the only one to consider is calcium chloride, and even then, it should be properly contained in a permeable fabric tube, like the sock method we mentioned earlier.
High-Risk Methods You Must Avoid
Beyond the wrong tools and chemicals, a few other dangerous "solutions" pop up that you should steer clear of at all costs. These shortcuts pose a serious threat to both your home and your safety.
It's shocking, but we've heard stories of people using open-flame devices like propane torches to melt ice. This is an extreme fire hazard. It can easily ignite your roofing materials, the underlying wood sheathing, or even the insulation in your attic. The risk of setting your house on fire is just not worth it.
A pressure washer might also seem like a clever way to blast the ice away, but it's a recipe for disaster. Hitting your roof with a high-pressure jet of water forces moisture underneath your shingles. That water will refreeze and expand, lifting and cracking the shingles and practically guaranteeing a leak come springtime. You'll also just be adding more water to the problem, potentially making the ice dam even larger.
Ultimately, the best approach for how to remove roof ice dams is always a gentle and methodical one. Patience and gradual melting win the day. Avoid brute force and harsh chemicals—it's the only way to solve the immediate issue without creating a much more expensive one down the road.
When to Call in the Pros for Ice Dams
Look, I'm a big fan of DIY, but there are times when you need to know your limits. When it comes to ice dams, trying to be a hero can lead to a world of hurt—for you and your house. Knowing when to put down the roof rake and call a professional isn't admitting defeat; it's making a smart call to protect your biggest investment.
If you find yourself on a ladder, looking up at a monster ice dam and thinking, "This feels like a really bad idea," you're probably right. Trust that gut feeling. Tackling a serious ice dam without the right gear and experience can easily turn a manageable problem into a catastrophic one, complete with major roof damage or a trip to the emergency room.
Red Flags: It's Time to Make the Call
Some situations are just non-starters for a DIY approach. If you spot any of these, don't hesitate—get a professional on the phone right away.
- There's Water Inside Your House: This is a five-alarm fire. Water dripping from the ceiling or running down your walls means the ice dam has already won the first battle. You need that dam gone now to stop the bleeding and prevent widespread water damage, ruined insulation, and the inevitable mold that follows.
- The Ice Dam is Massive: A little ridge of ice is one thing. A glacier hanging off your eaves that's more than six inches thick is another beast entirely. The sheer weight can tear off gutters and put incredible stress on your roof. You can't fight that with a rake.
- You Live in a Two-Story (or Taller) Home: The danger level goes up exponentially with every foot off the ground. Getting on a ladder in icy conditions is risky enough on a ranch home. Trying to work on a second story is just asking for a life-altering fall. Pros have the training and safety harnesses to manage these heights safely.
- Your Roof Has a Steep Pitch: Any roofer will tell you that a steep pitch changes everything. It's tough to keep your footing even in good weather. Add ice and snow, and it becomes a treacherous, unpredictable surface. It’s just not worth the risk.
Think of these as hard-and-fast rules, not gentle suggestions. Pushing your luck here is a gamble you don't want to lose.
The Gold Standard: Why Professionals Use Steam
When you hire a pro, you’re not just getting an extra set of hands. You're getting their expertise and, most importantly, their specialized equipment. The only truly safe and effective way to remove a serious ice dam is with low-pressure steam. It’s light-years ahead of any DIY method and avoids the brute-force damage that comes from hacking away with hammers or chisels.
A professional-grade steamer uses high heat at very low pressure to melt the ice from the bottom up. This carefully breaks the bond between the ice and your shingles, letting the dam come off in big, clean chunks without a single granule being harmed. It’s a surgical approach, not a demolition job.
Think of it like this: trying to chip away a massive ice dam is like using a sledgehammer for a delicate operation. Steaming, on the other hand, is like using a surgeon's scalpel—it's precise, effective, and leaves no collateral damage. It's the only method that can guarantee your roof remains unharmed.
Understanding the Cost vs. the Catastrophe
Yes, professional ice dam removal costs money. But it’s an investment to prevent a much, much bigger financial headache. According to industry data, the average cost for professional ice dam removal is about $1,200, but the range can be anywhere from $400 to $4,000. Where you fall on that spectrum depends on the size of your roof, its pitch, and how much ice we're talking about.
Steam removal, being the safest and most effective method, typically runs between $800 and $2,400. Since labor makes up around 90% of that bill, it's clear you're paying for a skilled technician to do a dangerous job correctly. You can learn more about what goes into these ice dam removal costs to see the full picture.
Now, compare that cost to what you’d pay for drywall replacement, new insulation, mold remediation, and structural repairs from unchecked water damage. Suddenly, the professional's fee looks like a bargain. Making that call is often the smartest and most cost-effective decision you can make.
How to Prevent Ice Dams from Forming Again
Getting an ice dam off your roof is just step one—it’s the emergency patch-up. Think of it like bailing water out of a boat that has a leak. You've handled the immediate danger, but unless you plug the hole, you'll be bailing again soon. The real, lasting fix is to stop ice dams from ever forming in the first place by getting to the root of the problem.
This isn't about some fancy gadget. It's about turning your roof into what is often called a "cold roof." The goal is pretty straightforward: keep the entire surface of your roof the same temperature as the air outside. When there's no warm spot on your roof, snow melts evenly and drains away like it's supposed to. It doesn't get a chance to melt, run down, and refreeze at the edges. Achieving this comes down to two things: proper attic insulation and ventilation.
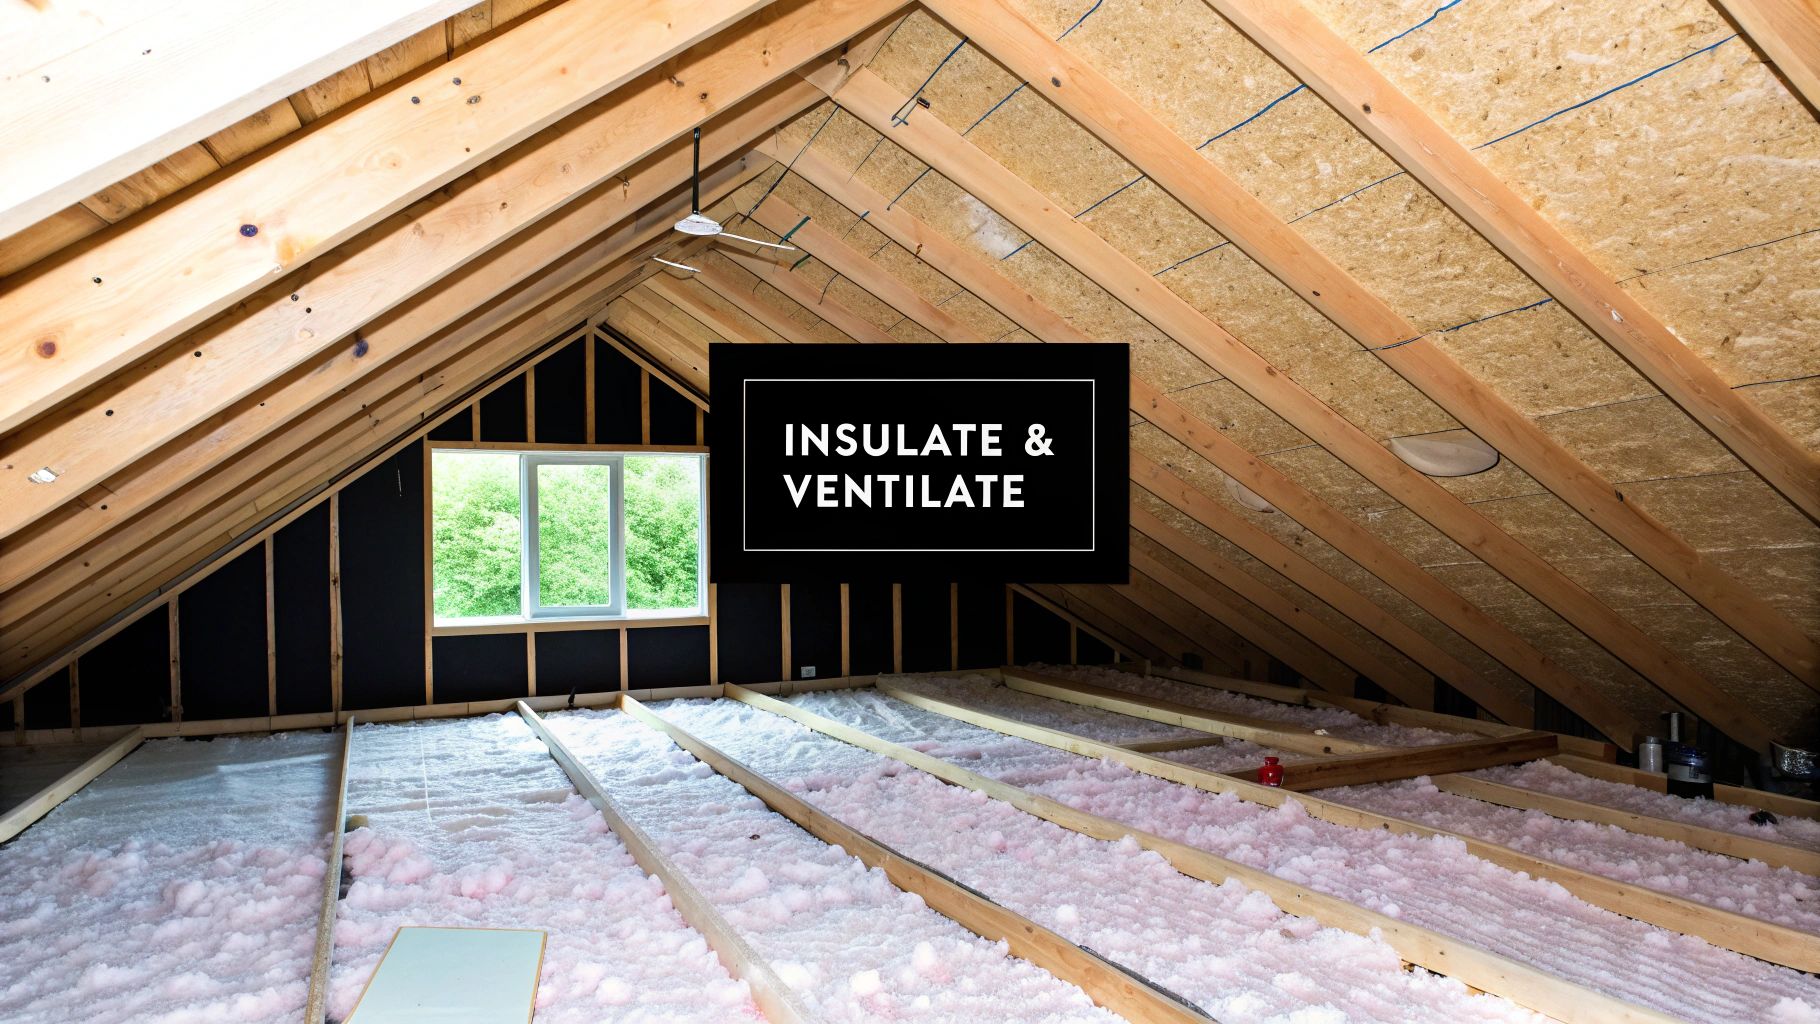
Creating a Cold Roof with Proper Insulation
The number one reason ice dams form is heat escaping from your living space and warming up the attic. Your attic floor is basically a winter hat for your home. If that hat is thin or has holes, heat pours right out. A thick, seamless layer of insulation is your best defense.
Before you add more insulation, you have to plug the leaks. Warm air is surprisingly good at finding escape routes, and it often gets into the attic through small gaps we call attic bypasses. These are little openings in your ceiling that act like chimneys, funneling warm air directly to the underside of your roof sheathing.
You'd be surprised where you'll find these air leaks:
- Gaps around plumbing pipes and electrical wiring.
- Unsealed attic hatches or pull-down stairs.
- Openings around recessed lights and bathroom exhaust fans.
Sealing these gaps with expanding foam and caulk is the critical first move. After that, you can focus on the insulation itself. For our climate here, building codes often call for an insulation level of R-49 or even R-60. That translates to about 16 to 22 inches of blown-in fiberglass or cellulose. A good rule of thumb? If you can easily see the tops of your ceiling joists in the attic, you almost certainly need more insulation.
Balancing Your Attic Ventilation System
Insulation is for keeping heat in your house. Ventilation is for getting unwanted heat out of your attic. A good ventilation system works all year, but its winter job is to flush out any bit of heat that manages to sneak past your insulation. This works with a balanced system of intake and exhaust.
Soffit vents, located under your roof's eaves, are the intake, pulling in cold outside air. This cool air flows up along the underside of the roof deck, pushing any warmer, moist air out through ridge vents at the very peak of the roof. It’s this constant, slow-moving airflow that keeps the roof deck cold and stops the snow from melting from the bottom up.
The golden rule for ventilation is a 1:300 ratio. That means you need one square foot of vent area for every 300 square feet of attic floor space. The key is that this has to be balanced: half the ventilation area at the soffits (low) and the other half at the ridge (high). An imbalanced system just doesn't create the airflow you need.
When to Consider Heating Cables
While improving insulation and ventilation is the permanent solution, some homes just have complicated rooflines or architectural quirks that create chronic trouble spots. For these situations, professionally installed heating cables can be a useful tool.
It’s important to know that heating cables don't actually prevent ice dams. What they do is create melted channels through the ice, giving water a clear path to drain off the roof and through the gutters. They treat the symptom, they don't cure the disease.
For the best results, self-regulating heating cables should be installed in a zigzag pattern along the roof eaves, making sure they extend just past the home's exterior wall. You’ll also want to run the cable down into your gutters and downspouts to keep them from turning into solid blocks of ice. For homeowners wanting a complete breakdown of these preventative strategies, you can learn more about how to prevent ice dams in our detailed guide.
To really get ahead of this, it's also smart to avoid the common roofing and gutter maintenance mistakes that can make things worse. In the end, combining these solutions—sealing air leaks, beefing up insulation, balancing ventilation, and using heat cables where needed—gives you a powerful, multi-layered defense. This proactive approach doesn't just stop ice dams; it makes your home more energy-efficient, saving you money on heating bills for years to come.
Your Ice Dam Questions Answered
Even after getting the basics down, most homeowners still have a few questions swirling around. Let's clear up some of the most common things people ask when they're staring up at a chunk of ice on their roof, so you can make the right call for your home.
Will An Ice Dam Just Go Away On Its Own?
Technically, yes, an ice dam will melt when spring arrives. But waiting it out is a massive gamble. As long as that ice dam is sitting there, it's a barrier trapping all the melting snow behind it, forcing water to back up under your shingles.
That water doesn't just disappear. It soaks your insulation, leaves ugly stains on your ceilings, makes your paint peel, and can even kickstart mold growth you can't see. It's always, always better to deal with an ice dam right away instead of hoping for a warm front, especially if it’s a big one or you're already seeing drips inside.
Is It Okay To Pour Hot Water On An Ice Dam?
This is a persistent myth, and frankly, a terrible idea. You might melt a small channel for a minute or two, but that water is going to cool down and refreeze almost instantly. You'll often end up with an even bigger, thicker ice dam.
Worse, you risk "shocking" your cold, brittle shingles with the sudden temperature change, which can crack them on the spot. And let's not forget the personal safety risk of hauling buckets of scalding water up a ladder in icy conditions. Just don't do it. Stick to safer, proven methods.
A sudden change in temperature is an enemy to most building materials. Pouring boiling water on a frozen roof is like throwing an ice cube into a hot pan—you’re inviting cracks and fractures.
Does My Homeowners Insurance Cover Ice Dam Damage?
This is the big question, and it's not a simple yes or no. The good news is that most standard homeowners insurance policies will cover the resulting interior water damage. That means repairs to drywall, paint, flooring, and insulation are usually covered.
The bad news? The policy almost never covers the cost of actually removing the ice dam itself. Also, if the insurance adjuster finds that the damage happened because of long-term neglect (like an old, known roof leak you never fixed), they could deny your claim. The best thing to do is pull out your policy or call your agent to get the exact details on your coverage.
If I See Icicles, Do I Definitely Have An Ice Dam?
Not always, but it's a huge red flag. A few stray icicles here and there can be perfectly normal.
The real tell-tale sign is a solid, thick ridge of ice running along the edge of your roof, with icicles hanging down from that ridge. That’s the classic picture of an ice dam at work. It shows that water is freezing at the eaves instead of flowing away safely. When you see that pattern, it's time to investigate further.
When you're staring down a stubborn ice dam and need it gone safely and professionally, don't wait for the damage to spread. The team at Penn Ohio Roofing & Siding Group has the right tools and the experience to remove ice dams without harming your roof. Contact us today for a free estimate and keep your home protected this winter.