
It's a common misconception that if a house wasn't built with a drip edge, it's too late to add one. That’s simply not true. In fact, installing drip edge on an existing roof is one of the smartest and most effective upgrades you can make. This simple strip of metal is your best defense against water damage, potentially saving you a fortune in future repairs.
Why Your Roof Needs a Drip Edge Now

Most people don't think about drip edge until they see the tell-tale signs of a problem—dark water stains running down the siding or, worse, rotting fascia boards. Without this component, water uses surface tension to cling to the edge of your shingles. From there, it wicks back underneath, soaking directly into the wood structure of your roof.
It’s a slow-motion disaster. This constant, subtle water exposure is a direct threat to your home's integrity, leading to issues that are far more than just cosmetic.
The Real-World Damage of Missing Drip Edge
Think of a drip edge as the unsung hero of your roof. It creates a clean, finished line that performs one crucial job: kicking water away from the fascia and into the gutters where it belongs. Without it, you’re leaving your home exposed.
Here's what retrofitting a drip edge actually does for you:
- Saves Your Fascia and Soffit: It creates a physical barrier, stopping water from running down and rotting out the wooden boards along your roofline.
- Keeps the Roof Deck Solid: By channeling water away, it protects the underlying roof sheathing from the dampness that causes soft spots and decay.
- Stops Ugly Staining: It's the best way to prevent those dark, vertical streaks that appear on fascia and siding from years of dripping water.
- Improves Gutter Performance: It makes sure rainwater actually lands in the gutter instead of sneaking behind it and damaging the wood.
A properly installed drip edge isn't just a piece of trim. It's a critical part of your roof's water management system and the first line of defense at its most vulnerable point: the edge.
This small addition is a specific type of flashing, which is the family of materials used to seal joints and stop leaks. To see the bigger picture, you can learn more about the role of roof flashing in keeping a home dry. Water infiltration is a huge factor in premature roof failure, with industry data showing leaks and water damage are behind nearly 20-25% of all roofing problems.
Picking the Right Drip Edge and Tools
Before you even think about climbing a ladder, a trip to the hardware store is in order. Getting the right materials is half the battle, and your choices here will make the job go smoother and ensure your work lasts for years.
When it comes to the drip edge itself, you'll mainly be deciding between aluminum and galvanized steel. They both get the job done, but one is likely a better fit for your home and climate.
Drip Edge Material Comparison
Making the right material choice up front prevents headaches down the road. Here’s a quick breakdown to help you decide what’s best for your home, climate, and wallet.
| Material | Average Cost (per linear ft) | Best For | Key Considerations |
|---|---|---|---|
| Aluminum | $1 – $2 | Coastal or high-humidity areas. | Lightweight and easy to cut. Most importantly, it will not rust. |
| Galvanized Steel | $2 – $3 | Areas with hail or frequent tree branch fall. | Heavier and more durable against impact. The zinc coating prevents rust, but it can be scratched. |
Ultimately, both are solid choices. If you live near the coast, aluminum is a no-brainer. For most other climates, either will work, so it often comes down to budget and how easy you want the material to be to work with.
Understanding Drip Edge Profiles
Once you've picked a material, you'll see drip edge comes in different shapes, known as profiles. For installing on an existing roof, you'll almost always want the "Type D" profile.
This profile has a distinct T-shape with an extended outer flange. That little extra metal is a game-changer—it kicks water well clear of your fascia board, providing much better protection than a basic "L-style" bend. It’s designed specifically to cover the gap between the roof deck and fascia that’s common on many homes.
Pro Tip: Spend the extra few cents per foot for a Type D profile. It’s a small price for a big upgrade in performance and the best defense against water wicking back under your shingles—which is the whole reason you're doing this project in the first place.
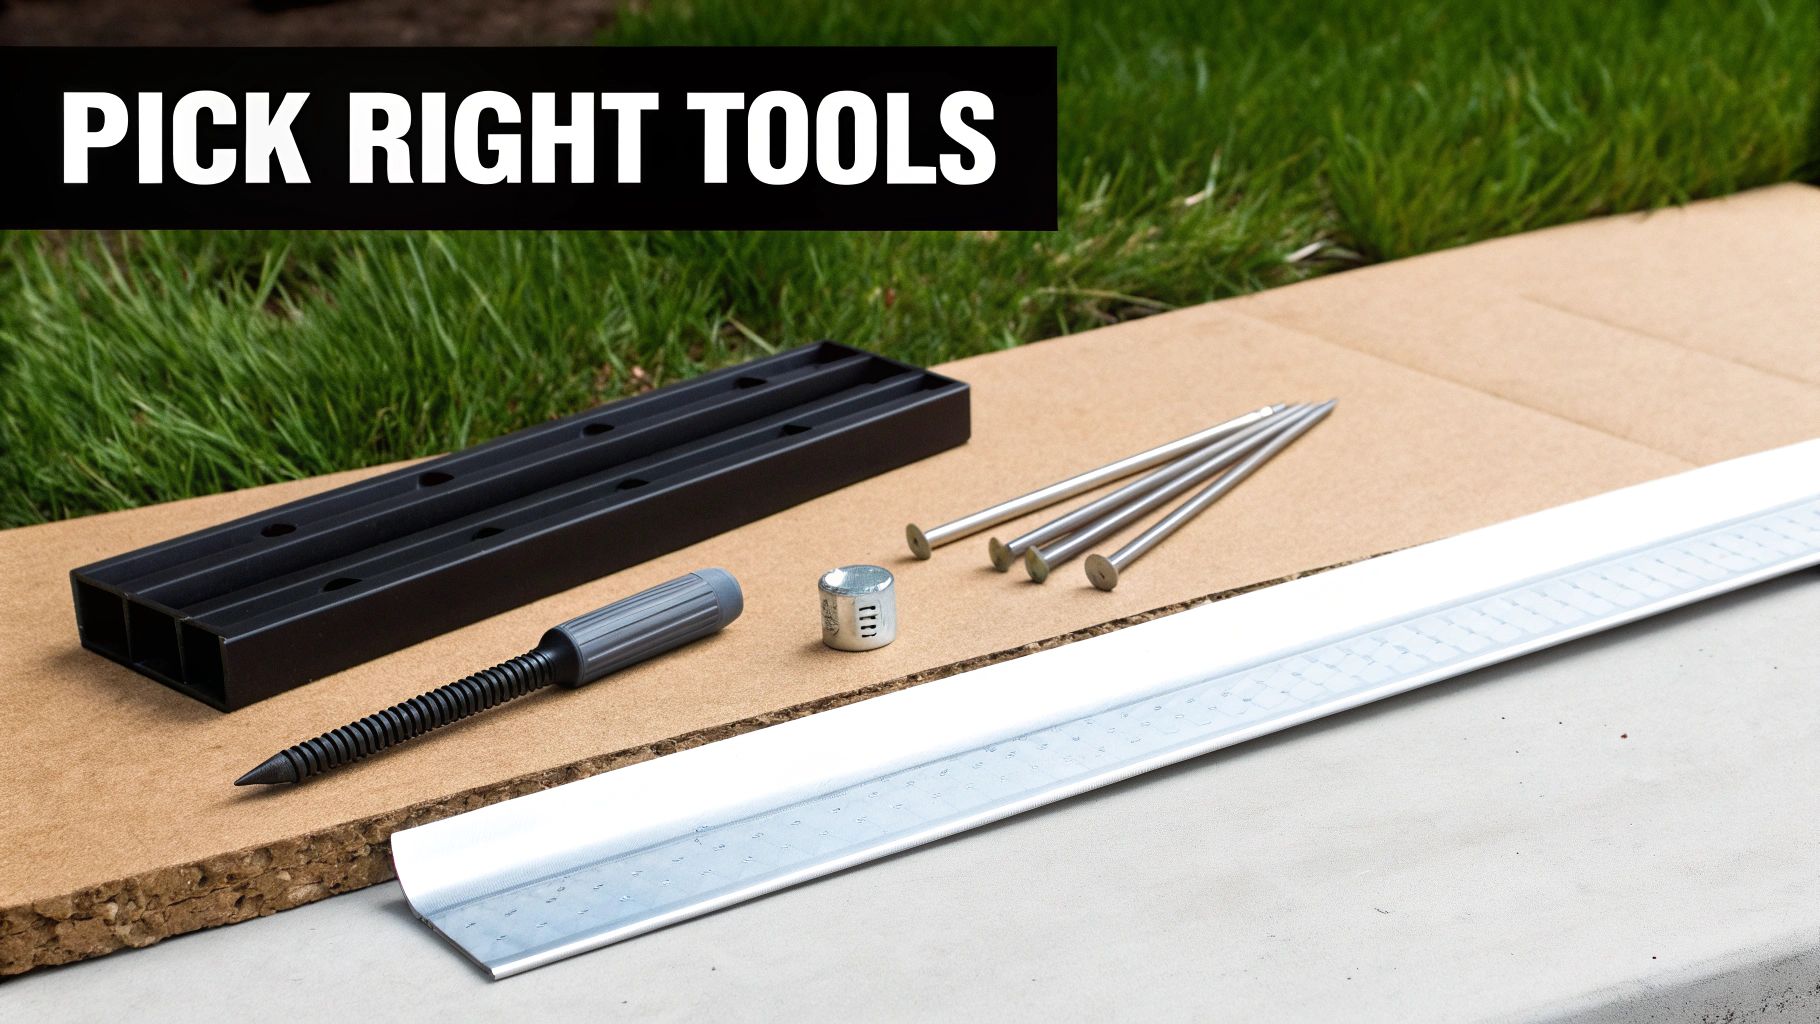
Your Tool and Supply Checklist
Nothing is more frustrating than having to stop mid-job for a tool you forgot. Gather everything you need before you start to keep things moving smoothly and safely.
- A sturdy extension ladder: Safety first. Make sure it's on stable ground.
- Flat pry bar or stiff putty knife: You'll need this to gently break the tar seal on the bottom row of shingles without damaging them.
- Tin snips (or aviation snips): Essential for making clean, straight cuts in the metal.
- Hammer and galvanized roofing nails: 1 ¼-inch nails are the standard for this job.
- Chalk line: This is your secret to a perfectly straight, professional-looking installation.
- Measuring tape: For accurate cuts and overlaps.
The total cost for a drip edge project can vary quite a bit. If you hire a pro, you could be looking at anywhere from $150 to $1,000, depending on your roof's size and complexity. If you're tackling it yourself, you can expect the materials to run about $1 to $3 per linear foot. For a deeper dive, you can read more about drip edge installation costs to get a better handle on budgeting.
Getting the Roof Edge Ready for Drip Edge
Here’s where a good job becomes a great one. Before you even touch a piece of drip edge, you need to prep the roof edge itself. This isn't just about cleaning up; it's about making sure the foundation for your new drip edge is solid and ready.
First things first, you'll need to gently lift up the first row of shingles. Be careful here. Older shingles get brittle and can snap if you're too aggressive. I like to use a flat pry bar to slowly work my way along the roofline, just breaking the old tar seal. You only need to lift them enough to slide the drip edge underneath—don't go crazy.
Check for Rot and Damage
With those shingles lifted, you get a good look at the parts of the roof that take the most abuse: the sheathing and the fascia board. This is your chance to play detective. Press down firmly on the wood along the edge of the roof.
Here’s what you’re hunting for:
- Soft Spots: If the wood feels spongy, that’s a red flag for water damage and rot.
- Fascia Board Decay: Look for dark, crumbly, or soft wood right at the top of the fascia.
- Torn Underlayment: Inspect the roofing paper or synthetic barrier. Is it ripped, brittle, or missing in spots?
If you find rot, stop what you're doing. Slapping new drip edge over rotted wood is a waste of time and money. The problem will just get worse. You must cut out and replace any compromised wood before moving on.
Dealing with bad sheathing or underlayment is non-negotiable. If you want to dive deeper into why this barrier is so crucial, our guide explains what roof underlayment is and the vital role it plays.
Once everything is solid, grab a chalk line. Snap a straight line along the roof edge to give yourself a perfect guide for the installation. It’s a simple trick that makes a huge difference in the final look.
Putting Your Drip Edge in Place
Alright, you've done the prep work, and now it's time to get the metal on the roof. The order you do this in isn't just a suggestion—it's the only way to make sure water sheds properly. Pros have a simple rule: eaves first, then gables. The eaves are the horizontal edges, and the gables are the sloped sides.
Think of it like siding or shingles: you always start at the bottom and work your way up. This ensures that any water running down the sloped gable edge will flow over the piece on the eave, not underneath it. Get this wrong, and you're just creating a funnel for water to get behind your fascia.
Before you even touch a piece of metal, though, your initial focus should be on a solid, safe setup. This quick visual breaks down those crucial first steps.

As you can see, this isn't about rushing. It’s about being methodical to make sure the roof is ready before you start adding new components.
Tackling the Eaves First
Pick a corner on one of the horizontal eaves to begin. Gently lift the first row of shingles and slide the first piece of drip edge underneath. The top flange should lie completely flat against the roof deck, while the outer edge hangs just over the fascia board. This small overhang is what kicks water away from the wood and directs it squarely into the gutter.
With the piece positioned correctly, it's time to fasten it down using 1 ¼-inch galvanized roofing nails. How you nail it is just as important as where you place it.
- Drive a nail every 12 inches or so, right down the center of the top flange.
- Make sure to put a nail at each end of the piece, about an inch in from the edge.
When you lay down the next piece, overlap it by at least two inches on top of the first one. This simple step is key to preventing water from wicking its way through the seams, giving you a solid barrier along the entire roofline. Just keep this pattern going until all the eaves are covered.
Here's a pro tip that makes a real difference: seal the overlap joints. A small bead of roofing cement or a good quality sealant between the overlapped sections adds an extra defense against wind-driven rain trying to find a way in.
Cutting and Fitting the Gable Edges
Once the eaves are done, you can move on to the gables (the sloped or "rake" edges). The process feels similar, but the layering is what truly matters here. Always start at the bottom of the slope and work your way up to the peak.
The first piece of gable drip edge must be installed so it lays over the eave drip edge where they meet at the corner. I can't stress this enough. If you reverse this, you've just built a chute that sends water right behind your fascia board, leading to the exact kind of rot you're trying to stop.
You'll need your tin snips to get the corners right. For a simple outside corner where the gable meets the eave, a 45-degree cut on the gable piece's flange will help it sit nicely. At the roof's peak, you'll need to cut and bend the pieces to form a tight, overlapping cap that sheds water effectively.
For a final layer of protection, especially where the drip edge interacts with gutters or fascia, run a bead of a high-quality sealant like Everbuild Roof Gutter Sealant. This creates that last, critical seal against any lingering moisture.
Finishing the Job and Common Mistakes to Avoid
With the drip edge fastened down, you're on the home stretch. But these last few details are what truly make for a professional, long-lasting job. Your final task is to secure the shingles you carefully pried up earlier.
Just apply a quarter-sized dab of roofing cement under each shingle tab you lifted. Press it down firmly to make sure it creates a solid bond. This simple step restores the shingle's wind resistance and keeps everything locked in place. I also like to add a tiny dot of sealant over each nail head along the drip edge flange for an extra layer of waterproofing.
Pitfalls to Watch Out For
I’ve seen a lot of DIY drip edge jobs over the years, and a few common errors pop up time and time again. Knowing what not to do is just as important as knowing the right steps for installing drip edge on an existing roof.
Keep an eye out for these frequent mistakes:
- Incorrect Overlap Direction: This is the big one. The drip edge on the sloped gables must always go over the pieces on the horizontal eaves. If you do it the other way around, you're literally building a funnel that directs water right behind your fascia board, leading to rot.
- The Wrong Fasteners: Using nails that are too long is a classic rookie mistake. They can pop through the underside of your roof sheathing, giving water a direct path into your attic. Stick with 1 ¼-inch galvanized roofing nails—they're the right tool for the job.
- Forgetting the Overlap: Don't just butt the ends of the drip edge sections together. Each new piece needs to overlap the previous one by at least two inches. Anything less creates a gap that water will inevitably find.
A great drip edge installation is only one part of a healthy roof drainage system. It works hand-in-hand with your gutters. To make sure the whole system is working properly, check out our guide on how to clean downspouts and gutters.
Answering Your Drip Edge Installation Questions
Even after walking through the steps, a few common questions always seem to come up when it's time to get hands-on with a drip edge installation. Getting these details right is what separates a professional, leak-proof job from a future headache.
Can I Install Drip Edge Without Removing Any Shingles?
I get this question a lot. While it seems like a great shortcut, you really can't install drip edge properly without touching the shingles.
The whole point is to create a seamless path for water to travel off the roof. To do that, you have to carefully lift the edge of that first row of shingles. This lets you slide the drip edge underneath, right where it belongs. If you just tack it on top, you're inviting water to sneak under the shingles and rot your roof deck.
What Is the Difference Between Installing on Eaves Versus Rakes?
The order you install the pieces in is everything. Think about how water flows downhill—you want every piece to overlap the one below it.
You always start with the eaves (the horizontal bottom edges of the roof). The drip edge goes on before the underlayment and shingles. Then, when you move to the rake edges (the sloped sides), the drip edge is installed over the underlayment. This layering makes sure water coming down the rake flows over the eave drip edge, not behind it.
Yes, absolutely. Overlapping each section by at least one to two inches is critical. This creates a continuous barrier and prevents water from seeping through the seams between pieces, which would defeat the entire purpose of the drip edge.
For professional roofers, mastering these techniques is part of the job, but finding the next project is just as important. If you're looking to grow your business, you might find services that offer new roofing leads in Denver a useful resource.
If you've gotten up on the ladder and realized the job is more than you bargained for, or if you've spotted some other issues with your roof, don't hesitate to call in a pro. Penn Ohio Roofing & Siding Group brings over 25 years of hands-on experience to every job, making sure your roof is buttoned up and built to last. Reach out to us for a free estimate at https://pennohiorc.com.