
That sinking feeling when you spot a water stain on your ceiling is something no Hermitage homeowner wants to experience. But don't panic—a fast, measured response can make all the difference, turning a potential catastrophe into a manageable repair. Your first moves are all about controlling the damage inside your home.
What to Do When You Find a Hole in Your Roof
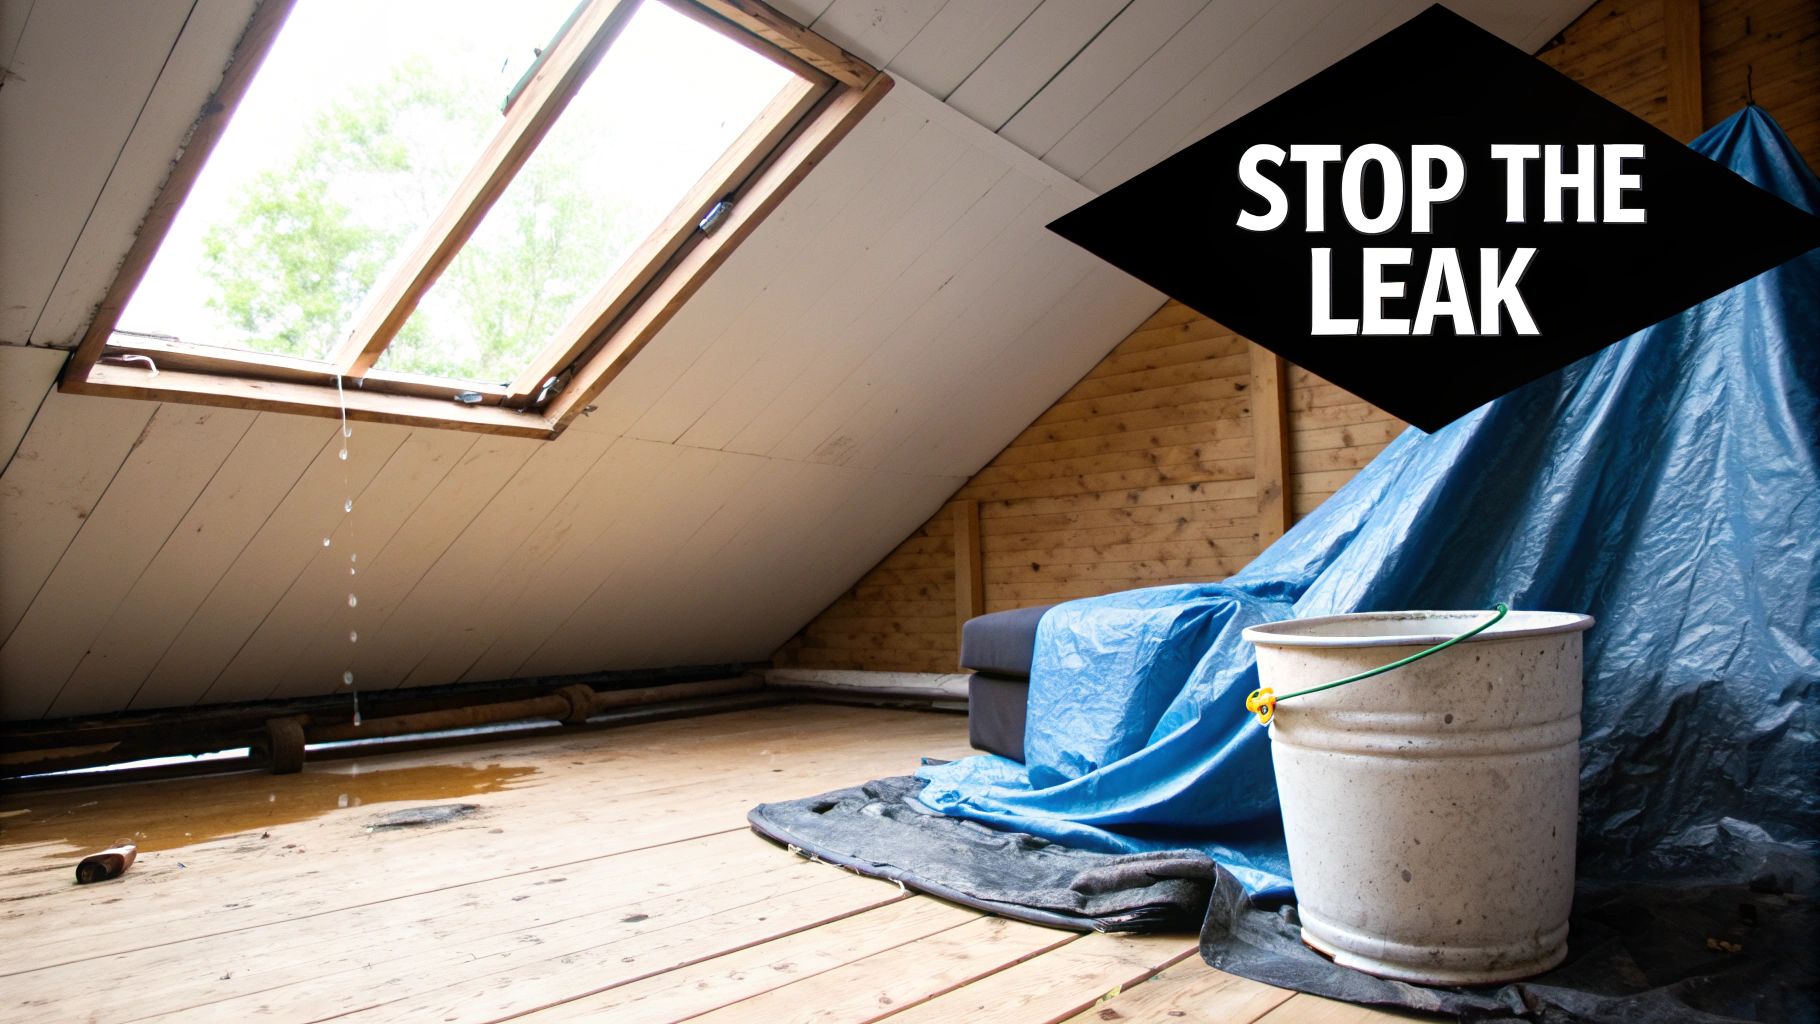
The instant you see that stain or hear that drip, your priority shifts to damage control. Fast action can be the difference between a small ceiling patch and a major renovation involving drywall, insulation, and ruined furniture.
Your immediate job is to catch the water. Grab whatever you can—buckets, plastic totes, even a clean trash can—and get it directly under the leak. If water is splashing out, surround the container with old towels or blankets to soak up the overspray.
For a larger leak that’s saturating the ceiling, you might need a more creative solution. You can create a makeshift funnel by tacking a heavy plastic tarp to the ceiling, directing the water from a wide area down into a single large bucket. This keeps the water contained and prevents it from spreading.
When you have a roof leak, a quick and safe assessment is critical. This table outlines a step-by-step plan to help you evaluate the situation without putting yourself at risk.
Immediate Roof Damage Response Plan
| Assessment Area | Key Indicators to Check | Recommended Immediate Action |
|---|---|---|
| Interior Living Space | Spreading water stains, active drips, peeling paint or drywall. | Place buckets/tarps under leaks. Move furniture and valuables out of the way. |
| Attic | Daylight visible, wet insulation, dark stains on roof decking. | Use a flashlight to trace the water path. Step only on joists. |
| Exterior (From Ground) | Missing shingles, debris on roof, damaged flashing. | Visually inspect from the ground with binoculars. Do not climb the roof. |
| Documentation | All visible damage—inside and out. | Take extensive photos and videos for your insurance claim. |
Following these initial steps will secure your home and give you the information you need before deciding on a permanent repair or calling a professional.
Safely Assess from the Attic
Once you've managed the immediate mess inside, it's time to play detective. The safest place to start your investigation is from the attic, not the roof itself. Never climb onto a potentially damaged roof, especially if it's wet or windy. The structure could be compromised, and a fall is a serious risk.
Grab a good flashlight and head up to the attic. Move carefully, making sure to step only on the solid wood joists. A misstep could send you right through the ceiling drywall below.
You’re looking for the smoking gun—the exact spot where water is getting in. Keep an eye out for these telltale signs:
- Beams of Daylight: The most obvious clue. If you can see the sky, you’ve found a hole.
- Water Stains: Look for dark, streaky, or circular stains on the underside of the plywood roof deck.
- Soggy Insulation: Check for insulation that looks compressed, damp, or discolored. Water can travel along rafters, so the leak's entry point might be several feet away from where it's dripping.
- Active Drips: If it's still raining, you can often trace the drips right back to the source.
Document Everything and Protect the Area
While you’re up there, use your phone. Take clear photos and videos of everything you see: the entry point, the stained wood, the soaked insulation, and the path the water is taking. This documentation is gold when it comes time to file a homeowner's insurance claim.
Pro Tip: Solid documentation is your best friend when dealing with insurance adjusters. Get shots from multiple angles, showing both the source of the leak in the attic and the resulting damage to your living space. It paints a clear picture of the incident's full impact.
After you've gathered your evidence, the final immediate step is to get a temporary patch on the outside to stop more water from coming in. This almost always means securing a heavy-duty tarp over the damaged area. Remember, this is just a temporary stopgap to buy you time, not a real fix for a hole in your roof. It protects your home from further damage while you plan a proper, permanent repair.
Identifying the Cause to Find the Right Fix
So, you've found a hole in your roof. That's the first step, but the real detective work is figuring out why it's there. A quick patch might seem like the answer, but if you don't understand the root cause, you'll be back up on that ladder sooner than you think.
The cause of the damage dictates everything—what materials you need, how quickly you need to act, and whether this is a job you can handle yourself. Some problems are obvious and dramatic, while others are sneaky, developing quietly for years right above your head.
Sudden and Severe Damage
Here in Hermitage and the surrounding counties, we know our weather can turn on a dime. A nasty spring thunderstorm or the high winds from a passing storm system are often the biggest culprits for sudden roof damage.
When Mother Nature is to blame, the evidence is usually pretty clear:
- Fallen Limbs or Trees: This is the most dramatic cause. An impact from a heavy branch doesn't just punch a hole; it can easily crack shingles, splinter the underlying decking, and even compromise the roof's structure.
- High Winds: You'd be surprised how easily a strong gust can get underneath an asphalt shingle, breaking the sealant and ripping it clean off. This leaves the underlayment exposed and vulnerable.
- Hail Impact: Hail is a different beast. It often leaves small, circular dings or "bruises" on shingles, knocking off the protective granules. Those spots then wear down much faster, eventually leading to a leak.
Understanding exactly what happened is key. For instance, widespread hail impacts require a very different approach than just a few missing shingles. You can learn more about specific solutions for hail damage roof repair.
Slow and Sneaky Problems
Not every hole is the result of a big storm. In my experience, many of the most damaging leaks come from small issues that go unnoticed for a long time. They start small and grow into major headaches.
Keep an eye out for these more subtle culprits:
- Material Aging: Nothing lasts forever. After 15-20 years, asphalt shingles get brittle and start to crack. Metal flashing around chimneys and vents can rust through. It’s just the natural lifecycle of a roof.
- Improper Installations: That old satellite dish mount that was never sealed correctly? Or the bathroom vent that wasn't flashed properly? These are prime entry points for water.
- Pest Damage: Don't underestimate squirrels and raccoons. They can chew right through shingles and decking to find a cozy place to nest, creating persistent leaks in the process.
These slow-burn issues are often why it can be so hard to figure out where a leak is actually coming from. Water can travel a long way from the entry point. Our guide on how to find roof leaks can help you play detective and trace that water trail back to its source.
A single popped nail might not look like much, but it creates a perfect little highway for water to get under your shingles. Over one rainy season, that tiny opening can cause a surprising amount of rot in your roof deck, and you won't see a thing from the ground.
Connecting the Cause to the Solution
Once you have a good idea of what caused the hole, you can make an informed decision on how to fix it. This is the crucial point where you separate a simple weekend DIY task from a job that absolutely needs a professional.
Think about it this way:
- A single missing shingle from a windstorm is often a manageable fix for a handy homeowner.
- But widespread granule loss after a hailstorm indicates the integrity of the entire roof slope is compromised. That's a much bigger problem that really needs a pro to assess.
- A hole from a removed pipe or vent needs more than a simple patch. To do it right, it has to be framed in, decked, and sealed so it becomes a seamless part of the roof structure again.
Dealing with a hole in the roof is something many homeowners will face. On average, the cost for a roof repair in 2025 is estimated to be around $750. Of course, this can swing widely depending on the job. In the U.S., a simple fix might only be $300, while a more complex repair involving structural work could easily top $1,500.
By taking the time to correctly diagnose the problem, you're not just patching a hole—you're ensuring the fix will last, protecting your home for years to come.
How to Repair Holes on Different Roof Types
Alright, let's get down to the actual repair work. How you fix a hole in your roof really comes down to what kind of roof you have. An asphalt shingle roof needs a completely different approach than a metal or flat roof. Each one has its own quirks and requires the right tools to get a solid, lasting seal.
This infographic gives a good snapshot of what we're usually up against.
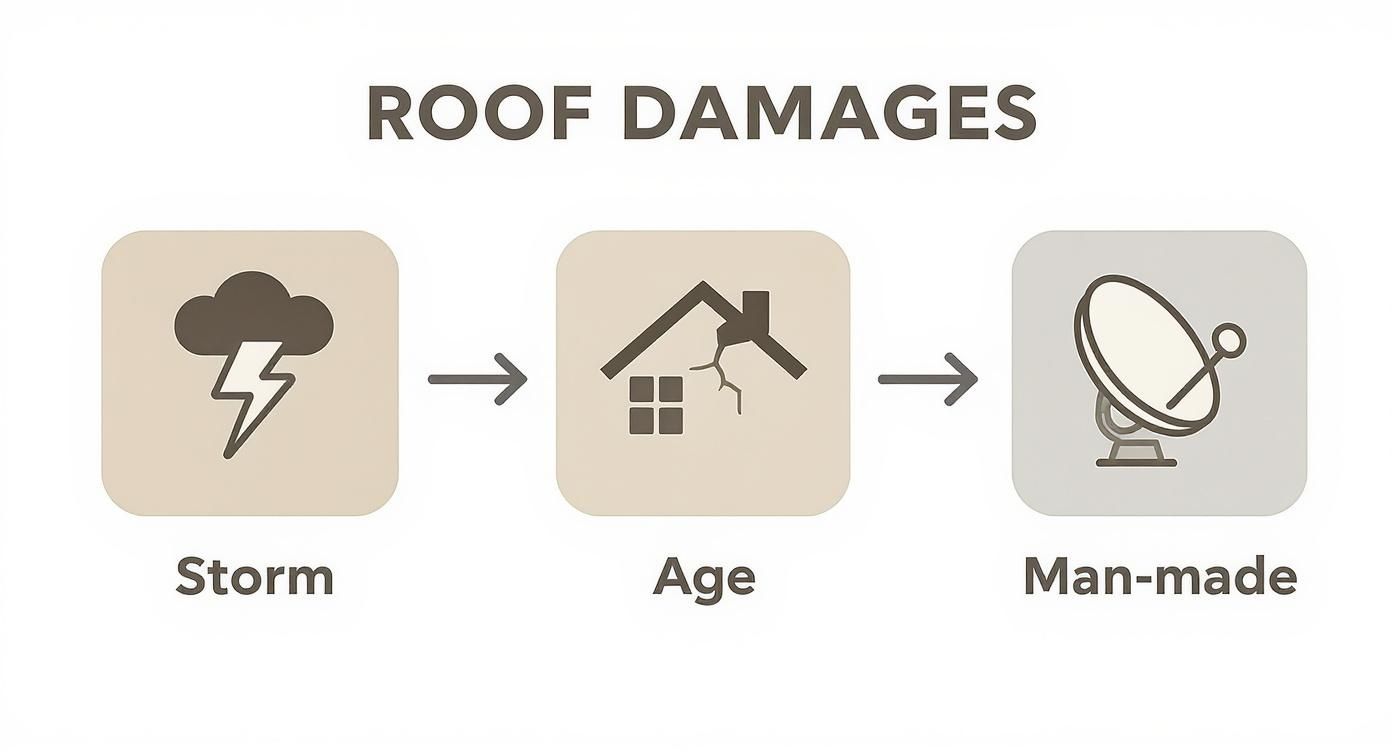
As you can see, the damage we find usually traces back to a big storm, the roof simply getting old, or something man-made like a poorly installed satellite dish. Understanding what caused the hole is the first step because it often dictates the best way to fix it for good.
Repairing Holes in Asphalt Shingle Roofs
Asphalt shingles are everywhere around here, and the good news is they're one of the easier types to repair. The main goal is to swap out the damaged shingle without messing up the ones around it.
You'll need a few specific tools for this. Your best friend is going to be a flat pry bar. Grab that, a hammer, some 1 ¼-inch roofing nails, a sharp utility knife, and a tube of quality roofing cement.
First, you have to carefully break the seal on the shingles in the row just above the one you're replacing. Use your pry bar to gently lift their bottom edges, which will expose the nail heads holding the damaged shingle in place. Pop those nails out, and the old shingle should slide right out.
Slide the new shingle into place, making sure it's aligned correctly. Then, nail it down with four roofing nails, placing them just underneath the sealant strip so the shingle above will cover them. The last step is critical: put a small dab of roofing cement over each nail head you just put in and under the tabs of the shingles you had to lift. This creates that essential watertight seal.
Crucial Tip: Never drive a nail through the bottom, exposed part of a shingle. Nails must always be covered by the shingle in the next row up. An exposed nail head is just a future leak, no matter how much gunk you smear on it.
Tackling Repairs on Metal Roofs
Metal roofing is tough, but it's not bulletproof. We see small punctures all the time from falling branches or screws that were driven in a little too aggressively. The upside is you usually don't have to replace a whole panel for a small hole.
For minor punctures, it's all about sealing and patching. You'll want a wire brush, a solvent or cleaner made specifically for metal roofs, a top-notch metal roofing sealant, and maybe a patch kit.
Start by scrubbing the area around the hole with your wire brush and solvent. You need to get rid of any rust, grime, or old sealant so the new patch can get a death grip on the metal. For a tiny pinhole, sometimes a thick glob of a UV-stable polyurethane or butyl sealant is all you need.
If the hole is bigger, you'll need a patch. This could be a scrap piece of matching metal or a peel-and-stick patch designed for metal roofs. Squeeze a bead of sealant around the hole, press your patch down hard, and then apply another bead of sealant around the outside edges of the patch. That double seal is what makes the repair last.
Fixing Holes on Flat Roofs
Flat roofs, common on commercial buildings and many home additions in the area, are a different animal entirely. Most of these are covered in a rubber membrane like EPDM or TPO. Fixing a hole here feels more like patching a bike's inner tube than working with shingles.
Your go-to tools will be a special membrane cleaner, a primer, the patch material, and a small, hard seam roller. Be careful here—using the wrong chemical cleaner or adhesive can literally dissolve the membrane. Stick with products made for your specific roof type.
You’ll want to clean an area much bigger than the hole itself. Once it's perfectly clean and bone-dry, apply the primer where the patch will go.
Next, cut a patch with rounded corners; sharp corners can get caught and start to peel up over the years. Make sure the patch extends at least two inches beyond the hole on all sides. When you're ready, peel off the backing, lay it over the primed area, and use your roller to press it down. Start from the center and work your way out to force out any air bubbles. A clean, bubble-free bond is everything. For those thinking of tackling this on their own, it’s worth checking out a comprehensive DIY guide on how to fix a hole in a roof.
No matter what kind of roof you're on, the basic rules for a solid repair never change:
- Prep is everything. You absolutely must start with a clean, dry surface.
- Use the right stuff. Don't grab a tube of all-purpose silicone from the hardware store. Get sealants and materials made for your roof.
- Think like water. Your goal is to create overlapping seals that shed water down and away from the weak spot.
By matching your repair strategy to your roof type, you can confidently patch up many common issues and keep your home protected.
Roof Repair Safety You Should Never Ignore
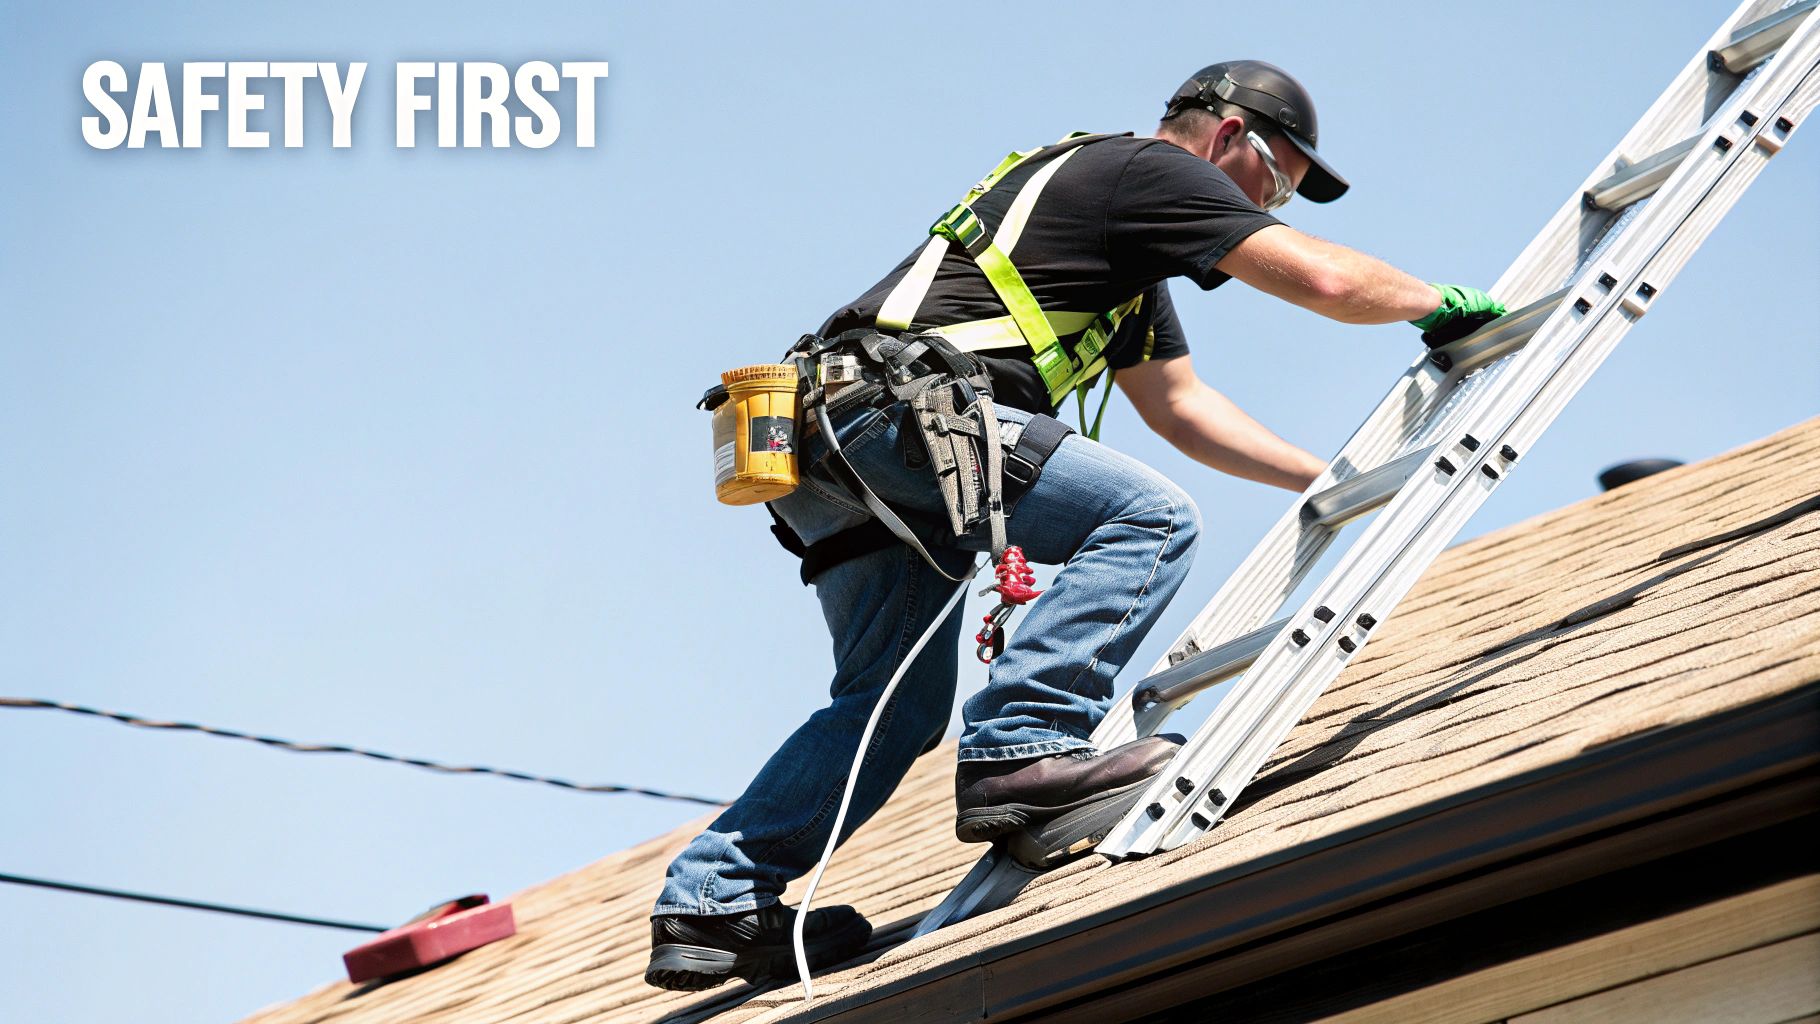
Before you even touch a ladder, let's have a frank discussion. Getting up on your roof is inherently dangerous work. It doesn't matter if it's a simple patch or something more involved—gravity is always a factor, and one wrong move can change everything. This isn't about scaring you; it's about respecting the very real risks so you can get the job done and walk away safely.
Ignoring basic safety is the quickest way to turn a manageable home repair into an emergency room visit. Let’s get beyond the obvious and talk about what a smart, safe setup actually looks like.
Your Essential Safety Gear
Working on a roof without the right personal protective equipment (PPE) is a huge gamble. It's just not a place to skimp or try to make do with what you have lying around.
Here's your non-negotiable safety kit:
- Proper Footwear: This is your first line of defense. You need sturdy, rubber-soled boots or shoes with aggressive tread. Worn-out sneakers are an absolute no-go; they offer zero reliable grip.
- Safety Harness: If your roof has any kind of noticeable pitch, a personal fall arrest system (PFAS), also known as a safety harness, is a must-have. It's useless, though, unless it's anchored to a solid structural point on the roof.
- Gloves and Glasses: Simple, but crucial. Good gloves protect your hands from splintered wood and sharp shingles, while safety glasses keep debris, dust, and sealant out of your eyes.
Think of this gear as your personal insurance policy. It’s what stands between a minor slip and a life-altering injury.
Falls are the leading cause of death in the construction industry, and a shocking number of these happen on residential projects just like this. A properly worn and anchored safety harness can reduce the risk of a fatal fall by over 80%.
Setting Up a Safe Work Zone
Your safety plan starts on the ground, long before you start climbing. It all begins with your ladder.
First, make sure your ladder extends at least three feet above the roof's edge. This gives you a secure handhold when you’re transitioning on and off the roof, which is one of the most common places people fall. Then, use the 4-to-1 rule for the angle: for every four feet up to the support point (where the ladder touches the house), the base should be one foot out from the wall.
Always, always place your ladder on solid, level ground. If you’re working on soft dirt or uneven grass, lay down a wide, sturdy board to place the ladder's feet on. This prevents it from sinking or kicking out from under you. It’s a simple step that provides critical stability.
Critical Environmental Checks
Even with the best gear, Mother Nature gets the final say. Trying to work on a roof in poor conditions is just asking for trouble.
- Moisture is a No-Go: Never, ever work on a wet roof. Morning dew, frost, or a passing shower can make even a low-sloped roof feel like an ice rink.
- Mind the Wind: A strong gust of wind here in Middle Tennessee can catch you completely off guard. It can throw you off balance or, worse, catch a tool or a piece of material you're holding and pull you right along with it. Always check the forecast and wait for a calm day.
- Beware of Power Lines: Before you even raise the ladder, look up. Get a clear picture of where every power line is and make sure your ladder, tools, and body will stay far, far away from them.
Finally, and this one is important, have a spotter on the ground. They can secure the base of the ladder, hand you tools, and be there to call for help immediately if anything goes wrong. Tackling a roof repair by yourself is a risk that is never worth taking.
Knowing When to Call a Roofing Professional
A can-do attitude is fantastic for most home projects, but a smart homeowner also knows their limits. When it comes to a hole in your roof, the line between a manageable weekend task and a job that demands an expert is finer than you might think. Getting it wrong doesn't just risk a leaky patch; it puts your safety on the line.
Learning to spot the red flags—the signs that a problem is way beyond a DIY fix—is absolutely essential. These aren't just suggestions. They’re serious warnings that the damage you see is likely just the tip of the iceberg. Pushing forward without the right training can quickly turn a small issue into a costly nightmare.
Red Flags That Demand a Professional Eye
Some problems are clear giveaways that it's time to put down the tools and pick up the phone. If you run into any of these, your safest and best bet is to call a licensed roofer immediately.
- Visible Damage to the Roof Deck: If you're in the attic and see splintered, soft, or waterlogged plywood, the problem is no longer just about the shingles. This means the roof's structural layer is compromised and needs far more than a simple patch.
- Leaks in Multiple Spots: One drip is a problem. Multiple drips in different rooms point to a much bigger, more widespread issue. You could be looking at a systemic failure of your roofing material or underlayment, not just one isolated hole.
- A Sagging Roofline: Any dip or bow in your roof is a massive structural red flag. It often points to failing rafters or trusses, likely weakened by long-term water damage. This is a serious safety hazard. Under no circumstances should you ever get on a sagging roof.
- Damaged or Missing Flashing: Those metal strips around your chimney, vents, and valleys are called flashing, and they are your roof’s first line of defense in its most vulnerable spots. If the flashing is rusted, bent, or pulling away, it takes a skilled hand to repair or replace it correctly.
Don't forget to consider your roof's pitch. A simple repair becomes exponentially more dangerous as the slope gets steeper. Without professional safety gear and the experience to use it, the risk of a life-altering fall is just too high.
The Long-Term Value of an Expert Repair
Hiring a professional roofer is really an investment in your peace of mind. Their value goes way beyond just plugging a hole. A seasoned roofer brings a trained eye that can spot subtle issues you'd almost certainly miss, like hidden hail damage or the early signs of a failing underlayment.
Their expertise guarantees the job is done right—not just patched, but properly integrated into your roofing system. Professionals know the specific building codes for Hermitage and the surrounding counties, ensuring the work is up to standard. Finding the right person for the job is critical, and our guide on how to choose a roofing contractor offers some great tips for making a confident decision.
A professional repair almost always comes with a warranty. This guarantee on both the materials and the workmanship means that if the repair fails, they come back and fix it. That's a level of assurance you just can't get when you do it yourself.
The demand for skilled roofers speaks for itself. The industry saw the number of roofing contractors in the U.S. grow by 2.2% between 2023 and 2024 alone. With the market valued at roughly $56.7 billion in 2024, a huge slice of that comes from repairs just like this, showing how many homeowners rely on professional expertise. You can learn more about roofing industry trends and costs on Angi.com.
Ultimately, deciding whether to call a pro comes down to weighing the risk against the reward. While replacing a single shingle might be in your wheelhouse, anything more complex requires the tools, safety protocols, and deep knowledge only a professional brings to the table.
Common Questions We Get About Roof Holes
Even with a good guide, you’re bound to have some lingering questions about fixing a hole in your roof. That’s completely normal. Let's run through some of the most common questions we hear from homeowners in Hermitage and the surrounding areas, and hopefully, we can bust a few myths for you.
How Long Will a Temporary Roof Patch Actually Last?
A temporary patch, whether it's a well-strapped tarp or a quick smear of roofing cement, is just first aid for your house. Its only job is to buy you some time. Depending on the weather we get, a temporary fix might hold up for a few weeks or, if you're lucky, a few months.
But you should never, ever mistake it for a permanent solution. These patches are only designed to stop the immediate bleeding—the water pouring into your home—while you arrange for a proper repair. The real danger is that moisture can still get trapped underneath, leading to wood rot and mildew in the roof deck that you won't see until it's a massive problem.
A temporary patch is your emergency brake, not your engine. Use it to stop the crisis right now, but don't count on it to get you down the road. The longer you wait for a real fix, the higher the risk of more expensive, hidden damage.
Can I Just Use Silicone Caulk to Fix a Small Hole?
This is easily one of the most common—and costly—mistakes we see people make. Grabbing a tube of standard household silicone caulk from the hardware store to patch a roof hole is a recipe for disaster. Plain and simple, those products are not built to survive on a roof.
Think about it: your roof bakes in the summer sun, freezes in the winter, and gets blasted with UV rays all year long. Household caulk will turn brittle, crack, and pull away from the roofing material in no time. You'll be right back where you started, but with a false sense of security that everything is fine.
For a durable, watertight bond that can expand and contract with your roof, you absolutely must use products made specifically for roofing. That means a high-quality roofing cement or a professional-grade sealant formulated for your specific material, whether it’s asphalt, metal, or rubber.
Will My Homeowner's Insurance Cover My Roof Repair?
When it comes to insurance covering a hole in your roof, the answer is almost always a classic "it depends." The deciding factor is nearly always what caused the damage in the first place.
Most policies will cover the repair costs (minus your deductible) if the hole was caused by a sudden, one-time event. This usually includes things like:
- Storms with high winds that tore off shingles.
- Punctures and dents from a bad hailstorm.
- A tree or a heavy branch falling on your roof.
On the flip side, insurance will almost certainly deny a claim if the problem stems from neglect or just old age. This includes leaks from worn-out, cracked shingles or failing flashing that should have been maintained. The key is to document everything with photos right after the damage happens and call your insurance agent to go over your specific policy.
What Is the Best Time of Year to Repair a Roof?
For most roof repairs, the sweet spot is mild, dry weather. Here in our area, that makes late spring and early fall the perfect seasons for this kind of work. The moderate temperatures allow roofing adhesives and sealants to cure properly, which is crucial for creating the strongest possible bond.
Trying to do a repair in the dead of summer can be tricky. The intense sun can make asphalt shingles so soft that they're easy to damage just by walking on them. Winter repairs are even tougher; cold temps make shingles brittle and prone to cracking, and sealants have a hard time sticking correctly. And that’s not even mentioning the serious safety hazards of dealing with ice or snow on a roof.
Don't let a hole in your roof turn into a catastrophe. If you're looking at damage that feels like more than you can handle, the experienced team at Penn Ohio Roofing & Siding Group is here to help. We provide reliable, professional repairs to protect your home and give you back your peace of mind. Contact us today for a free estimate and a lasting solution.