You walk outside after a Mercer County winter and the house tells you what it needs. Paint is peeling off old wood near the sunny side. Aluminum looks chalky and tired. A loose panel rattles when the wind picks up. Around Hermitage, that usually means the siding has stopped being a finish problem and started becoming a protection problem.
That’s why so many local homeowners end up looking hard at vinyl siding installation Hermitage PA. It fits the climate, it keeps the budget in line better than many alternatives, and when it’s installed correctly, it handles the seasonal temperature swings that punish exterior materials in western Pennsylvania. The key phrase there is installed correctly. Good vinyl work looks simple from the street. It isn’t simple on the wall.
Is Vinyl Siding Right for Your Hermitage Home
A lot of siding jobs in Hermitage start the same way. A homeowner calls after seeing one obvious problem, then finds three more once they begin looking closely. Caulk lines around windows are cracked. Bottom edges near the splash zones feel soft. The west side of the house looks faded more than the north side. None of that is unusual here.
Vinyl has become the default choice for many homes for practical reasons, not because it’s trendy. In Pennsylvania markets like Hermitage, vinyl accounts for over 60% of new residential installations, and a typical 1,600 square foot project is often completed in 1 to 2 weeks, with Hermitage code updates simplifying over 90% of standard installations because permits are generally only required for structural changes, according to regional vinyl siding installation data for PA markets.
Why local homeowners keep choosing vinyl
Vinyl makes sense when the house needs protection first and appearance second, but you still want both. It doesn’t ask for the same repainting cycle that wood does. It also gives you more flexibility on style than many homeowners expect.
If you’re still comparing profiles, trim ideas, and exterior combinations, it helps to look at broader general siding solutions to understand what changes from one material to another and what stays the same at the wall assembly level.
Here’s where vinyl usually fits well in Hermitage:
- Older homes with recurring paint issues: If the same elevations keep peeling, the problem often goes deeper than surface coating.
- Homes with faded or dented aluminum: Replacement usually makes more sense than chasing cosmetic repairs.
- Owners who want lower upkeep: Vinyl works well for people who don’t want to scrape, patch, and repaint every few years.
- Homes with mixed architectural lines: Lap siding, vertical panels, shake accents, and board and batten all give you design room without changing the whole structure.
Practical rule: Vinyl is a solid choice when you want a clean exterior, predictable maintenance, and a system that can be installed quickly without turning the house into a long construction project.
Where vinyl works best and where homeowners should pause
Vinyl is a strong option, but it isn’t magic. It won’t fix bad wall prep. It won’t stop leaks if flashing is wrong. And it won’t hide major wave or sag in an older wall if the installer skips the flattening work.
It’s also worth being honest about expectations. If your current siding issue is mostly biological staining or surface grime, replacement may not be the first move. Sometimes cleaning buys time. If that’s the question you’re sorting out, this guide on how to clean mold off vinyl siding is useful before you decide between maintenance and a full replacement.
For many Hermitage homes, though, vinyl lands in the sweet spot. It’s practical, durable, and well suited to the kind of weather this area throws at a house.
Planning Your Siding Project A Hermitage Checklist
The best siding jobs are won before the first panel comes off the bundle. Bad planning shows up later as delays, change orders, odd trim decisions, and walls that don’t look right when the sun hits them. Good planning makes the install cleaner, faster, and less stressful.
Start with the style, not the color
Homeowners often pick a color first. That’s backwards. Start with the profile and the trim layout because those decisions change how the home reads from the street.
Common choices in Hermitage include:
- Traditional horizontal lap: Safe, familiar, and fits almost any neighborhood.
- Vertical siding: Works well on gables, additions, and homes where you want more height visually.
- Shake accents: Usually used sparingly in peaks or entry areas.
- Board and batten: A good fit for farmhouse-style updates or mixed-texture exteriors.
Once the profile is locked in, then color, soffit, fascia, and shutter decisions get easier.
Think hard about insulated vinyl
Not every home needs insulated vinyl, but some homes benefit from it more than others. If your walls feel cold in winter, or if your current exterior has little thermal value, insulated vinyl deserves a serious look.
Localized Hermitage cost guidance notes that the long-term return depends on local weather performance, and while the initial investment is about $4,000 to $7,000, proper installation can improve energy efficiency by up to 30% over the siding’s lifespan in Pennsylvania weather, according to Hermitage vinyl siding cost information.
That doesn’t mean every house will see the same result. It means insulation value matters more here than in a mild climate.
Use a real planning checklist
Before you sign a contract or order materials, check these items:
Confirm the scope
Decide whether you’re replacing only wall cladding or also replacing soffit, fascia, trim coil, gutters, and light blocks.Inspect problem areas
Look closely at hose bibs, window heads, door pans, deck attachments, and lower wall sections where snow and splash-back hit hardest.Ask about wall flatness
Older Hermitage homes often need furring or surface correction before new siding goes on.Choose trim details
Corner width, window casing look, starter heights, and transition lines matter more than commonly realized.Plan for noise and access
Move grills, patio furniture, and vehicles. Crews need space to work safely around ladders and debris.
The cleanest projects are the ones where the homeowner and installer have already decided what happens at every corner, light fixture, and window before tear-off starts.
Know when Hermitage permits matter
A lot of standard vinyl work moves smoothly because permit requirements are lighter when the work is non-structural. That said, homeowners shouldn’t guess. If the project includes wall repairs, framing changes, window resizing, or anything structural, ask the city first.
A practical approach is simple:
- Call before work starts if framing, sheathing replacement beyond spot repair, or structural modification is expected.
- Get zoning clarity if additions, setbacks, or exterior changes affect property lines or accessory structures.
- Build a realistic schedule that includes material delivery, tear-off, prep, installation, and final cleanup.
In Hermitage, the easiest siding jobs are the ones planned like construction projects, not weekend makeovers.
DIY Installation vs Hiring a Hermitage Professional
A Hermitage homeowner can watch a few videos, rent staging, and start hanging panels on a Saturday. The true test comes in January, after a hard freeze, wind off the valley, and another round of snow melt hitting the same wall. Siding that looked fine in mild weather starts to show the truth fast. Crooked lines stand out in low winter light. Loose nailing shows up when panels rattle. Water problems usually trace back to the cuts and trim details around openings, not the broad wall.
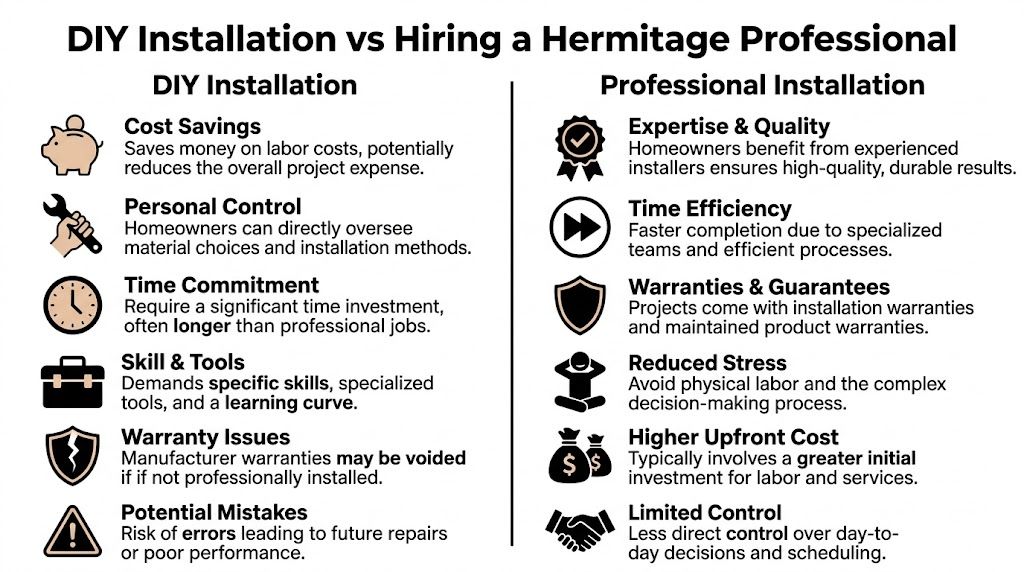
Where DIY makes sense
DIY can work on a small, simple section. A detached garage, a shed, or one low wall with few penetrations is a reasonable place to learn. On that kind of area, mistakes stay limited, access is easy, and you are not fighting second-story height, porch roofs, or a row of window heads.
It also helps if you already know how to lay out a wall, read level lines, and order material correctly. Homeowners who start by learning how to measure vinyl siding for a house usually make better decisions before the first box shows up. Bad takeoffs create expensive problems. Running short mid-job or overordering trim pieces is common on first attempts.
Where DIY jobs get into trouble
Hanging the panel is the easy part. The detail work decides whether the wall looks professional and whether it handles Mercer County weather.
Common trouble spots include:
- Layout drift. If the starter course is off, every course above it carries the error.
- Window and door cuts. Short tabs, tight cuts, and sloppy J-channel work show immediately.
- Nailing technique. Panels need room to move. Nail them tight and they buckle in summer heat.
- Transitions. Gables, porch tie-ins, band boards, and roof-to-wall areas take patience and planning.
- Ladder and staging safety. Two-story work is where a money-saving project can turn into a hospital bill.
Older homes in Hermitage make this harder. Walls are often out of plane, corners are not perfectly true, and past repairs leave uneven backing that has to be corrected before the siding goes on. A homeowner may not notice that problem until the courses start telegraphing every dip and hump.
What a professional crew brings
A good siding crew is buying speed, yes, but that is not the main value. The primary value is judgment.
Experienced installers know where freeze-thaw cycles punish a wall first. They leave proper movement clearance. They know when a wall needs furring, when trim should be rebuilt instead of covered, and when a “simple re-side” is a repair job in disguise. They also work in a sequence that keeps the house protected if weather turns halfway through tear-off.
That matters in Hermitage, where a forecast can shift quickly and older housing stock hides surprises.
| Decision point | DIY reality | Professional reality |
|---|---|---|
| Material ordering | Easy to miss waste factors and accessory counts | Quantities are usually tighter and based on repeat installs |
| Wall irregularities | Often discovered after installation starts | Usually identified during estimate or early prep |
| Weather exposure | Project can sit open between weekends | Crew can dry-in and keep work moving |
| Finish quality | Improves slowly with practice | Built from repetition on windows, corners, and eaves |
| Code and permit judgment | Homeowner has to verify what applies | Contractor should flag when repairs or structural issues change the scope |
A practical way to decide
Hire a pro for full-house siding if the home is two stories, has a lot of openings, has known moisture history, or sits on a grade that makes access awkward. Hire a pro if clean lines matter to you from the street. Vinyl is forgiving in some ways, but it is brutally honest about layout errors.
DIY is a fair choice for a small section if you have time, patience, the right tools, and realistic expectations. Full replacement on a Hermitage house is different. In my experience, homeowners usually call for help after they hit the same points. Wavy walls, difficult window details, and trim work that takes three times longer than expected.
Paying once usually costs less than fixing a partial install after one western Pennsylvania winter.
Prepping Your Home's Exterior for New Siding
The siding itself gets all the attention, but prep is what determines whether the wall performs. Vinyl is not a waterproof skin. It sheds water. That means the drainage plane behind it has to be correct. If the substrate is wrong, the finished wall can look perfect while problems build underneath.
Tear-off and inspection come first
Once the old cladding is off, the underlying condition of the house shows up. At this stage, crews find soft sheathing near window corners, old caulk built up in layers, loose trim boards, and repairs from past leaks that never fully fixed the source.
The first tasks are physical, not cosmetic:
- Remove failing materials that interfere with a flat installation
- Secure loose boards and trim
- Cut out rotten wood
- Take down obstacles such as downspouts, light fixtures, and anything else that blocks proper flashing and trim work
If this part is rushed, the rest of the job gets built over compromise.
The wall has to be flat and backed correctly
Vinyl siding should be installed over rigid sheathing with a weather-resistant barrier, not directly over open studs, and improper flashing and moisture handling can lead to structural rot within 3 to 5 years in climates with significant precipitation, according to installation guidance on substrate prep and weather barriers.
That matters in Hermitage. Freeze-thaw and repeated wetting around penetrations will exploit every shortcut.
For homeowners trying to understand material quantities before work begins, this guide on how to measure vinyl siding helps clarify the takeoff side of the project.
If the wall is wavy before siding starts, it will still be wavy after siding ends. New panels don’t fix crooked framing or bad sheathing.
Housewrap and flashing do the real water management
The weather-resistant barrier and flashing details do more to protect the house than the visible siding panel. Window heads, sills, doors, ledger connections, and utility penetrations are where the assembly either works or fails.
A sound prep sequence usually looks like this:
Repair and flatten the substrate
Furring strips or foam-backed corrections may be needed to plane out older walls.Install the weather-resistant barrier
The barrier has to be integrated, not just stapled on loosely.Flash windows and doors before siding
Siding trim should direct water out, not trap it.Build out corners and openings fully
Incomplete backing around trim pieces usually leads to movement and poor finish lines.
Most failed siding jobs fail here
Homeowners often blame the siding product when the actual problem is under it. Water staining inside the house, soft sheathing, swollen trim, and recurring mold smell near openings usually trace back to prep errors.
A good install starts with the mindset that no panel goes up until the wall underneath is ready.
A Guide to Flawless Vinyl Siding Installation
Once the wall is prepped, installation becomes a precision job. Vinyl rewards accuracy and punishes impatience. The panels need room to move, the lines need to stay true, and every accessory has to work with the next one.

Set the wall before you hang the first panel
The install starts with layout. Crews establish a level reference line around the house, then set the starter strip so the first course runs true. If the starter is off, everything above it follows the same error.
After that come the accessories:
- Corner posts at outside and inside corners
- J-channel around windows, doors, and roof intersections
- Starter strip aligned for drainage and visual consistency
- Undersill or utility trim where top courses need a secure finish
Many DIY jobs often already start to drift. The field panels are the easy part. The detail trim determines how the job looks up close.
The biggest technical issue is movement
Vinyl expands and contracts with temperature. That isn’t a minor detail. It is the detail that decides whether the siding stays flat or buckles.
According to Georgia-Pacific installation guidance for vinyl siding, a vinyl panel can expand and contract by up to 1/2 inch over a 12'6" length. Installers need to leave about 1/32 inch between the nail head and the siding, nail in the center of the slot, and leave 1/4 inch clearance in receiving channels when temperatures are above 40°F and 3/8 inch when below 40°F.
That’s not optional in Hermitage. The local temperature swing is exactly what exposes bad fastening.
Overtightening is what turns a straight wall into a buckled wall. The panel has to hang, not be pinned in place.
How the panels should actually be fastened
A proper install follows a rhythm. Lock the panel fully into the course below. Confirm it’s seated. Fasten through the center of the nailing slot. Stop short of clamping the material tight.
The fastening rules matter:
- Panels should move side to side after fastening
- Nails belong in the slot center, not hard against either end
- Spacing has to stay consistent, especially across long runs
- Corrections should use the right tool
If a panel needs adjustment, a zip tool is the proper way to release it without damaging the edge
A panel that can’t move is a panel that will eventually show the mistake.
Openings and transitions separate average work from clean work
Most homeowners notice corners first from the street. Installers notice windows first. Window and door openings show whether the crew can cut, support, and flash neatly.
Strong work around openings usually includes:
| Area | What good installation looks like |
|---|---|
| Windows | Even reveals, clean J-channel cuts, proper drainage path |
| Doors | Tight trim layout without pinching movement |
| Roof lines | Proper channel integration where siding meets shingles or flashing |
| Top course | Secure finish with no loose or flapping edges |
Laps matter too. On longer walls, crews should place laps so they don’t draw the eye. Skilled installers start at less visible areas and keep repeated overlaps from stacking in obvious patterns.
Final checks that matter
Before the job is finished, the wall should be checked in changing light and from more than one angle. Things that deserve a second look include ripples at the starter, pinched panels, accessory gaps that are too tight, and trim pieces that don’t sit flat.
A clean vinyl siding installation Hermitage PA job isn’t just about getting panels on the house. It’s about letting the wall breathe, drain, and move the way the material was designed to move.
Budgeting and Choosing Your Hermitage Siding Contractor
A Hermitage homeowner usually gets sticker shock in one of two places. The first quote looks higher than expected, or the low quote looks good until change orders start showing up. I’ve seen both. In Mercer County, siding jobs often get more expensive when crews skip wall repairs, underbid trim details, or assume an older house is flatter and drier than it is.
What a Hermitage siding budget should cover
A siding price should break out more than panels and labor. On houses around Hermitage, the budget often needs room for tear-off, dumpster and disposal fees, housewrap or other weather-resistive barrier work, trim accessories, soffit and fascia tie-ins, and some level of wood repair once the walls are opened up. Freeze-thaw cycles are hard on window heads, lower wall sections, and garage walls that catch splashback, so hidden repair work is common enough that it should be discussed before the contract is signed.
Instead of chasing a single price per square, look for a quote that answers these questions:
| Budget item | What you want to see |
|---|---|
| Tear-off and disposal | Included clearly, with dumpster or haul-away noted |
| Wall prep | Housewrap, flashing updates, and substrate correction spelled out |
| Trim package | Corners, J-channel, starter, undersill, utility trim, and finish details listed |
| Repair allowance | A written method for handling rot or damaged sheathing |
| Permit responsibility | Who checks with Hermitage or Mercer County requirements and who pulls permits if needed |
| Cleanup | Magnet sweep, debris removal, and final walk-through included |
If a contractor cannot explain what happens when they find bad sheathing under the old siding, the estimate is incomplete.
How to compare contractors without getting fooled by a low number
Two contractors can quote the same brand and color and still be selling very different jobs. One may include flashing corrections around windows and doors, leveling problem areas, and replacing failed trim boards. Another may plan to cover defects and keep moving.
That difference matters more in Western Pennsylvania than national articles usually admit. Hermitage homes deal with wet springs, cold snaps, wind, and repeated expansion and contraction. A bid that ignores those conditions may look cheaper on paper and perform worse after two winters.
Use this checklist when you compare proposals:
Proof of insurance
Ask for current liability and workers' comp coverage for exterior work in Pennsylvania.Clear scope
The quote should state whether old siding comes off, what goes behind the new siding, and how corners, windows, doors, and roof lines will be trimmed.Repair process
Rot, insect damage, and soft sheathing need written unit pricing or a clear approval process.Permit knowledge
The contractor should know when permit questions apply locally instead of brushing them off.Crew accountability
Ask who is doing the work. Employees and subcontractors are not the same thing from a supervision standpoint.Warranty details
Product and workmanship coverage should be separated, with plain language on what can void them.
A good estimate is easy to read. A weak one stays vague on purpose.
Questions worth asking before you sign
Ask how the crew handles walls that are out of plane. Ask whether they install new housewrap on a full tear-off. Ask how they flash windows that have old trim details. Ask what they do if they find damage around decks, hose bibs, or light blocks.
Those answers tell you more than a sales pitch. A contractor who works in this area regularly should be comfortable talking through old wood movement, moisture staining, and the extra labor that shows up on homes that have already been sided once before.
If you want a local point of comparison, this page on a Mercer County siding contractor shows the kind of service information homeowners should expect to review before hiring.
For a broader example of how to judge contractor communication and scope, Choosing Four Seasons Roofing and Siding for Your Washington Home is useful because it shows the sort of questions homeowners should apply to any exterior company.
Red flags that usually cost homeowners money
Slow down if you hear any of these:
“We can cover that and save you money.”
Maybe. On a dry, flat wall, sometimes. On an older Hermitage house with moisture damage, that shortcut can trap problems and make later repairs worse.“Flashing is already there somewhere.”
“Somewhere” is not a plan.“We’ll sort out trim once we start.”
Field adjustments happen, but the trim system should not be improvised.“Permits never come up on siding.”
Local requirements vary. A contractor should check, not guess.“Rot repair is extra, but we’ll tell you later.”
Extra work happens. The contract should explain how pricing and approvals are handled before the first panel comes off.
The right hire is usually the contractor whose quote is the clearest, whose repair language is the most honest, and whose scope matches how houses in Hermitage age.
Local Vinyl Siding Questions Answered
How do you clean vinyl siding after winter in Hermitage
Start with the least aggressive method. A garden hose, soft brush, and siding-safe cleaner usually handle normal grime. Focus on the lower courses, shaded sides, and areas under overflowing gutters where buildup tends to collect. Avoid blasting water upward under laps.
Can one damaged panel be replaced without redoing the whole wall
Usually, yes. A skilled installer can disengage surrounding courses with a zip tool, remove the damaged section, and install a matching panel if the profile and color are still available. The challenge is color match on older walls. Sun exposure changes appearance over time, so a technically correct repair may still be slightly visible.
Do high winds threaten properly installed vinyl siding
Poorly installed siding is vulnerable. Properly installed siding is far more dependable because it’s fastened correctly, trimmed properly, and allowed to move as designed. Problems usually show up where accessories were rushed, panels were pinched, or previous repairs interfered with the locking system.
What do warranties usually depend on
Warranties often depend on following manufacturer installation requirements and keeping documentation. That’s why fastening method, trim details, and substrate preparation matter beyond appearance. If the install ignores product requirements, warranty disputes get harder.
Is vinyl a good fit for older Hermitage homes
Often, yes, if the prep is honest. Older homes benefit from vinyl when the walls are repaired, flattened, flashed properly, and trimmed with care. Older houses suffer when someone tries to cover defects instead of correcting them.
How do you know replacement makes more sense than repair
Repair makes sense when the issue is isolated and the rest of the system is sound. Replacement makes more sense when problems repeat on multiple elevations, when moisture issues keep returning, or when the existing exterior has reached the point where every repair starts another one.
If your home in Hermitage is showing wear, loose panels, moisture concerns, or you just want a clear answer on whether repair or replacement makes more sense, Penn Ohio Roofing & Siding Group can help you evaluate the exterior, explain the scope plainly, and provide a local estimate for vinyl siding work.