The classic gambrel roof angles are about 30 degrees on the upper slope and about 60 degrees on the lower slope. That's the standard starting point, but the right choice depends on what you need most from the roof: more loft headroom, lower overall height, easier framing, or stronger real-world performance.
If you're sketching a barn, shed, garage, or Dutch Colonial and trying to make the profile look right, this is usually the point where the project gets tricky. On paper, gambrel roof angles look simple. In the field, every angle choice changes the wall height, the joint geometry, the amount of usable upper-floor space, and how forgiving the framing will be when you're cutting members and setting trusses.
That matters even more in places like Sharon, Pittsburgh, and Erie, where weather, code requirements, and build quality all have to line up. A gambrel can give you excellent space efficiency, but only if the geometry serves the build instead of fighting it.
Table of Contents
- Planning Your Gambrel Roof Project
- Understanding Gambrel Pitches and Angles
- How to Calculate Rafters for a Gambrel Roof
- Design Choices The Impact of Different Gambrel Angles
- Structural Integrity and Weather Considerations
- Common Mistakes and When to Hire a Professional
Planning Your Gambrel Roof Project
A lot of gambrel projects start the same way. Someone wants a barn-style shed in Sharon, a garage loft outside Pittsburgh, or a Dutch Colonial look that feels traditional without wasting the upper level. The first question is usually, “What are the standard gambrel roof angles?”
The common benchmark is about 30 degrees for the upper slope and about 60 degrees for the lower slope, which is the most widely repeated geometry reference for a gambrel roof and one of the clearest ways to distinguish it from a simple gable with one continuous plane, as explained in Angi's overview of gambrel roof geometry. That shape became popular because the lower section stays steep while the upper section preserves attic volume without pushing the ridge excessively high.
That said, using the classic angle pair just because it's familiar can box you into a roof that looks right but doesn't perform the way you want. A storage loft wants different geometry than a conditioned upper room. A decorative barn profile can tolerate compromises that a workshop or habitable space cannot.
Start with the decisions that actually drive the angle
Before you draw rafters, settle these points:
- Use of the upper space: Storage, hay loft, workshop, or finished room all push the profile in different directions.
- Wall height target: The roof doesn't exist by itself. It starts where the wall framing stops.
- Exterior proportions: Some gambrels look balanced. Others look pinched or squat because the top segment is too shallow for the lower segment.
- Build method: Prefab trusses and site-built rafters don't tolerate layout mistakes the same way.
- Local review: In western Pennsylvania, weather and code review can change what looks practical on paper.
Practical rule: Don't choose gambrel roof angles by appearance alone. Choose them by the headroom, ridge height, and framing method you need the building to deliver.
A serious DIYer should also think about who's going to build and inspect the assembly. If you're still vetting who should handle the work, this guide on how to choose a roofing contractor is a useful place to sort out qualifications before the roof design hardens into material orders.
What usually works as a starting approach
For most projects, the cleanest path is to use the classic geometry as a reference point, then adjust from there. If the loft feels cramped, the top section often needs rethinking. If the building gets too tall for the site or starts looking top-heavy, the upper slope may be too aggressive.
What doesn't work is copying an angle set from a photo and assuming the wall height, span, and attic usability will somehow match. They won't. Gambrel roofs are forgiving in appearance, but they are not forgiving in layout.
Understanding Gambrel Pitches and Angles
A lot of confusion around gambrel roof angles comes from builders and homeowners mixing up pitch and angle. In conversation, people swap the terms. On the job, they mean different things, and that difference matters when you lay out cuts.
Start with the shape, not the math
Think of a gambrel roof like a bent arm. The shoulder is the upper slope. The forearm is the lower slope. The elbow is the break where the roof changes direction.
That break is what gives the gambrel its space efficiency. The lower section gets steep enough to create sidewall clearance, and the upper section closes the roof over the top. Whether that roof feels roomy or cramped depends on the relationship between those two parts.
Pitch and angle are not the same thing
Pitch is usually written as rise over run, such as 4/12, 7/12, or 20/12. Roofers use that language because it translates directly to layout and framing tools.
Angle is the slope in degrees. Carpenters often think in degrees when discussing saw settings, protractors, and geometry.
The core conversion formula is:
- Angle = arctan(rise ÷ run)
If you already know the angle and need the pitch format, you reverse the process using tangent. You don't have to do that by hand if you're using a construction calculator, but it helps to know what the number means.
For a homeowner who wants a clean primer on the basics, what is roof pitch is a helpful refresher before you move into a broken-slope roof like a gambrel.
Common Roof Pitch to Angle Conversions
| Pitch (Rise/Run) | Angle (Degrees) |
|---|---|
| 4/12 | 18.4 |
| 7/12 | 30.3 |
| 8/12 | 33.7 |
| 10/12 | 39.8 |
| 12/12 | 45.0 |
Those examples are useful because gambrel builders often think in both systems at once. You might discuss the roof shape in degrees, then lay it out in pitch.
A gambrel roof works best when the two slopes relate to each other as one system, not as two separate numbers picked in isolation.
One practical guide to gambrel geometry notes common pitch pairs such as 20/12 bottom with 4/12 top or 14/12 bottom with 7/12 top, and adds a rule that the upper pitch should be at least half the lower pitch. It also points out the design consequence: if the top gets too shallow relative to the bottom, the roof can look squat and lose usable headroom; if the top gets steeper, loft volume increases but overall height also rises, affecting envelope and build constraints, as discussed in Barn Geek's gambrel pitch and height guide.
That single relationship explains a lot of failed gambrel designs. Builders focus on the steep lower section because it gives the roof its identity. The upper section is where they either preserve the space or accidentally waste it.
How to Calculate Rafters for a Gambrel Roof
Once the shape is chosen, the build comes down to layout. That means converting gambrel roof angles into member lengths, cut geometry, wall heights, and a roof assembly that fits together when the crew starts lifting pieces.
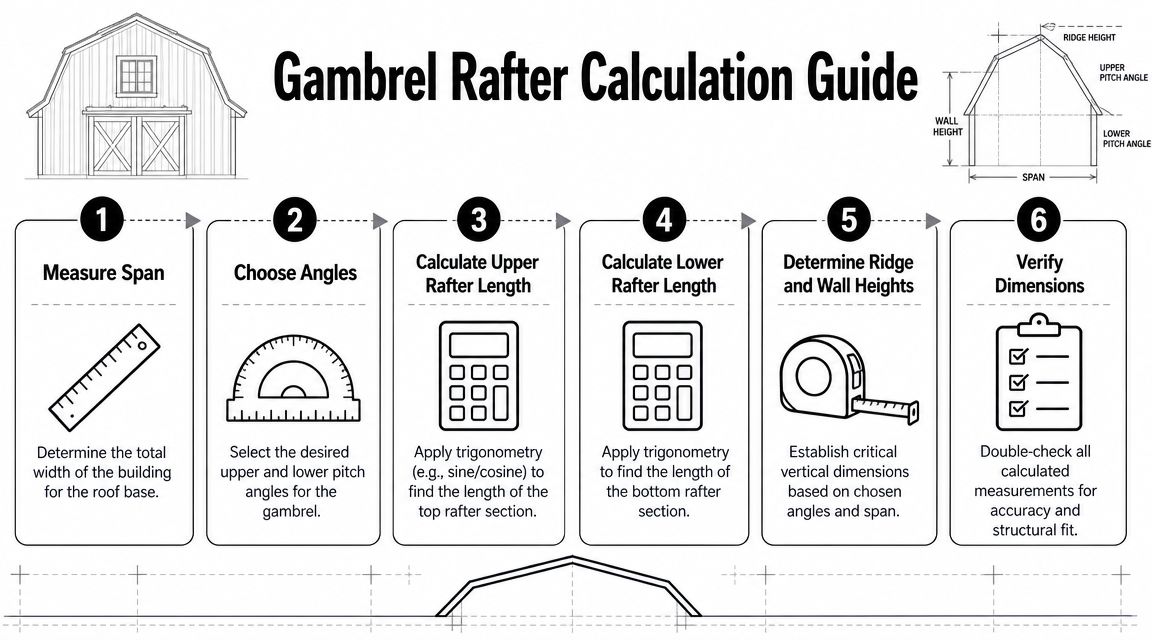
A practical layout workflow
The cleanest way to calculate gambrel rafters is to work in sequence, not by jumping straight to rafter length.
Measure the building span
Start with the full width of the structure. From there, work from half-span for one side of the roof.Choose the upper and lower pitches
A common pair discussed in practical guidance is 20/12 on the bottom and 4/12 on the top, referenced in Barn Geek's explanation of gambrel pitch proportions. That pair creates a steep lower wall-like section and a much flatter top.Decide where the slope break happens
This is one of the most important design decisions in the whole roof. The break point controls how much of the half-span belongs to the lower segment and how much belongs to the upper segment.Calculate rise and length for each segment
For each segment, you need horizontal run and vertical rise. Once you know those, use basic right-triangle math or a construction calculator to determine rafter length.Add real framing components
Plate thickness, ridge material, gusset placement, and connection details all affect final dimensions.Check wall height and loft clearance before cutting production pieces
This is where the design becomes a buildable assembly instead of a roof sketch.
If you need to sort out the larger geometry of the roof before breaking down each member, this guide on how to calculate roof area with pitch helps frame the slope math in a way that translates to material planning.
Where builders get into trouble
The hard part isn't just finding rafter length. It's finding the correct cut geometry at the joints.
A gambrel rafter system usually includes:
- The lower seat area: Where the member lands at the wall plate
- The slope-break joint: Where upper and lower members meet
- The peak cut: Where opposing upper rafters meet at the ridge or ridge assembly
One technical framing reference notes a practical gambrel truss layout that uses 22.5° end cuts at each member end and says 16 inches on center is a stronger spacing option than 24 inches on center, improving stiffness and reducing panel deflection on broader spans, as described in this gambrel roof design reference. That doesn't mean every gambrel should be built exactly that way, but it shows how sensitive these roofs are to joint consistency and spacing.
If one truss has a slightly different break angle than the rest, the error won't stay isolated. It shows up in sheathing alignment, panel seating, and roof plane consistency.
Use a full-size check before you cut everything
For site-built rafters, the safest method is often to calculate first, then verify with a full-size layout on a sheet or floor. That lets you check three things fast:
- Joint alignment: The upper and lower members meet where you expect.
- Wall and ridge dimensions: The total assembled height matches the design.
- Practical cuts: Saw settings and connection details are realistic, not just mathematically correct.
This is also where you find out whether your gambrel roof angles produce useful upper-space geometry or just decorative shape. A roof can be mathematically valid and still fail the project because the loft ends up with poor headroom, awkward knee space, or an exterior profile that looks compressed.
For prefabricated trusses, the same logic applies. The calculations may happen in software, but the consequences still show up in wall height, heel detail, bracing, and installation tolerance. The geometry has to serve the framing package from start to finish.
Design Choices The Impact of Different Gambrel Angles
The biggest mistake people make with gambrel roof angles is treating them like a style choice only. They're not. The pair you choose controls the shape of the upper room, the building's total height, and how much framing and roofing material the roof is likely to consume.
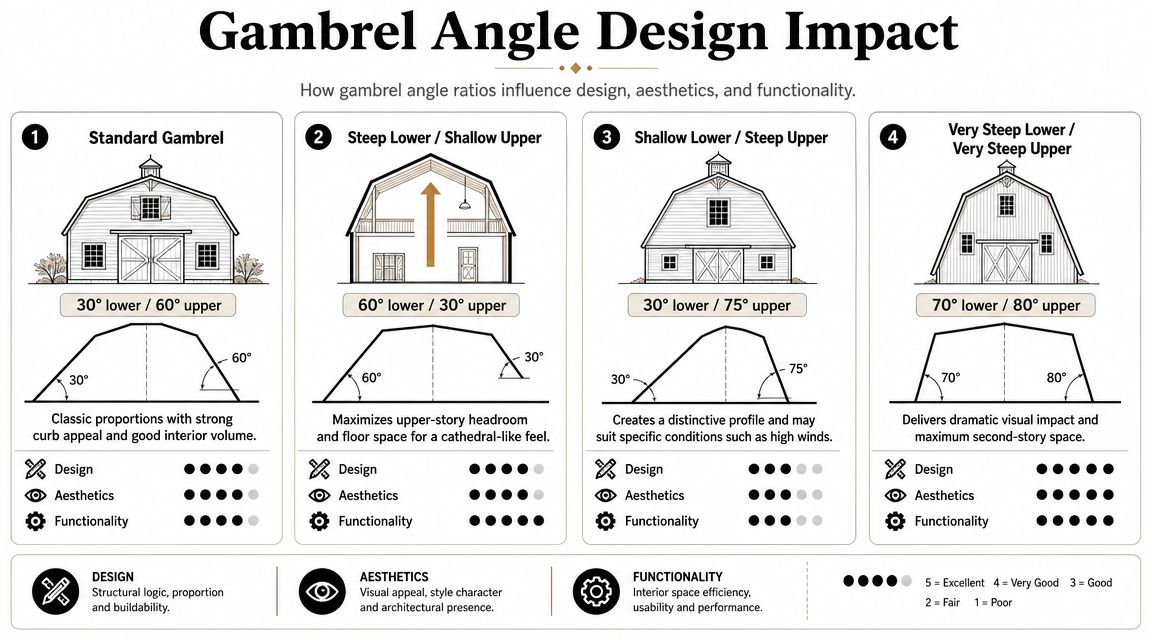
Two pitch pairs that create very different buildings
A useful comparison is between a 20/12 bottom with 4/12 top and a 14/12 bottom with 7/12 top, both identified as common gambrel proportions in Barn Geek's shed and barn geometry discussion. These don't produce the same result at all.
The 20/12 and 4/12 combination pushes hard on the lower slope. That can create a dramatic barn-side look, but the shallow upper portion can leave the top feeling flatter than expected unless the break point and wall height are carefully tuned.
The 14/12 and 7/12 combination is more balanced. The upper section carries more of the roof form, which often improves the feel of the loft and gives the profile a less abrupt transition.
Here's the key rule from that same guidance: the upper pitch should be at least half the lower pitch. That's not just a visual preference. It directly affects the structural envelope, interior clear height, and the exterior silhouette.
What works and what usually disappoints
A gambrel tends to work well when the lower slope is steep enough to open up the sidewalls, but the upper slope still does meaningful work enclosing usable space.
What usually disappoints is a roof where the top pitch is chosen too shallow just to keep overall height down. The building may look broad and low, but the loft often loses usefulness fast.
A few practical outcomes to weigh:
- More headroom: A steeper upper slope usually improves usable loft space.
- Lower ridge height: A shallower upper slope helps keep the building shorter.
- More material and complexity: Steeper or taller profiles generally demand more framing precision and more roof surface.
- Stronger visual balance: Roofs look better when the two segments feel related, not forced.
For small outbuildings, Firm Foundations' shed roof advice is a good reminder that roof type should follow the building's purpose. That applies doubly to gambrels, because their shape is efficient only when the geometry matches how the structure will be used.
Some gambrels look “traditional” from the driveway and still underperform inside. The roof has to work in section, not just in elevation.
If the project is in a neighborhood with tight height expectations, or if the upper space needs to be insulated and ventilated, don't chase the most dramatic outline. Choose the angle pair that gives you a buildable assembly with useful space and predictable detailing.
Structural Integrity and Weather Considerations
A gambrel roof concentrates a lot of attention at one place: the change in slope. That break creates the classic barn profile, but it also creates a structural transition that needs careful framing and support.
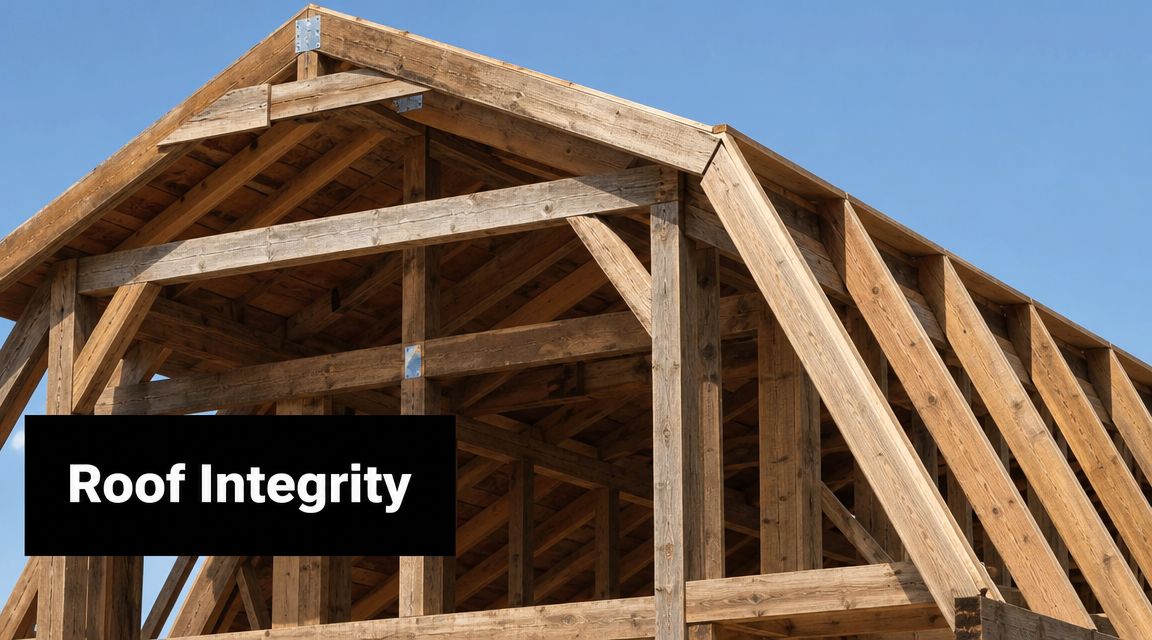
The knee joint needs respect
The joint where the upper and lower slopes meet is often the weak point in the whole assembly. Loads change direction there. Connections matter more there. Small layout errors become larger alignment problems there.
That's why gambrels reward disciplined framing. Whether the roof uses site-built rafters or prefabricated trusses, builders need the break point, member angles, gussets, and bracing details to stay consistent across the full run of the roof.
A roof survey can also uncover geometry and framing issues before replacement or retrofit work starts. If someone is trying to assess an existing building before redesigning the roof shape, this roof survey near me guide is a practical overview of what a proper survey process should examine.
Snow, wind, insulation, and ventilation change the decision
Classic gambrel roof angles can prove misleading. Many online discussions stop at appearance and ignore whether the assembly still makes sense under current code expectations.
One recurring gap in public advice is the failure to test “standard” gambrel shapes against modern needs such as insulation depth, ventilation space, and snow loading, which means a roof that looks visually correct may not be structurally sound or code-compliant today without professional engineering, as noted in this discussion of gambrel angle suitability under modern conditions.
That matters in Pennsylvania. In Erie and Pittsburgh, builders need to think about how snow may sit on the shallower upper section and how wind may pull differently on the two slope zones. A roof that sheds weather well in one segment can still create detailing problems in the other.
The roof assembly below the finish surface matters too. If you're reviewing the build-up from decking down, this explanation of what is roof underlayment is a good companion because the slope changes in a gambrel increase the importance of disciplined water-management layers.
What to inspect before sheathing goes on
Before roof panels or sheathing hide the frame, check these items carefully:
- Break-point consistency: Every truss or rafter pair should hit the same change-of-slope location.
- Connection quality: Gussets, plates, and fasteners need to be installed as designed.
- Bracing path: Loads must have a clear path through the roof and down into the supporting walls.
- Assembly depth: Insulation and ventilation need real space, not assumed space.
- Weather detailing: The slope change needs careful transition treatment.
A gambrel roof can be strong and long-lasting, but it won't forgive casual engineering.
Common Mistakes and When to Hire a Professional
Most gambrel roof failures don't come from the concept. They come from incomplete translation. Someone chooses a nice-looking angle pair, but they never fully convert it into a framed assembly with real members, real joints, and code-compliant dimensions.
Mistakes that cost time and lumber
One major weakness in online tutorials is that they often stop before the hard part. They show angle selection, but they don't carry the reader through plate thickness, ridge size, wall framing height, and the effect those details have on usable attic volume in a code-compliant build, which is exactly the gap identified in this video discussion of gambrel layout workflow problems.
The most expensive mistakes usually look like this:
- Cutting from idealized geometry only: The math works on paper, but the frame doesn't account for actual lumber thicknesses or connection hardware.
- Ignoring wall height interaction: The roof may technically fit, but the loft doesn't end up usable.
- Treating every joint like a simple gable cut: A gambrel has more than one critical angle, and the break joint is not forgiving.
- Skipping layout verification: Without a full-size check or engineered truss package, errors multiply quickly.
- Assuming “standard” means approved: Local review may reject what an internet diagram makes look normal.
When it makes sense to bring in help
A skilled DIYer can handle some gambrel projects, especially smaller outbuildings with straightforward loads and a clear framing plan. But the moment the roof needs engineered performance, habitable space, or clean coordination with modern insulation and ventilation requirements, the margin for error gets small.
Hire a professional when any of these are true:
- The upper level needs to function as living or working space
- The building is wide enough that stiffness and deflection become serious concerns
- You need trusses coordinated with exact wall heights
- The project must satisfy local structural review
- You're rebuilding an older structure with unknown conditions
A well-built gambrel doesn't happen because the shape is familiar. It happens because the geometry, structure, and roofing details all agree with each other.
If you're planning a gambrel roof in Sharon, Pittsburgh, Erie, Hermitage, Mercer, or the surrounding Pennsylvania service area, Penn Ohio Roofing & Siding Group can help you turn the angle choice into a roof system that's buildable, durable, and code-aware. Their team handles real-world roofing conditions, not just roof sketches, so you can move from concept to construction with fewer surprises.