You're probably standing in the garage or driveway with a stack of lumber, a framing square, and a phone full of roof calculator screenshots, thinking you've got the hard part handled. Then the doubts start. Is the ridge deduction built in or not. Will that birdsmouth sit clean on the plate. What happens if the first rafter is off by just a little and you copy it twelve times.
That's the part most basic guides skip. They show the roof math, but not the craft. If you want to learn how to construct rafters the right way, you need both. The numbers matter, and so do the little field adjustments that separate a roof that goes together clean from one that fights you all the way up.
Around Sharon, Pittsburgh, and Erie, I've seen plenty of DIY roof framing go wrong for reasons that had nothing to do with effort. Most of the trouble starts with assumptions. Assuming all lumber is straight. Assuming the building is square. Assuming the first pattern is good enough without a test fit. That's where this guide stays grounded.
Table of Contents
- Foundations of Rafter Layout and Design
- Choosing the Right Tools and Lumber
- Step-by-Step Rafter Marking and Cutting
- Securing Rafters and Ensuring Structural Stability
- Common Rafter Construction Mistakes to Avoid
- Your Rafter Project and Professional Guidance
Foundations of Rafter Layout and Design
If your layout is wrong on paper, your cuts will be wrong in lumber. On a roof, small errors do not stay small.
Start with the roof geometry
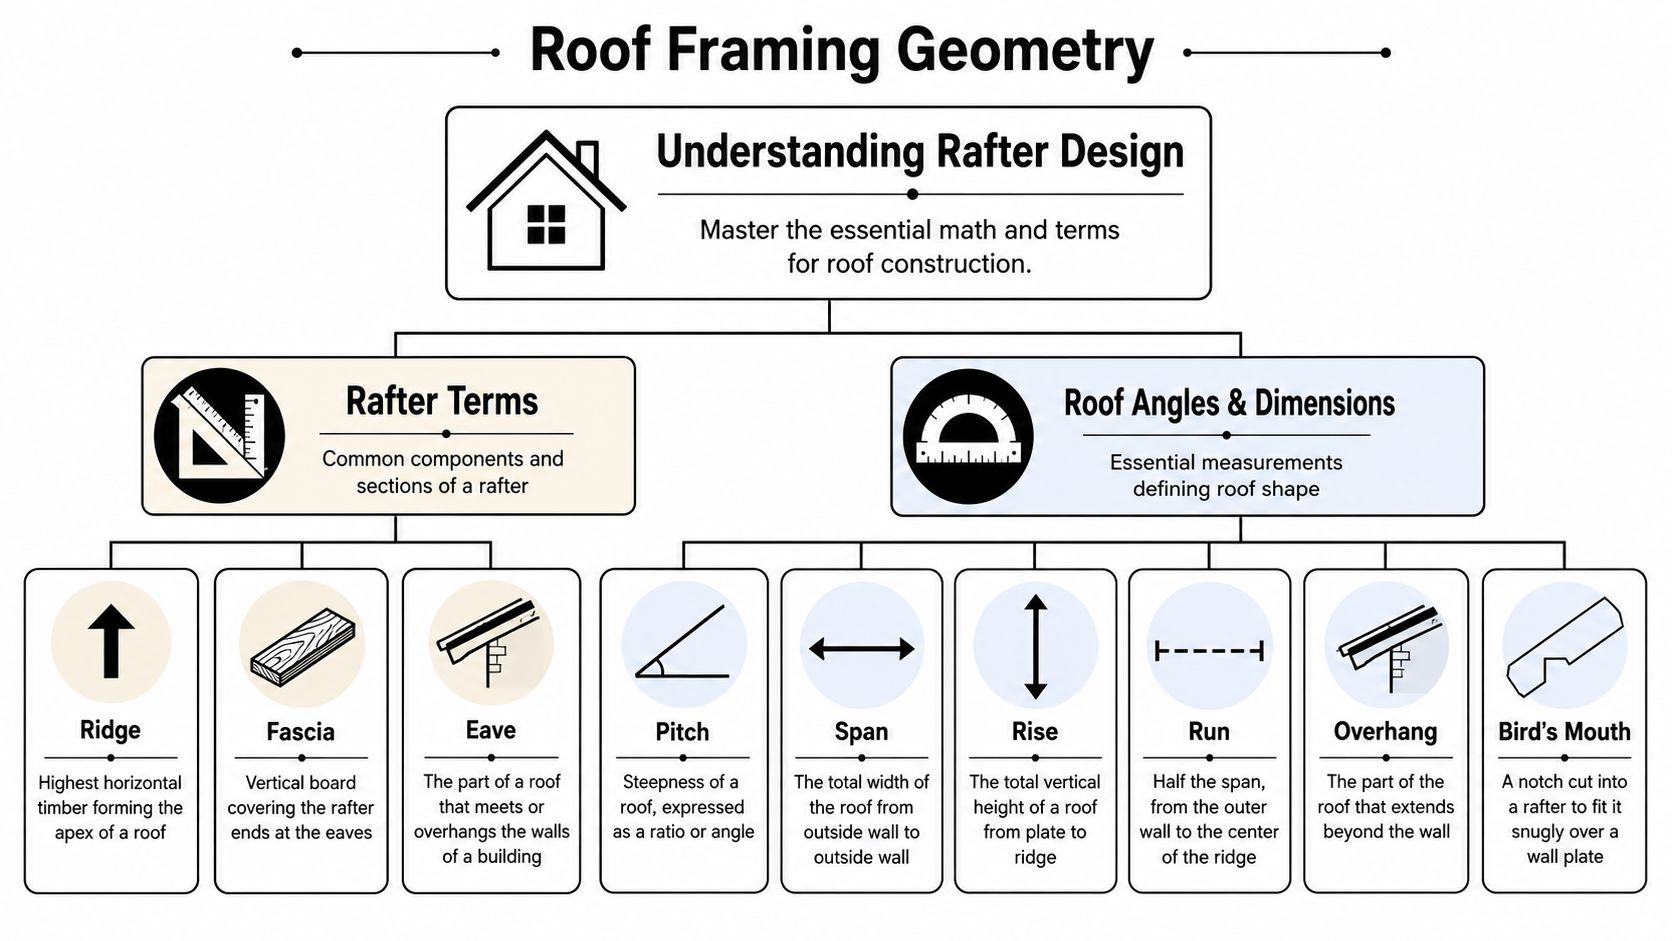
A common rafter starts with pitch, but field layout goes better when you keep the language straight from the start. In a 6:12 roof, the roof rises 6 inches for every 12 inches of horizontal run. For a common rafter, the run is half the building span, measured from the outside of the wall line to the centerline of the ridge unless the plan says otherwise.
That last part trips up plenty of capable DIYers. Plans, online calculators, and existing houses do not always use the same reference points. If you pull span from outside sheathing on one line, then switch to plate width or ridge center on the next, the numbers can look close and still cut wrong.
| Term | What it means in the field |
|---|---|
| Span | The full width across the building |
| Run | Half the span for a common rafter layout |
| Rise | The vertical climb from plate to ridge |
| Pitch | The steepness, written as rise over 12 |
| True length | The actual sloped length of the rafter body |
Use one reference system and stay with it.
If you also need to sort out how pitch changes roof surface area, review this guide on calculating roof area with pitch before you order material. Area and rafter length are related, but they are not the same calculation.
The deduction many DIYers miss
The calculator usually gives you the sloped length. The roof still needs to fit a real ridge board, real plates, and real lumber.
Ridge deduction is the first gotcha. If the ridge board is 1 1/2 inches thick, each common rafter gives up half of that at the peak. That means a 3/4-inch deduction from the layout for each side. Skip it, and the rafters run long at the top. Then the birdsmouth ends up fighting the plate, or the ridge line starts wandering because every piece is being forced into place.
Local code and plan details matter here too. In Mercer County, I tell people to verify the required ridge size before they mark a thing. A plan may call for a different ridge material or thickness than the stock assumption you used in the calculator. Change the ridge size, and the deduction changes with it.
A few field rules save trouble fast:
- Keep the rafter body and the overhang separate. Lay out the body first. Add the tail after the seat and top cut make sense.
- Measure actual lumber, not stamped lumber. A board sold as standard stock can run a little fat, a little shy, or wear a rounded edge that changes how your square sits.
- Mark from the same face and edge every time. Crown up is common, but consistency matters more than habit.
- Build one test rafter before cutting the stack. Basic guides skip this. Good framers do not. A test piece shows you whether the ridge deduction, seat cut, and heel height all work on the actual building.
Older houses around Sharon are rarely as square as the sketch in your notebook. Remodel work around western Pennsylvania can be worse. Plates bow, walls belly, and opposing walls miss each other enough to show up at the ridge. That is why a layout that works in theory still needs a test fit in place.
Clean geometry matters. Craft matters too. A roof framed from one checked, tested pattern goes together a lot better than a roof framed from calculator numbers alone.
Choosing the Right Tools and Lumber
A roof can be laid out correctly on paper and still fight you all day in the field. The usual trouble starts before the first cut. Stock that is twisted, crowned hard, or undersized will throw off fit, and a square or saw that is a little off will repeat that error on every rafter.
Start with the lumber, because the wood controls more than appearance. It controls how well your layout transfers, how clean the birdsmouth cuts, and whether the finished roof goes together without forcing pieces into place. The engineering side belongs here too, not as an afterthought. Species, grade, span, spacing, snow load, and connection details all affect whether a board is suitable for the job, so if you have any doubt about sizing or loads, get that reviewed before you cut.
Tools that matter on site
A short list of tools handles most rafter work if they are accurate and in good shape.

- Framing square. This is the main layout tool for plumb cuts, seat cuts, and repeatable marks. If it rocks on the edge because the lumber is rounded or rough, account for that the same way every time.
- Tape measure. Use one tape for the whole layout if you can. Small differences between tapes show up fast on a run of rafters.
- Sharp circular saw blade. A fresh blade leaves a cleaner line and gives you better control at the birdsmouth, where a ragged cut can turn a good board into scrap.
- Pencils and a knife. Pencil for rough layout, knife for final lines where the saw needs a crisp reference.
- Speed square and level. Good for checks and quick marks. They do not replace a framing square for full rafter layout.
- Sawhorses or solid support. A bouncing board leads to wandering cuts and a bad pattern piece.
Accuracy matters more than price. I would rather see a basic framing square that has been checked and a saw with a sharp blade than a pile of expensive tools used carelessly.
Lumber selection is part of the craft
Do not shop rafters by eye from ten feet away. Pull the boards, sight down them, and look at what will affect layout and bearing. Crown, twist, edge damage, wane, knots near the birdsmouth, and rounded factory edges all matter.
A few habits make a big difference:
- Use similar stock for common rafters. Mixing noticeably different boards gives you mixed results at the ridge and plates.
- Set crowns the same direction. Consistency keeps the roof plane cleaner.
- Watch actual dimensions. Lumber sold under the same nominal size can vary enough to change how your square sits and how your cuts read.
- Keep knots and weak grain away from the birdsmouth. That area already removes wood from the member.
- Choose the pattern rafter carefully. Pick a board with straight, readable grain and no surprises.
That last point gets skipped in a lot of DIY guides. It should not. One good test rafter tells you more than a stack of calculator printouts, especially on older houses around Sharon where walls are not always straight and plates are not always level.
Complex roof shapes raise the stakes. If you are framing beyond a basic gable, review the geometry before you buy a pile of lumber or start laying out cuts. This guide to gambrel roof angle layout and framing considerations is useful for understanding how quickly those angles change the work.
Safety belongs in this section too. Wet treated lumber, heavy green stock, and long rafters are awkward to move and dangerous to cut without proper support. If the material is oversized, the spans are pushing the limit, or the roof ties into a repair with existing sag or spread, that is a good point to stop and have a contractor, engineer, or a company like Penn Ohio Roofing & Siding Group look at the framing before you commit to a full cut list.
Step-by-Step Rafter Marking and Cutting
Many people rush this part. Don't. A slow first rafter saves lumber, time, and aggravation.
Lay out one rafter before you cut a stack
Old-school roof framing relied on framing-saw layout and pitch tables because they let builders scale rafter length from pitch without recalculating every cut. One instructional example uses a pitch table showing that an 8:12 roof pitch equals 14.42 inches per foot of run, which framers multiply by total run to get full length, as shown in this instructional framing video.
That table method is useful, but don't let it fool you into skipping field verification. Tables help with length. They don't tell you whether the ridge is straight, the plates are level, or your stock has a bow.
Before anything else, lay out one master rafter.
If your roof shape is more involved than a straight gable, especially on barn-style work, study the geometry before you mark anything. Different roof forms create different angle problems, and this overview of gambrel roof angles is a useful reference for that kind of layout.
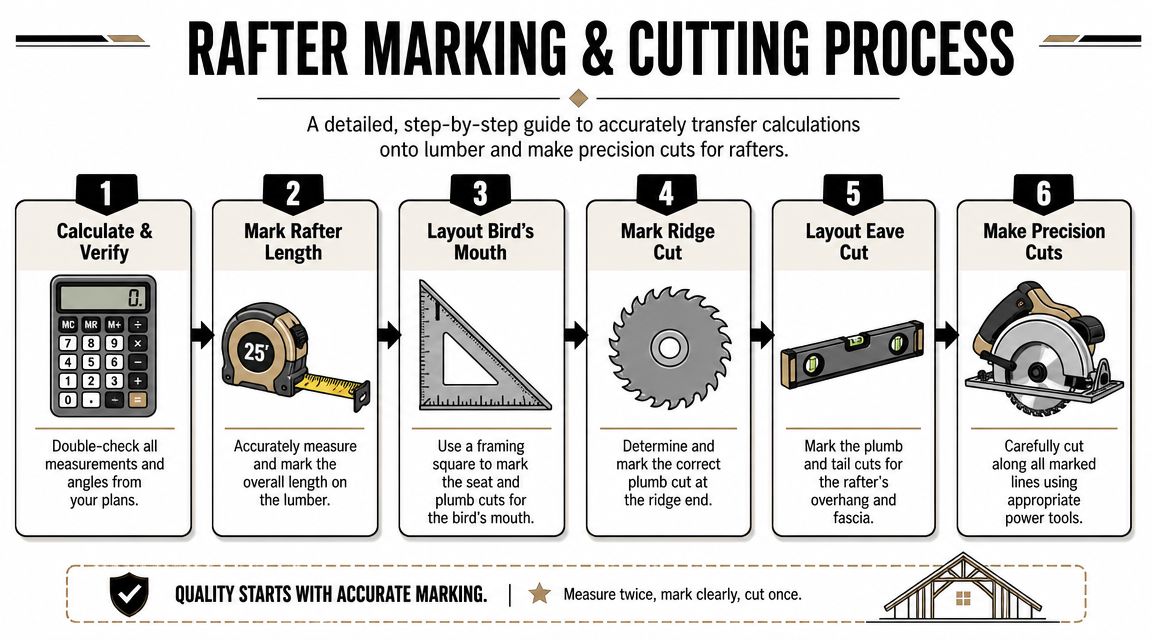
Mark the cuts in a working order
There's more than one acceptable sequence, but this order keeps mistakes down.
Mark the top plumb cut first.
Start from the crown-up orientation you've chosen for the board. Use the framing square for the roof pitch and draw the plumb line that will meet the ridge.Measure the rafter body along the top edge.
Don't guess where the seat should land. Measure carefully from the top cut reference point.Lay out the birdsmouth.
This notch has two working lines. The plumb cut at the heel and the level seat where the rafter bears on the top plate. If the seat is sloppy or overcut, the fit gets weak and ugly fast.Mark the tail after the body is right.
The overhang can be uniform and attractive, but only if the structural part of the rafter already fits.
A lot of DIYers do the tail too early because it feels easier. Then they end up protecting a pretty cut on the wrong board.
Test fit before production
This is the craft part that basic guides miss. Cut the first rafter cleanly, then put it in place and carefully look at the fit.
Check these points:
- Top fit at the ridge. It should meet as intended, without forcing.
- Seat on the plate. It needs solid bearing, not a corner touch.
- Heel alignment. The plumb portion of the birdsmouth should land where you planned.
- Tail consistency. Look down the line for fascia alignment if you're installing more than one.
If the first rafter needs persuasion with a sledge, the pattern is wrong.
Don't make corrections by eye on every board. Fix the master, remark it clearly, and use that corrected piece as your template. That one step prevents the most common production mistake on DIY roof framing, which is copying a small error over and over until the whole roof shows it.
A couple of jobsite habits help too:
| Habit | Why it works |
|---|---|
| Cut just shy of the line when unsure | You can tune a tight fit, but you can't put wood back |
| Label pattern faces | Prevents flipping the template and mirroring mistakes |
| Check saw bevel and baseplate | Mis-set saws create identical bad cuts very efficiently |
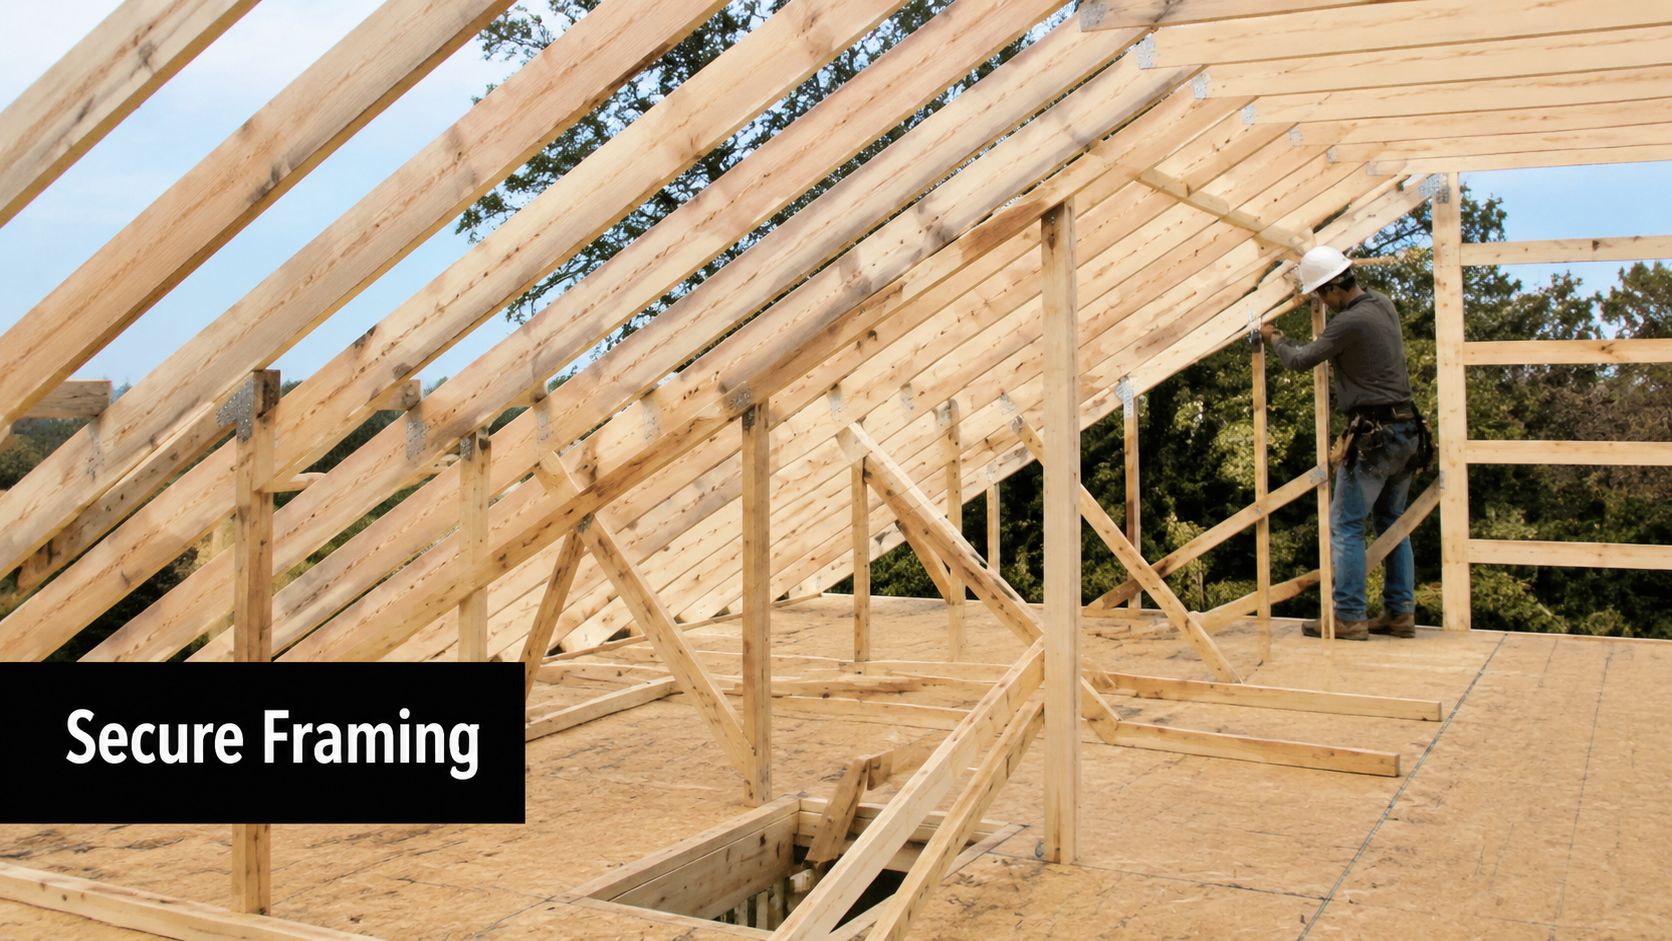
Securing Rafters and Ensuring Structural Stability
A roof doesn't become sound because the individual rafters look neat. It becomes sound when loads move through the whole assembly the way they're supposed to.
A roof works as a system
Once rafters are cut, the next question is how they connect. The ridge, the wall plate, and the ties all matter. If any one of those is treated casually, the roof can spread, rack, or lift where it shouldn't.
Here's the practical breakdown:
- At the ridge. Rafters need to meet cleanly and fasten according to the design. A messy top fit puts stress in the wrong places.
- At the wall plate. The birdsmouth should bear properly, and the connection needs to resist uplift as well as downward load.
- Across the roof frame. Collar ties and rafter ties serve different purposes. People mix them up all the time. One helps with upper roof behavior, the other helps control wall spread lower in the assembly.
If you're sorting out edge details and trim transitions while planning overhangs, this plain-language guide on what fascia is on a roof helps connect the framing to the finished roof edge.
The roof frame should feel like one system under your hands, not a pile of parts barely touching each other.
Where common rafters stop being simple
Most beginner material stops at common rafters on a single-pitch layout. That's fine for a straightforward gable, but it doesn't prepare you for irregular framing.
A major gap in beginner guidance is unequal-slope and irregular roof framing. More advanced layouts require handling opposite slopes, valley rafters, and backing angles, and framers often need to mathematically equalize rises and verify measurements geometrically, as noted in the Johnson Level framing guidebook.
That's why a simple framing project in Sharon can turn into a more technical one the minute a dormer, offset addition, or uneven remodel roof enters the job. In Pittsburgh suburbs especially, older additions often leave you tying new framing into roof lines that were never as square or true as the plans suggest.
A simple rule helps here. If your project includes valleys, hips, unequal slopes, or tie-in work to an existing roof, don't treat it like a beginner common-rafter exercise. The geometry changes, and so do the consequences of being off.
Common Rafter Construction Mistakes to Avoid
You find out fast whether your pattern is right. Sometimes it shows on the first test fit. Sometimes the problem waits until the sheathing goes on and the fascia line starts waving at you from the ground.
A lot of DIY rafter mistakes start the same way. The math looked right on paper, so the cuts get repeated before the first piece proves itself on the building.
One of the most useful habits is making one test rafter, fitting it in place, and correcting it before you cut the rest. Beginner guides often mention rafters ending up too long or leaving a gap, and this fit-up and template video shows the value of checking the pattern on the structure before committing the whole stack.
The mistakes I'd watch for first are these:
- Cutting every rafter from an untested pattern. One bad template can ruin a pile of lumber in a hurry.
- Ignoring lumber dimensions. Stock varies more than online calculators assume, especially if the material has a little crown, twist, or inconsistent milling.
- Overcutting the birdsmouth. A notch can sit down nicely and still take too much strength out of the rafter.
- Using force to make a piece fit. If you have to shove, rack, or pry it into place, the cut or the layout is off.
- Assuming the building is square and level. Older garages, sheds, and additions often drift enough to throw off a clean textbook layout.
Those errors tend to stack up. A long rafter gets pushed into place. The seat cut stops bearing the way it should. The tails stop lining up, and the roof edge tells on every shortcut.
The gotcha many basic guides miss is that a correct calculation is only the starting point. Real framing lumber is rarely perfect, ridge stock may not match the plan exactly, and existing walls can be out of line just enough to matter. That is why experienced framers cut one, test one, then use that piece as the true pattern only after it fits.
Honesty with your own skill level matters here. A new outbuilding on a square frame is one kind of job. Tying into an older house, correcting a sag, or matching an addition is another.
Across a lot of older homes and farm buildings in western Pennsylvania and eastern Ohio, you run into settled walls, patched roof lines, and framing that was built by eye years ago. A by-the-book cut can still miss because the structure itself is no longer by the book.
If every board needs a different adjustment, stop and figure out why. If the ridge line will not stay straight, the tails refuse to line up, or the birdsmouth fit keeps changing from rafter to rafter, the problem is bigger than saw technique. At that point, having a framer or roofer look at the layout can save material, time, and a structural headache you do not want buried under shingles.
Your Rafter Project and Professional Guidance
Rafter work is satisfying because it combines math, hand skill, and judgment. When it goes well, the roof starts to look right early. The cuts land clean, the pattern repeats, and the frame comes together without a fight.
The main lessons are simple. Get the geometry right. Use decent stock. Mark one master rafter carefully. Test fit it before you copy anything. Don't confuse a correct layout with a structurally adequate roof.
That last point matters most. A roof carries load, resists uplift, ties walls together, and sets the line for everything that follows above the sheathing and below the gutters. That's why a capable DIYer can do some rafter projects well, but it's also why some projects shouldn't be guessed through.
If your roof framing is straightforward, your structure is square, and you're disciplined about the pattern process, you can make solid progress. If you run into irregular geometry, questionable existing framing, or structural concerns, bring in help before the mistakes get buried under roofing materials.
If you're planning a rafter project in Sharon, Hermitage, Pittsburgh, Erie, or nearby communities, Penn Ohio Roofing & Siding Group can review the roof structure, discuss repair or replacement options, and provide a free estimate for work in Mercer, Beaver, and Lawrence counties.