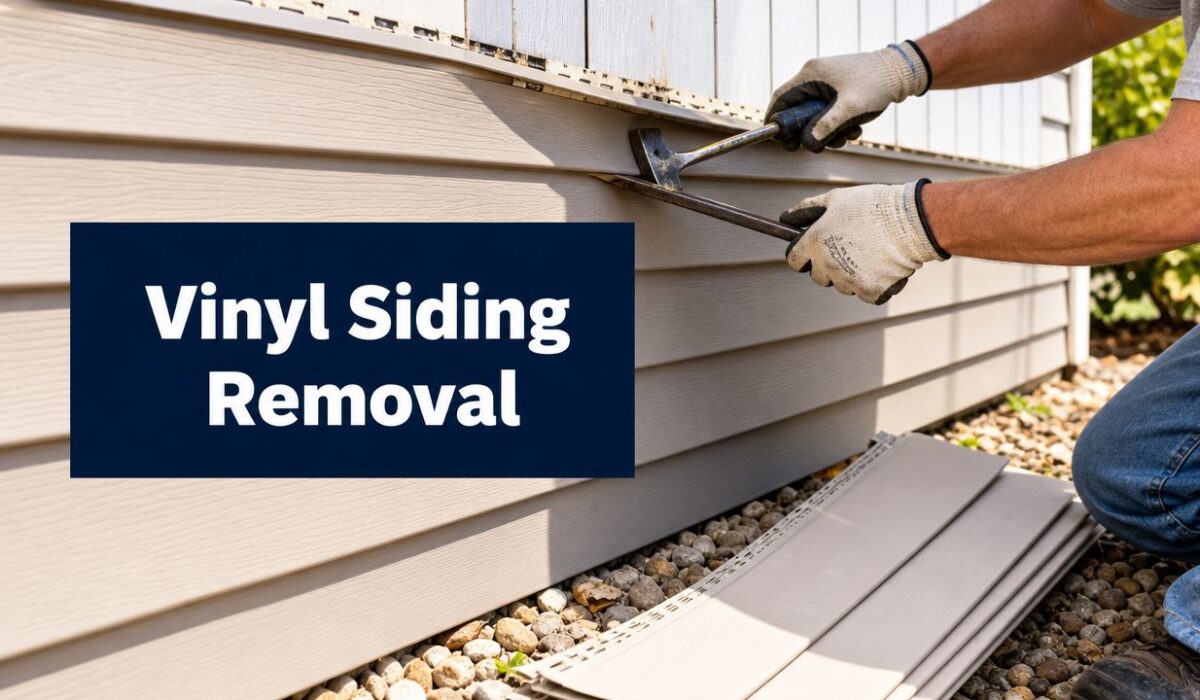
You're probably standing in the yard looking at siding that used to be fine and now clearly isn't. Maybe it's faded, cracked near a corner, loose after a storm, or rippled around a window. A lot of homeowners in Sharon, Pittsburgh, and Erie start with the same thought: “I just need to pull this old vinyl off and put new siding on.”
That's sometimes true. Often, it isn't.
Vinyl siding removal is rarely just a demolition task. It's also the moment when you find out whether the wall behind the siding was protected well, flashed correctly, and kept dry over time. That's the part most quick how-to guides skip, and it's the part that changes a simple exterior refresh into a real repair job.
Table of Contents
- Why Plan a Vinyl Siding Removal
- Essential Tools and Safety Preparations
- The Step-by-Step Siding Removal Process
- Inspecting and Repairing What Lies Beneath
- DIY vs Professional Removal Cost Time and Risk
- Your Next Steps And When to Call the Pros in PA
Why Plan a Vinyl Siding Removal
A common scenario goes like this. The siding looked acceptable from the street for years, then one season you notice chalking, brittle edges, open seams, or panels that won't sit flat anymore. You wash one wall, replace one piece, and realize the problem isn't isolated.
Sometimes cleaning buys you time. Sometimes it only makes the wear easier to see. If you're trying to figure out whether the siding is just dirty or at the end of its run, it helps to understand pressure wash vinyl siding limits before you assume appearance alone is the issue.
Removal is normal, not unusual
Homeowners often feel like a full tear-off means something went badly wrong. It usually just means the house has reached the point where patching no longer makes sense. U.S. demand for vinyl siding reached roughly 25.8 million squares by 2025, a market value of about $1.8 billion. With a typical lifespan of 20–40 years, this volume implies that hundreds of thousands of homes will require siding removal and replacement annually over the next decade, according to Freedonia Group's vinyl siding industry analysis.
That matters for one reason. You're not dealing with an oddball project. You're dealing with standard exterior maintenance on a huge share of the housing stock.
Practical rule: If the siding is brittle, repeatedly coming loose, or hiding repeated moisture stains indoors, removal isn't overkill. It's inspection access.
The real opportunity is behind the panels
The best reason to plan the job carefully isn't curb appeal. It's what the removed siding lets you verify. You get a direct look at sheathing condition, wrap details, flashing transitions, and the quality of older repairs.
That's also why homeowners should think beyond detergent and surface appearance. If you're still in the evaluation stage, Penn Ohio's guide to vinyl siding cleaning products can help separate cosmetic buildup from signs that the cladding itself may need to come off.
A planned removal gives you control. You can protect landscaping, organize debris, decide whether reusable panels are worth saving, and prepare for the very real possibility that the wall needs repair before any new siding goes on.
Essential Tools and Safety Preparations
Start with the right assumption. Vinyl siding doesn't come off cleanly just because you own a pry bar. It comes off cleanly when you disengage it in the right order, support the panel, and avoid turning a removable piece into shattered scrap.

Tools that actually matter
Some tools are essential. Others just make the work less frustrating.
- Zip tool: This is the proper siding removal tool. It reaches under the buttlock and releases the panel without forcing the seam.
- Flat pry bar or nail puller: Use it to pull fasteners without chewing up the nail hem.
- Hammer: Useful for trim removal, stubborn nails, and controlled tapping.
- Utility knife: Good for scoring, trimming, and cutting away old sealant.
- Tape measure: Necessary if you're labeling and saving pieces for reuse.
- Stable ladder or scaffold: The work is awkward enough without fighting unsafe footing.
Nice-to-have items help more than people expect.
- Painter's tape and marker: Label each removed piece by wall, course, and direction if you plan to reuse it.
- Buckets or magnetic trays: Keep nails and screws from ending up in the grass or driveway.
- Drop cloths or plywood sheets: Protect shrubs, decks, and AC units below the wall.
- Tin snips: Handy around trim details where a knife isn't the right tool.
If you'll be cutting replacement pieces, Penn Ohio's article on the best way to cut vinyl siding is a useful companion to the removal work.
Safety prep that gets skipped too often
The injuries on siding jobs are usually simple and preventable. Cuts from sharp trim edges. Eye hits from brittle fragments. Falls from rushed ladder moves. Accidental contact with exterior fixtures.
Use the basics every time:
- Safety glasses: Small chips and nail fragments travel fast.
- Work gloves: Vinyl edges and aluminum trim can slice your hands.
- Hard hat: Smart if someone is working above you or you're removing upper courses near overhangs.
- Dust mask: Helpful when old sheathing, dried debris, or fungal material is exposed.
- Work boots with grip: You'll be twisting, reaching, and backing down ladders with debris in hand.
Shut off power to exterior lights, receptacles, and fixtures on the wall you're opening. It's easy to forget what's wired behind a mounting block until a tool slips.
Prepare the site before the first panel
A clean setup saves time later. Move grills, furniture, and planters away from the wall. Lay out a debris zone where broken panels can stack without blocking your path. Decide in advance whether you're saving panels, trashing all of them, or setting aside only long undamaged runs.
If the house has bushes tight to the wall, tie them back or protect them. Wrestling siding loose while standing inside shrubs leads to torn plants and bad footing. Slow setup is cheaper than rushed removal.
The Step-by-Step Siding Removal Process
The removal process is straightforward once you respect the order. Most damage happens when people know what the siding looks like, but not how it's locked together.
Start at the top and work deliberately
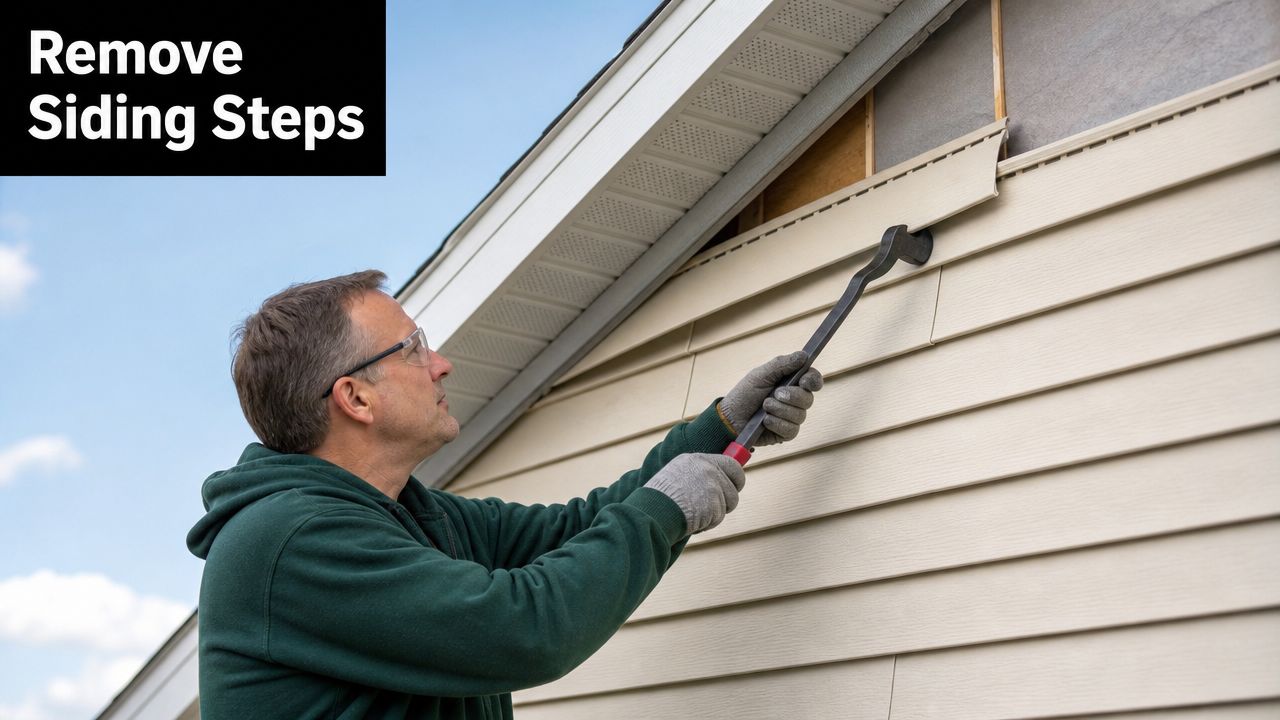
If you're removing a whole wall, begin with the highest accessible course and work downward. If you're removing one damaged section, start with the panel directly above the target piece so you can expose the fastening hem.
The key move is this: a sound removal workflow starts by locating the interlock seam, inserting a zip tool under the panel's buttlock, and sliding it horizontally to disengage the lock before removing nails. Forcing the panel before it's fully disengaged is a common cause of cracking, especially in cold weather, as explained in this vinyl siding removal tool guide.
That last point matters. Cold vinyl doesn't forgive rough handling.
Follow the unlock, expose, remove sequence
Use this order and don't improvise it:
Find the seam
Look along the lower edge of the panel you need to free. You're locating the interlock where it hooks to the course below.Insert the zip tool
Hook the tool under the buttlock and pull gently while sliding sideways. You should feel the lock release rather than snap.Lift the loosened panel above
Once unzipped, lift the lower edge of the upper course enough to expose the nails in the panel below.Pull the nails carefully
Use a pry bar or nail puller. Pull straight when possible so you don't tear the slotted nailing hem.Lower and remove the panel
After the fasteners are out, support the panel and work it free without twisting.
If a panel doesn't release, stop and check for a missed fastener or a section that isn't fully unlocked. More force is usually the wrong answer.
Working around windows, doors, and corners
Flat wall runs are the easy part. Trim areas are where DIY jobs get messy.
Around windows and doors, the panel edges usually sit in J-channel or another trim receiver. You may need to flex the panel slightly to free it. If someone sealed the trim with caulk, score the bead first with a utility knife rather than ripping the panel edge.
At outside corners, remove courses methodically and keep them in order. Corner posts and trim accessories often overlap the panel ends in ways that don't tolerate brute force. If you plan to reuse the siding, label each panel immediately after removal instead of making a pile and guessing later.
For starter strips and lower courses, expect more dirt, insect debris, and trapped moisture. Lower wall sections also deserve extra care because they're where splashback and drainage problems often show up first.
If you plan to reuse any pieces
Reuse changes your handling. It's one thing to tear off brittle siding headed for disposal. It's another to preserve matching pieces because that color or profile is no longer easy to find.
A few habits help:
- Stack panels flat: Don't lean long pieces in the sun where they can warp.
- Label by location: Left wall, rear wall, second course above window, and so on.
- Keep fasteners separate: Old nails mixed into a panel stack scratch and dent the finish.
- Don't drag pieces across concrete: Even removed panels can still be useful for a later repair.
The goal isn't speed. The goal is controlled access to the wall without creating extra damage you'll pay for later.
Inspecting and Repairing What Lies Beneath
This is where the job becomes real. Anyone can take siding off a wall. The hard part is knowing what the exposed wall is telling you.

A lot of homeowners assume they'll see dry sheathing and move straight to new siding. That's the assumption that causes repeat failures. Once siding is removed, installers often discover missing flashing, absent housewrap, fungal decay, or window integration problems, which can change the job from a simple siding swap into a major repair project, as noted in this overview of challenges found during vinyl siding removal.
What to look for right away
Start with your eyes and your hands.
- Soft sheathing: Press gently around lower walls, window corners, hose bibs, and penetrations. Softness, flaking, or crumbling means the material may no longer hold fasteners properly.
- Dark staining or fungal growth: Discoloration can point to chronic moisture, not just one isolated leak.
- Missing or torn housewrap: If there's no drainage plane behind the siding, wind-driven water may have been reaching the sheathing for years.
- Improper flashing: Head flashing over windows and doors, kick-out details, and transitions where roofs meet walls deserve close inspection.
- Poor window and door integration: Trim alone doesn't make an opening watertight. The water management details behind the trim matter more.
Decide what gets repaired first
Repair order matters. Don't install new wrap over rotten wood. Don't reinstall siding over unflashed openings. Don't assume a little softness will “dry out” once the wall is open.
Use this sequence:
| Priority | What to address | Why it comes first |
|---|---|---|
| First | Rotten or softened sheathing | New siding needs solid fastening and a sound substrate |
| Second | Missing flashing at openings and wall transitions | This controls bulk water before finishes go back on |
| Third | Housewrap or weather-resistive barrier defects | This restores the drainage plane behind the cladding |
| Last | Cosmetic trim and panel replacement | Finish work only makes sense after water control is corrected |
A wall that leaked once can be repaired. A wall that was never detailed correctly needs more than patchwork.
When a patch is enough and when it isn't
Small, localized damage can sometimes be cut out and replaced cleanly if the surrounding material is dry and solid. That might apply near one failed penetration or a narrow section under a window.
Broader decay is different. If the sheathing damage extends beyond a small area, if framing feels soft, or if multiple openings show the same defect pattern, the job has moved out of casual DIY territory. At that point, the risk isn't just ugly siding. It's continued water entry, poor nail holding, and concealed deterioration that keeps spreading after the new exterior goes on.
This is the part of vinyl siding removal that protects the house long-term. Ignore it, and new panels only cover old problems.
DIY vs Professional Removal Cost Time and Risk
A homeowner can remove vinyl siding. The better question is whether doing it yourself creates savings after you count the hidden parts of the job.
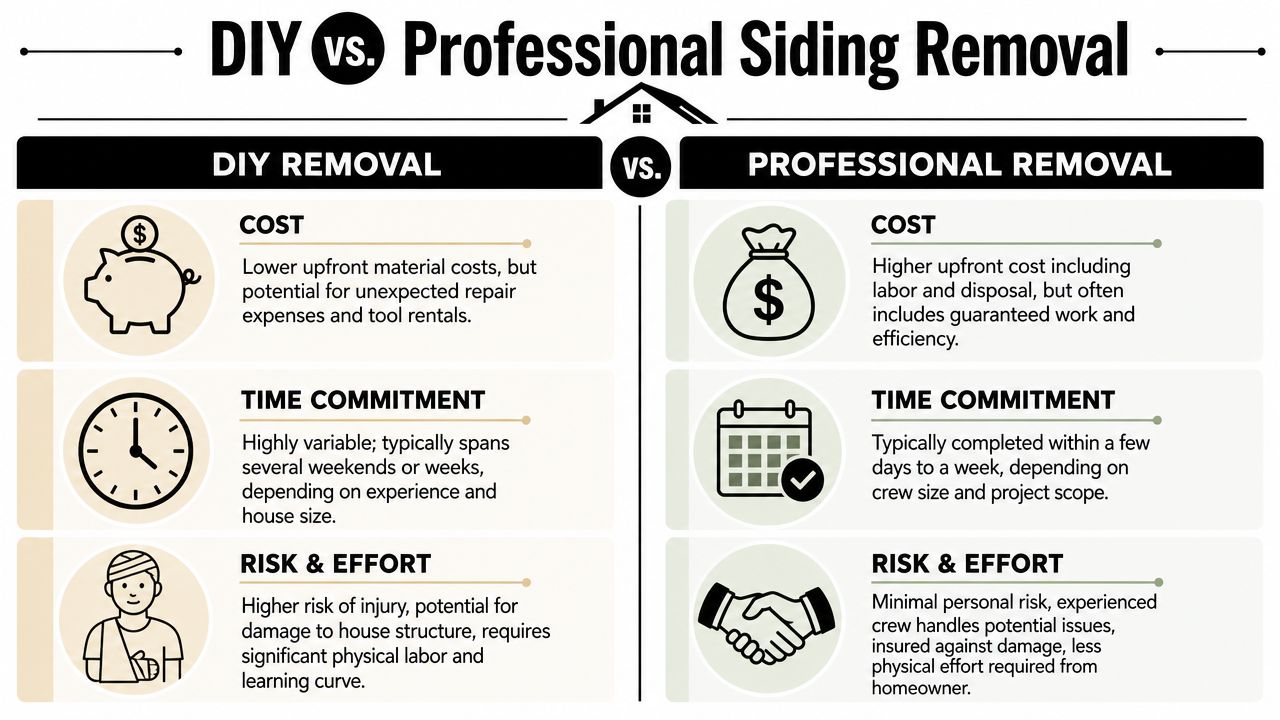
The financial tipping point
If you're only dealing with one damaged area, repair may be the sensible first move. National average costs for vinyl siding repair range from $283 to $1,089. When repair estimates approach 30-50% of a full replacement, which can be $8,000–$30,000, professionals and homeowners often pivot to a full removal and replacement project, based on Thumbtack's vinyl siding repair cost overview.
That's the part many people miss. The decision usually isn't “free DIY versus expensive contractor.” It's “limited repair, partial tear-off, or full replacement,” and each choice changes the labor and risk profile.
A plain comparison
| Factor | DIY removal | Professional removal |
|---|---|---|
| Upfront spending | Lower labor outlay, but tools, disposal, and repair materials add up | Higher quote, but labor, coordination, and disposal are usually built in |
| Time | Often stretches across nights and weekends | Usually moves faster because the crew already knows the sequence |
| Risk to the house | Higher if trim, flashing, or sheathing gets damaged during removal | Lower when the crew can spot and correct exterior-envelope issues |
| Personal effort | High. Ladder work, lifting, hauling, sorting debris | Low for the homeowner |
| Best fit | Small sections, accessible walls, confident DIY skill | Full elevations, upper-story work, hidden damage, or difficult trim |
Time and error cost more than people expect
DIYers usually underestimate two things. First, how slow the work becomes around windows, corners, and utility penetrations. Second, how much project momentum dies once the wall comes open and repairs are needed before siding can go back on.
That delay matters in Pennsylvania weather. In Sharon, Pittsburgh, and Erie, a wall that sits open longer than planned can turn a manageable job into a rushed weatherproofing problem.
Sometimes the cheapest path is the one that closes the wall correctly the first time.
When hiring out is the smarter move
Professional removal makes the most sense when any of these apply:
- The house has multiple stories: Ladder work changes the risk immediately.
- You suspect hidden moisture issues: Removal is only half the job if the wall system needs correction.
- The siding profile is hard to match: Breaking reusable panels becomes expensive fast.
- Openings are complicated: Bay windows, roof-to-wall intersections, and layered trim details need more than basic hand skills.
If your wall is straightforward and the work area is easy to access, DIY can be reasonable. If the project includes rot, flashing uncertainty, or a large elevation, professional labor often prevents more expense than it adds.
Your Next Steps And When to Call the Pros in PA
The decision usually becomes clear once you know what kind of job you have. If the siding is loose or damaged in one section, the wall is easy to access, and the sheathing underneath is sound, a careful DIY removal may be worth your time.
If you've read through the process and the inspection side feels more serious than you expected, that reaction is useful. It means you understand the stakes. Vinyl siding removal exposes the layer where water control either worked or failed, and that's not the place to guess.
A good stopping point for DIYers
You're in reasonable shape to handle it yourself if:
- The problem is localized: One area, one wall, or one obvious impact zone.
- The siding comes apart cleanly: Panels disengage without excessive breakage.
- The wall underneath is solid: No softness, staining pattern, or obvious detailing failure.
- You can close the wall promptly: You're not leaving exposed sheathing waiting on a future weekend.
When it's time to bring in help
Call a pro if you uncover soft sheathing, missing water-management details, or trim conditions you can't confidently rebuild. The same goes for upper-story work, walls tied into roofing transitions, and any project where the siding removal is really opening the door to broader exterior repairs.
For homeowners in western Pennsylvania, including Sharon, Pittsburgh, and Erie, a local contractor should know how these homes age, how weather exposure affects wall assemblies, and how to coordinate siding work with roofing and flashing details. If you need that level of help, Penn Ohio Roofing & Siding Group is one local option for homeowners looking for a siding contractor in Mercer, PA. The company is family-owned and has 25+ years of experience, serving the surrounding region with licensed, bonded, and insured crews.
A good outcome isn't just getting the old siding off. It's getting the wall corrected, protected, and ready for the next layer to last.
If your siding is cracked, loose, or hiding damage behind the wall, Penn Ohio Roofing & Siding Group can help you figure out whether you need a targeted repair or full removal and replacement. Reach out for a professional evaluation so the problem gets fixed at the wall assembly, not just covered at the surface.