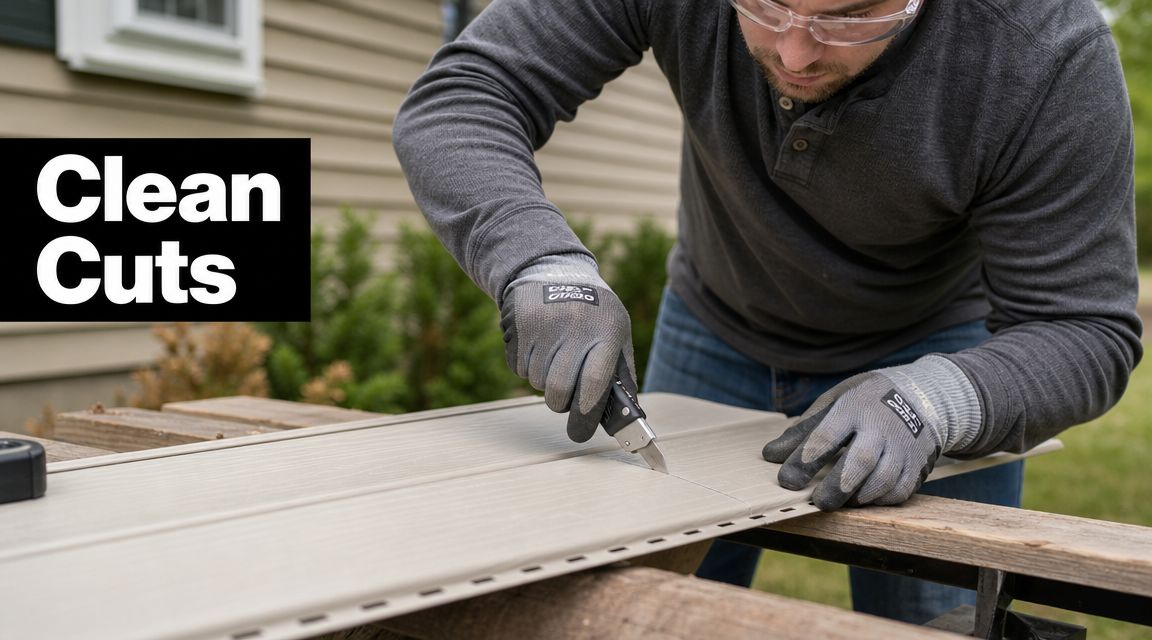
You're usually here for one reason. A piece of vinyl siding is on sawhorses, the tape measure is out, and you want one clean cut without turning a simple repair into a cracked, ugly panel.
That's where many tend to get confused. Vinyl doesn't cut like wood, and in Pennsylvania weather it definitely doesn't behave the same way in Sharon, Pittsburgh, or Erie from one season to the next. The best way to cut vinyl siding depends on the cut you're making, the temperature outside, and whether you need speed, control, or a finished edge that looks factory-made.
A lot of homeowners also start thinking about appearance once they're already holding the panel. If you're still deciding on the look of the exterior before cutting and installing, it helps to browse vinyl siding color options so the style and the install work together from the start.
Table of Contents
- Why Cutting Vinyl Siding Is a Skill
- Essential Tools for Cutting Vinyl Siding
- Preparation and Accurate Measurements
- Mastering Straight and Long Cuts
- Handling Curves and Complex Shapes
- Safety First and Common Mistakes to Avoid
Why Cutting Vinyl Siding Is a Skill
The panel usually breaks right after somebody says, “I only need one quick cut.”
That happens all the time on repair jobs. A homeowner lines up a blade, pushes too hard, or uses the wrong tool for the shape of the cut, and the siding splits past the mark. On older homes around Pittsburgh, I also see panels crack because the cut was technically straight, but the material was cold and brittle before anyone even started.
Vinyl siding rewards control, not force. If you rush it, the panel tells on you. You get chipped edges, torn corners, stress marks, and pieces that don't sit flat once they're locked into place.
Practical rule: A clean result comes from matching the tool to the cut, not from trying to make one tool do everything.
That's what separates a professional finish from a patch job. Short straight rips call for one method. Long production cuts call for another. Curves and notches around fixtures need patience and a different hand position entirely. The best way to cut vinyl siding isn't one universal trick. It's a set of habits that change with the cut you're making.
In Penn Ohio work, that matters because homes in Sharon, Hermitage, and Erie deal with temperature swings, older walls that aren't perfectly true, and repairs where new panels have to fit cleanly into existing runs. If the cut is off, the problem doesn't stop at the edge. It shows up after installation as a loose fit, a wave in the wall, or a panel that never quite looks right.
Essential Tools for Cutting Vinyl Siding
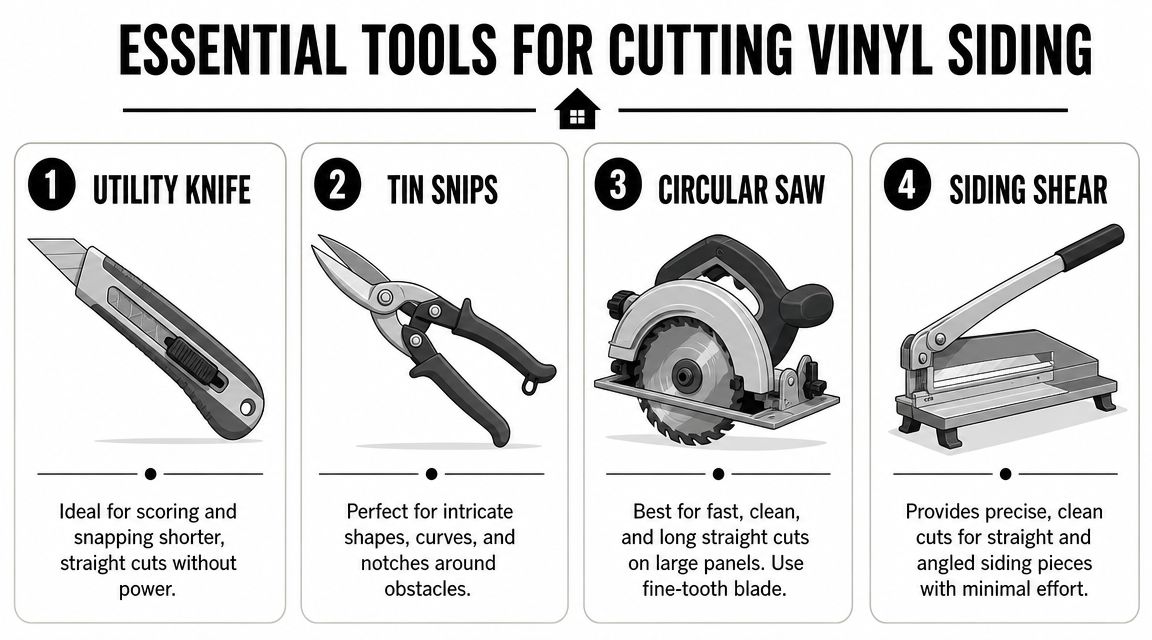
A good siding setup doesn't need a trailer full of specialty gear. Most of the time, three cutting tools handle the main work, and a fourth can make life easier if you do a lot of siding.
If you like practical shop habits, a few general home improvement tool tricks can also help you keep your layout, grip, and work surface under control when you're cutting exterior materials.
Match the tool to the cut
Utility knife is the workhorse for short straight rip cuts. Instead of trying to slice all the way through, you score the face and snap the panel on the line. That gives you more control and less edge damage than trying to muscle through with one heavy pass.
Tin snips are for precision. When you're cutting around a faucet, an outlet box, or a window corner, snips let you trim a little at a time. They're also useful for short vertical cuts where a saw is overkill and a knife doesn't give you enough shape control.
Circular saw is the right choice for long cuts and bigger production work. Trade guidance also separates standard vinyl from insulated products. One modern source notes that insulated vinyl siding must be cut with a circular saw, while standard vinyl can be cut with snips or a saw. That same source notes the blade can “grab and tear” if it's spinning the wrong way, which is why installers use the reversed-blade setup as standard practice in the field, as explained in this insulated siding cutting guide.
Siding shear is useful if you cut siding often and want repeatable straight or angled cuts without a saw. It's not mandatory for most homeowners, but it can be handy on trim-heavy jobs.
For homeowners who'd rather skip trial and error and have the panels fitted during installation, professional vinyl siding installation in Hermitage is one practical route.
Tool Selection for Vinyl Siding Cuts
| Tool | Best For | Pro Tip |
|---|---|---|
| Utility knife | Short straight rip cuts | Score with a straightedge, then bend and snap instead of forcing the blade through |
| Tin snips | Short vertical cuts, curves, notches | Take small bites so the panel doesn't crease at the corner |
| Circular saw | Long cuts and insulated siding | Keep the panel supported so the edge stays clean from start to finish |
| Siding shear | Repeatable straight and angled cuts | Useful when you want clean cuts with less mess than a saw |
The wrong tool usually doesn't fail all at once. It leaves little signs first. Chatter on the edge, whitening at the bend, and a panel that feels stressed before it's even hung.
Preparation and Accurate Measurements
Bad cuts often start before the blade touches the panel. A crooked mark, a rushed measurement, or forgetting about movement in the channel can ruin a panel that was otherwise cut cleanly.
Mark the panel before you touch a blade
Use a tape, a square, and a visible fine mark. On a bright day, especially with lighter siding colors, faint pencil lines disappear fast. I prefer a clear layout line that I can still read after moving the piece from the wall to the table.
Keep the panel fully supported while marking. Vinyl flexes, and if it sags while you measure, your line can drift. Check the wall opening, then check the accessory channel or corner post where the piece needs to fit. Those aren't always the same.
If you're planning a full exterior job, not just a single repair, a measuring guide like how to measure vinyl siding helps you avoid ordering and layout mistakes before cutting day starts.
Leave room for movement
Vinyl moves with temperature. That means the perfect measured length is not always the right installed length.
In colder conditions, installers are advised to leave a 3/8-inch expansion gap at accessory interfaces, or 1/4 inch in warmer conditions, so the panel can move without buckling or blowing out. That clearance guidance is laid out in this vinyl siding cutting and fit article.
A few prep habits make a big difference:
- Measure to the actual receiving point: Don't measure only face-to-face. Include the channel or corner where the piece lands.
- Cut for fit, not friction: A panel should sit in place with room to move. If you have to force it, it's too tight.
- Check temperature before final cuts: A panel sized on a warm afternoon in Sharon may behave differently once the air turns cold.
Tight cuts look good for about five minutes. After that, the wall starts telling you what you did wrong.
Mastering Straight and Long Cuts
Straight cuts are where most siding work lives. If you can do these well, the whole job looks sharper.
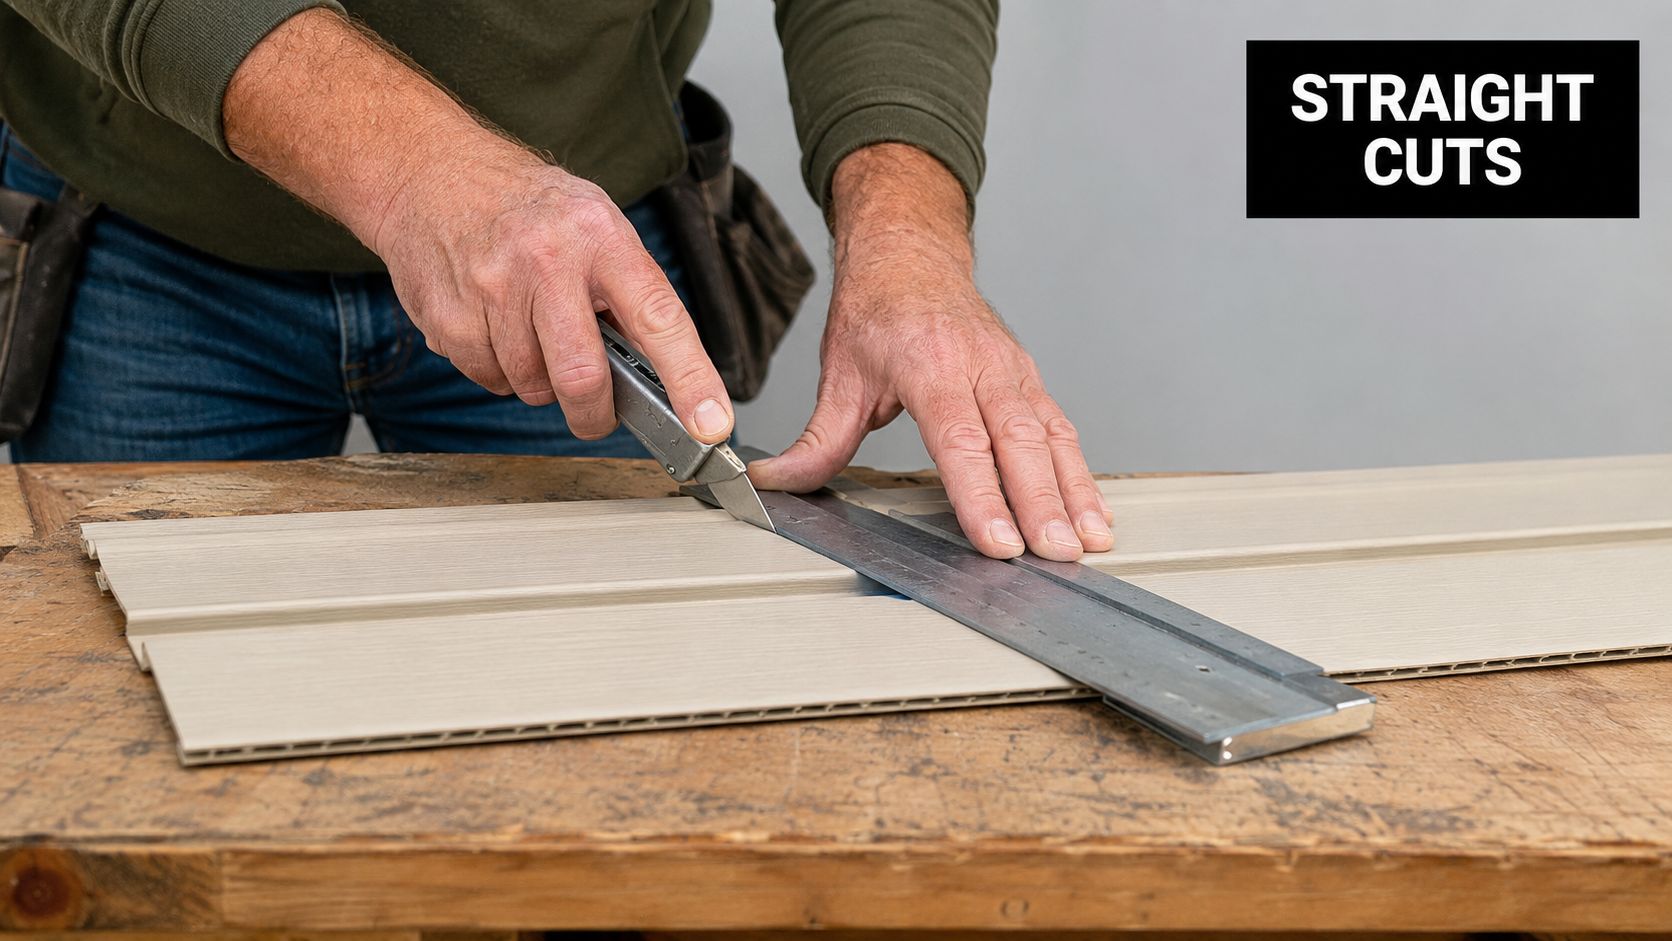
Use score and snap for shorter straight cuts
For straight cuts, the most widely recommended method is score and snap. Mark the line, place a straightedge on the panel, score the face with a utility knife, then bend the panel until it breaks cleanly. Trade guidance consistently treats this as the preferred approach for small sections because it helps reduce cracking and avoids the chipping you can get with power tools, as described in this guide to cutting vinyl siding cleanly.
The move that matters most is restraint. You're not trying to carve through the siding in one shot. You're creating a controlled weak line so the panel breaks where you want it to.
A clean routine looks like this:
- Lay the panel flat: Support both sides so it doesn't bounce.
- Lock in the straightedge: Don't freehand a finish cut if you want it to look professional.
- Score the face: Keep steady pressure and follow the line.
- Bend the panel away from the score: The break should run cleanly along the mark.
Use a saw for long runs
For long cuts, especially when you're trimming multiple panels to the same width, a circular saw is faster and more consistent. The pro setup is a fine-tooth plywood blade mounted backward, and one expert source specifically recommends a 40-tooth blade for cleaner results in vinyl, as noted in the same trade guidance linked above.
That backward blade setup looks odd if you haven't seen it before, but it solves a real problem. Standard blade direction can chip the face or make the cut feel aggressive. The reversed setup cuts cleaner because it reduces that grabbing action at the surface.
A few field habits help here:
- Support the full panel length: Long panels chatter if they hang off the table.
- Feed smoothly: Don't stop and restart midway unless you have to.
- Keep the face side consistent: If you're batching cuts, orient each piece the same way.
In practice, the best way to cut vinyl siding for straight runs comes down to this. Use the knife when control matters more than speed. Use the saw when the cut is long enough that consistency and efficiency start to matter more.
Handling Curves and Complex Shapes
Most houses stop being simple the minute you reach a light block, hose bib, receptacle, or window trim. That's where clean siding work starts looking like finish carpentry.
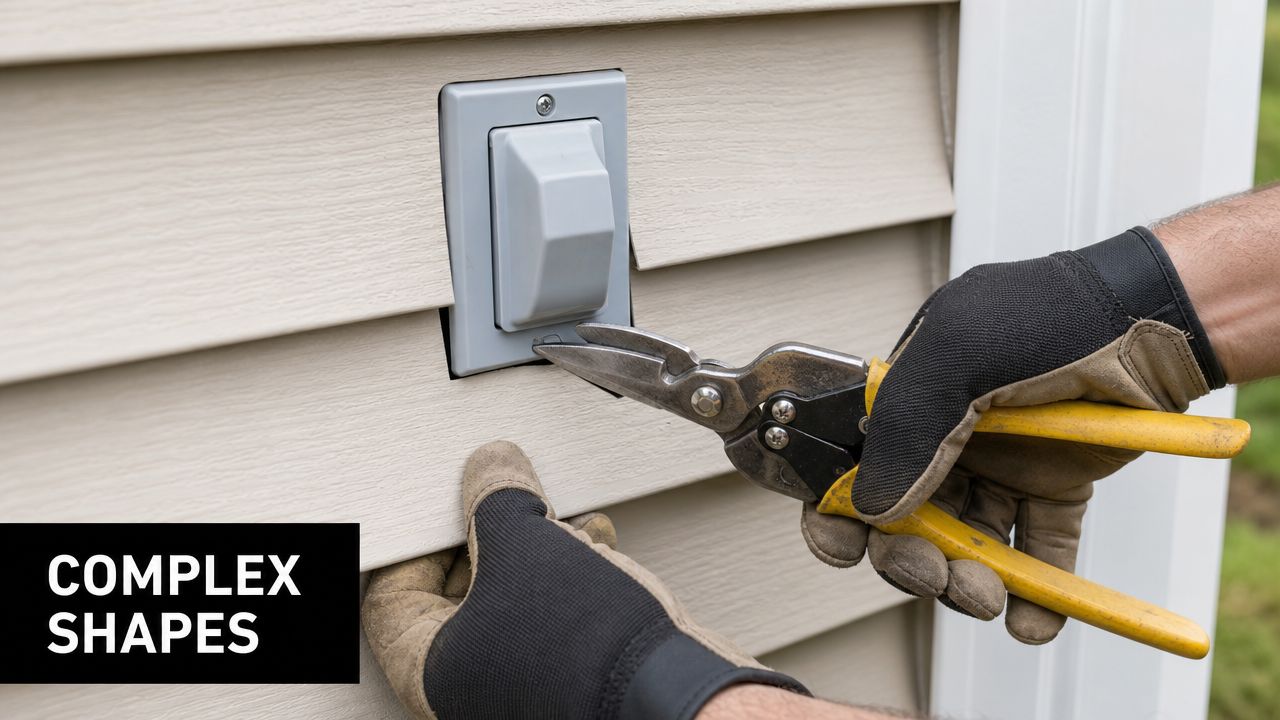
Snips are the right answer for detail work
Tin snips give you control that a saw can't. When the cut has to turn, stop short, or land exactly on a mark without overshooting, snips are the safer choice.
The mistake I see most is trying to make one full cut to the final shape. That usually creases the panel or leaves an ugly notch at the corner. Better results come from making a series of short, controlled cuts and sneaking up on the line.
Use this approach:
- Rough in the shape first: Leave a little extra material on the first pass.
- Trim in stages: Small bites keep the vinyl from folding or tearing.
- Relieve tight corners: If a notch is deep, make relief cuts before trimming the final edge.
Around fixtures, slow hands beat powerful tools every time.
How to cut around lights, outlets, and pipes
For odd shapes, make a template first. Cardboard works well because you can test it against the wall without wasting a panel. Once the template fits, transfer the shape to the siding and cut gradually.
For inside notches, start from the edge of the panel whenever possible. If the opening lands in the middle of the panel, drill or start a small opening carefully, then work outward with snips so you don't split the surrounding face. Keep the panel supported close to the cut so it doesn't flex while you're trimming.
A good fit around penetrations should look deliberate, not jammed in. You want the opening neat enough to finish cleanly with the proper trim or block, but not so tight that the panel binds when it moves.
Complex cuts also reward dry-fitting. Hold the piece in place before locking it in. On older homes in Erie and Pittsburgh, walls and trim lines are often a little out, and that final test fit catches mistakes while they're still easy to fix.
Safety First and Common Mistakes to Avoid
A lot of siding damage happens because people are focused on the cut and ignore everything around it. Bad support, cold material, dull blades, and awkward body position ruin panels fast.
Cold weather changes everything
This is the part most online guides miss. Cold-weather cutting is a major weak spot in typical siding advice. Vinyl becomes significantly more brittle as temperatures drop, which raises the chance of chipping and cracking during cutting and handling. That winter-specific problem is highlighted in this discussion of siding cutting in cold conditions.
That's a real issue in Western Pennsylvania. In Erie lake-effect cold or a hard winter morning near Sharon, a panel that behaved fine in mild weather can snap badly if you handle it the same way.
A few safe habits help:
- Warm the material when possible: Don't drag ice-cold panels straight to the cutting table if you can avoid it.
- Slow down your handling: Fast bends and rough moves crack cold vinyl.
- Support the piece close to the cut line: Less flex means less stress in brittle conditions.
Mistakes that ruin good siding
Some errors show up right away. Others wait until the panel is on the wall.
Common ones include:
- Using a dull blade: A dull knife tears instead of scoring cleanly.
- Forcing one tool to do every cut: That's how straight cuts wander and curved cuts look hacked out.
- Ignoring panel support: Long pieces need support before, during, and after the cut.
- Skipping safe removal habits on repair work: If you need to access existing panels before cutting replacements, this guide on how to take siding off helps prevent unnecessary damage.
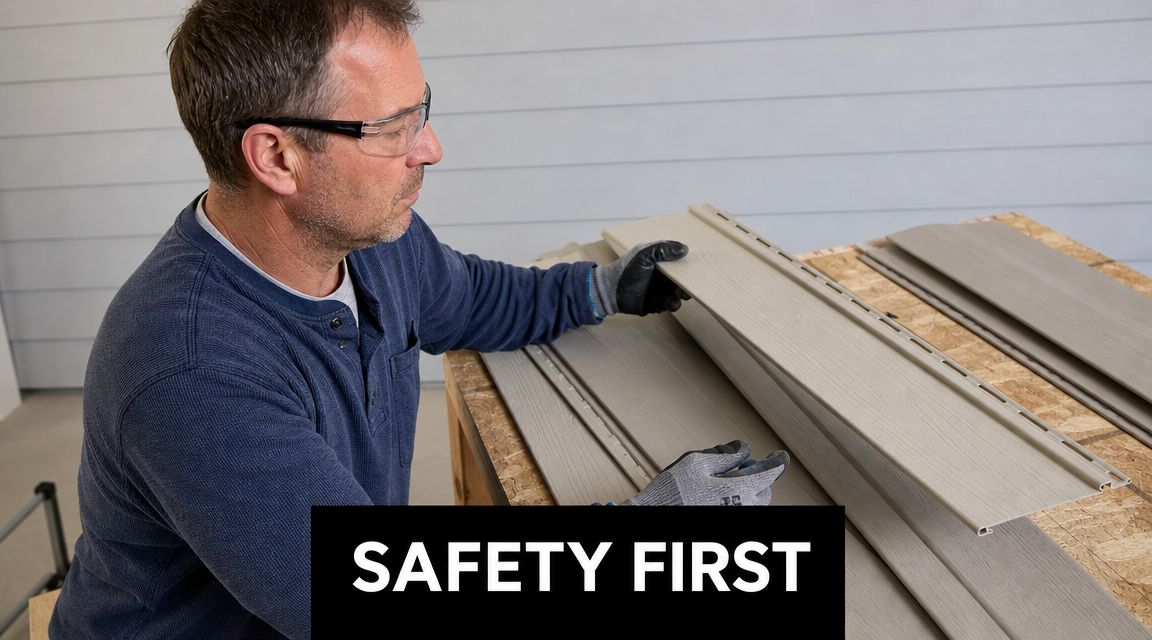
Wear safety glasses. Vinyl shards are sharp, and saw chips can move unpredictably. Gloves help too, especially when you're working snips around tight notches and cut edges.
If the job involves second-story walls, difficult fixture layouts, or brittle winter material, it's usually smarter to hand it off. Penn Ohio Roofing & Siding Group handles exterior work in this region, and for homeowners dealing with siding cuts tied to larger repair or replacement work, that's one local option when the project goes beyond basic DIY.
If you're dealing with cracked panels, tricky cut-ins, or a full siding project around Hermitage, Sharon, Pittsburgh, or Erie, Penn Ohio Roofing & Siding Group can help you handle the repair or installation with the right fit, safe removal, and clean finished cuts.