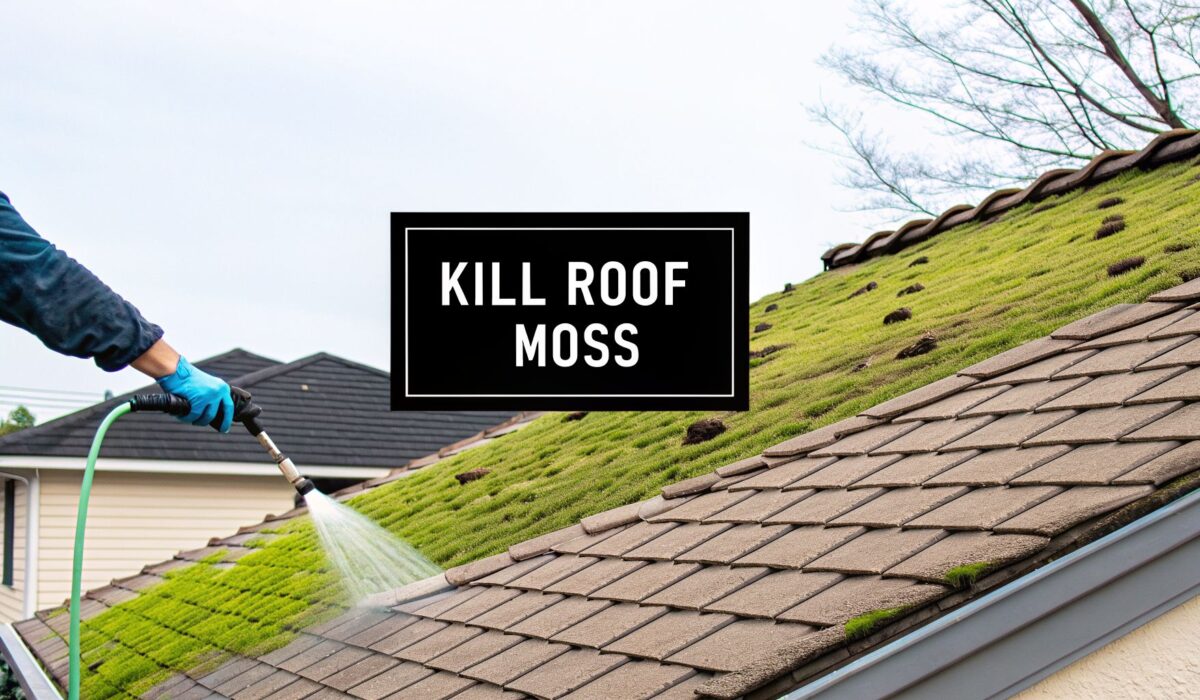
The best way to get rid of moss on your roof is to use a specialized, eco-friendly cleaning solution, apply it with low pressure, and gently rinse it away after it's had time to do its job. This soft wash method is absolutely essential. Trying to blast it off with a pressure washer can permanently scar your shingles, void your warranty, and set you up for some seriously expensive repairs. Getting this right is the key to protecting your home’s most important asset.
Why You Can’t Ignore Moss on Your Roof
That green, velvety blanket spreading across your shingles might look quaint, almost rustic, but it's really a silent threat to your home's integrity. It’s so much more than a cosmetic issue—it's an active problem that demands attention. Letting it go can kick off a chain reaction of damage that is both costly and completely preventable.
The Hidden Damage Moss Inflicts
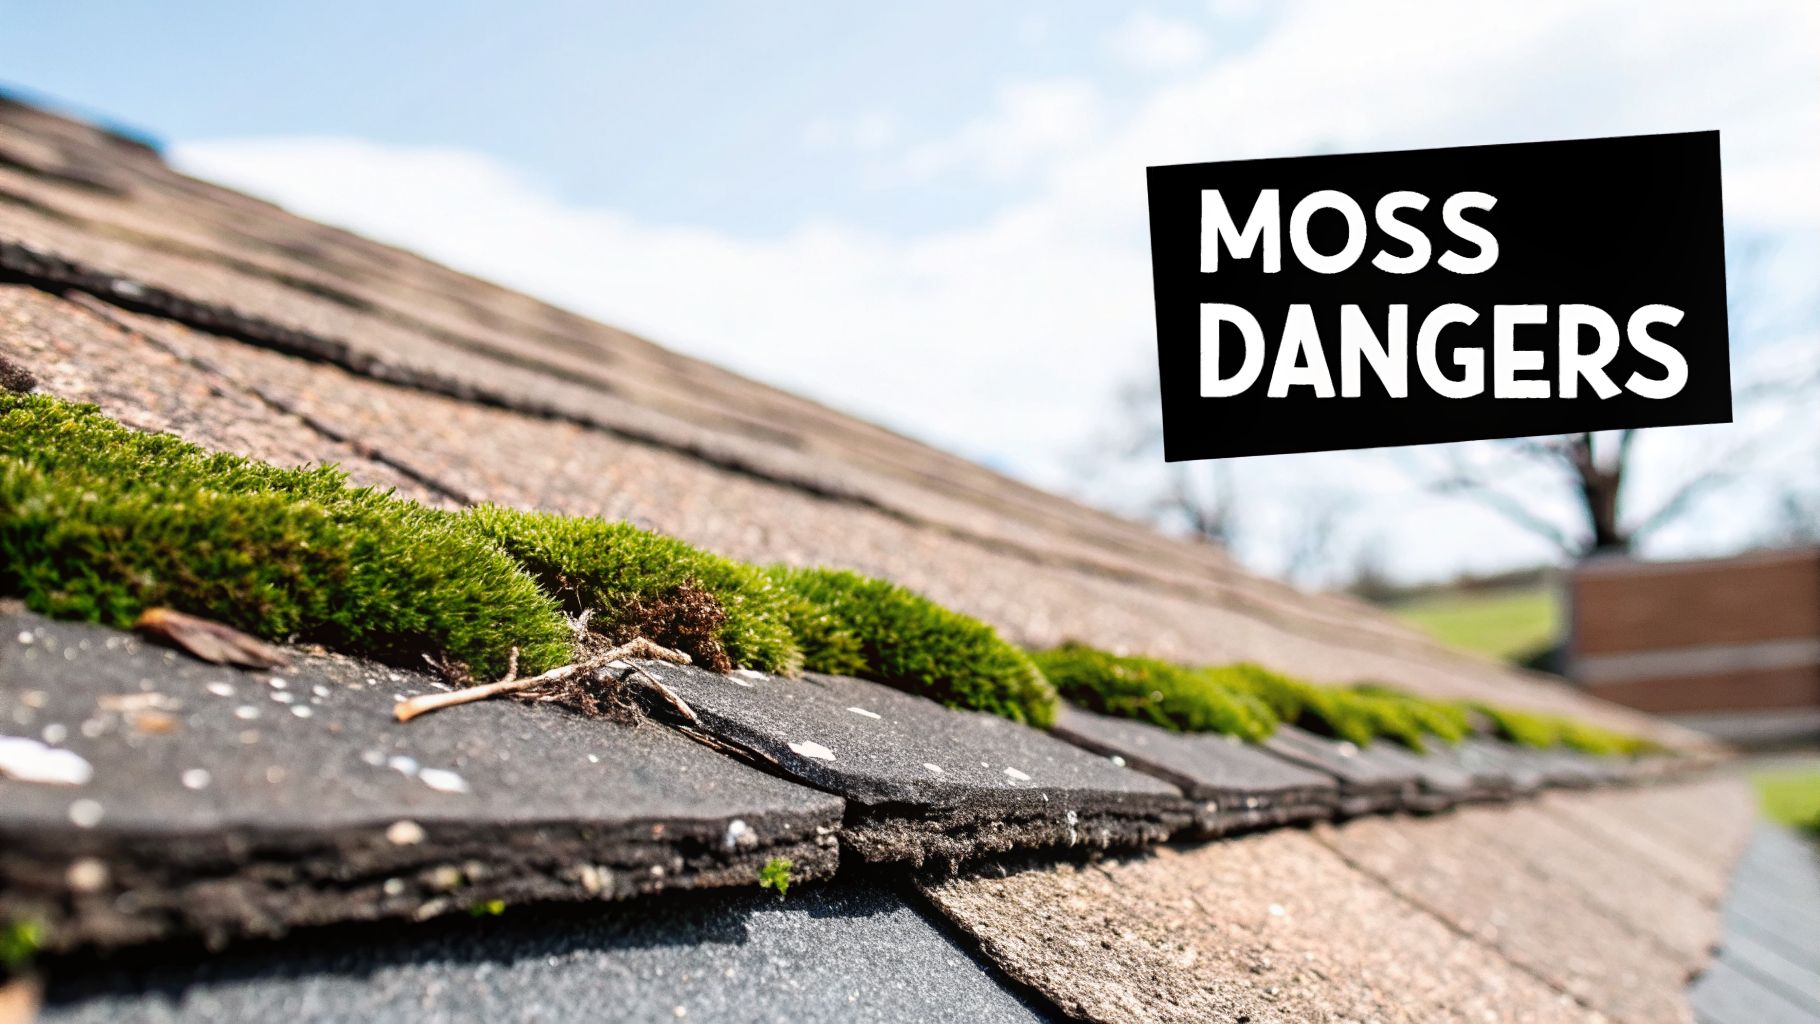
Think of moss as a sponge. It absorbs and traps a massive amount of water directly against your roofing materials. This constant dampness is the real enemy here. Asphalt shingles, which are meant to shed water as quickly as possible, are especially at risk.
When they’re always damp, shingles start to break down. The protective granules that shield them from UV rays and harsh weather get loose and wash right off. This exposes the asphalt layer underneath, drastically cutting the shingle's lifespan short.
Worse yet, moss grows tiny, root-like structures called rhizoids that work their way under the edges of your shingles. This slowly lifts them up, breaking the watertight seal and leaving them vulnerable to wind and water. When winter hits, that trapped water freezes and expands, creating ice dams that can shove water up under the shingles and right into your attic.
Expert Insight: In all our years on the job, some of the worst leaks we've repaired didn't start with a big storm—they started with years of unchecked moss growth. A tiny green patch can eventually rot out the entire roof deck and even compromise the beams holding it up. That's a repair bill exponentially higher than what simple moss removal would have cost.
From Cosmetic Flaw to Costly Repair
Dismissing moss as just an eyesore is a common and expensive mistake. What starts as a few green spots on a shaded slope can spread like wildfire, especially in the damp climates we get here in Pennsylvania and Ohio.
By letting it thrive, you’re risking some serious problems:
- Shingle Decay and Granule Loss: That constant moisture softens and degrades asphalt shingles, causing them to fail years ahead of schedule.
- Structural Rot: Water seeping under the lifted shingles can rot the wooden roof deck, rafters, and attic insulation. This damage often stays hidden until you have a major leak inside your home.
- Heavy Roof Load: A roof saturated with moss and water is incredibly heavy, putting a huge amount of strain on your home’s structure.
- Pest Infestations: Damp, decaying organic matter is basically an open invitation for insects and other pests to move in.
Homeowners are starting to catch on. The global market for roof cleaning services was valued at USD 6.28 billion in 2023 and is projected to climb to USD 10.15 billion by 2032. You can dig into the full roof cleaning market report to see the data, but the trend is clear: people understand that preventative maintenance like moss removal is a critical investment. Taking action now isn’t just a cleaning project; it's essential home maintenance.
Gathering Your DIY Moss Removal Toolkit
Before you even think about climbing a ladder to deal with that green fuzz on your roof, we need to talk about your game plan. This isn't just another weekend chore; it's a project that involves working at heights, and that means risk is part of the equation. A safe and successful moss removal job starts on the ground, with the right gear in hand, long before you set foot on a shingle.
Jumping into this with the wrong equipment is a surefire way to damage your roof or, even worse, yourself. Think of it this way: your first priority is staying safe, and your second is getting the moss off effectively. Let's make sure you have the right tools for both.
Essential Safety Gear You Cannot Skip
Let's be blunt: working on a roof is dangerous. Even on a single-story home, a fall can have serious consequences. The roof surface itself can be surprisingly slick from moisture, moss, or even loose shingle granules. Because of this, your first and most important investment is in high-quality safety gear.
These are the non-negotiables:
- A Sturdy Extension Ladder: Your ladder needs to be rated for your weight and tall enough to extend at least three feet above the roofline. This gives you something stable to hold onto as you get on and off the roof. Always, always place it on solid, level ground.
- A Roof Safety Harness and Rope: If your roof has any kind of noticeable pitch, a harness isn't just a good idea—it's your last line of defense. It's the one piece of equipment you hope you never need, but you'll be glad you have it if you do.
- High-Traction, Non-Slip Footwear: Grab a pair of soft-soled work boots. They give you the grip you need to move around confidently without scuffing up or damaging the shingles.
- A Reliable Spotter: Never work on a roof alone. Having someone on the ground to stabilize the ladder, pass you tools, and call for help in an emergency is absolutely critical.
We once heard a story about a homeowner who propped his ladder on a stack of bricks to get a little extra height. The bricks shifted, the ladder slid, and he was lucky to walk away with only a sprained ankle. Never compromise on ladder safety—find stable ground, even if it means taking a longer route.
Tools for the Moss Removal Job
With your safety squared away, you can turn your attention to the tools that will actually get the moss off your roof. The goal here is to be tough on the moss but gentle on your shingles. Using anything too aggressive can cause more long-term damage than the moss ever would.
Luckily, your main cleaning tools are pretty straightforward:
- Standard Garden Hose: You’ll need this to pre-wet the roof before applying any treatment and for the final rinse-down.
- Low-Pressure Nozzle: This is crucial. Do not use a pressure washer tip. All you need is a simple spray nozzle that creates a wide, gentle spray, almost like a shower setting. High pressure will strip the protective granules right off your shingles and force water where it doesn't belong.
- Soft-Bristle, Long-Handled Brush: Find a brush with bristles soft enough that you wouldn't mind using it on your car. An extendable handle is a huge help, allowing you to reach more area without dangerously leaning or overextending yourself.
- Handheld Sprayer: A basic pump sprayer, the kind you’d use in the garden, is perfect for applying your moss treatment solution. It allows you to distribute the liquid evenly without oversaturating any one spot.
One final prep step: make sure your gutters and downspouts are clear of any blockages. This is vital. When you start rinsing, all that dead moss and cleaning solution needs a clear path to drain away. Otherwise, you’ll just create a thick, sludgy dam right at the edge of your roof. If you need a refresher, you can learn how to clean downspouts and gutters properly before you start. It’s a small step that makes a big difference.
Choosing Your Moss Removal Method
With your tools in hand, it's time to decide on your approach. There's no single "best" way to kill moss on a roof—the right method really depends on how bad the problem is. If you're just seeing a light green haze, a bit of careful elbow grease might be all you need. But for those thick, spongy mats of moss, you’ll have to bring in a chemical solution to get the job done right.
We'll go over the most effective DIY methods, from a simple scrub-down to the best cleaning solutions you can use. More importantly, we'll cover what you absolutely must avoid doing so you don't accidentally wreck your shingles. The goal here is to kill the moss, not your roof's lifespan.
This safety flowchart is a great starting point to see if a DIY job is even a good idea for you. Notice that the very first question is about ladder safety.
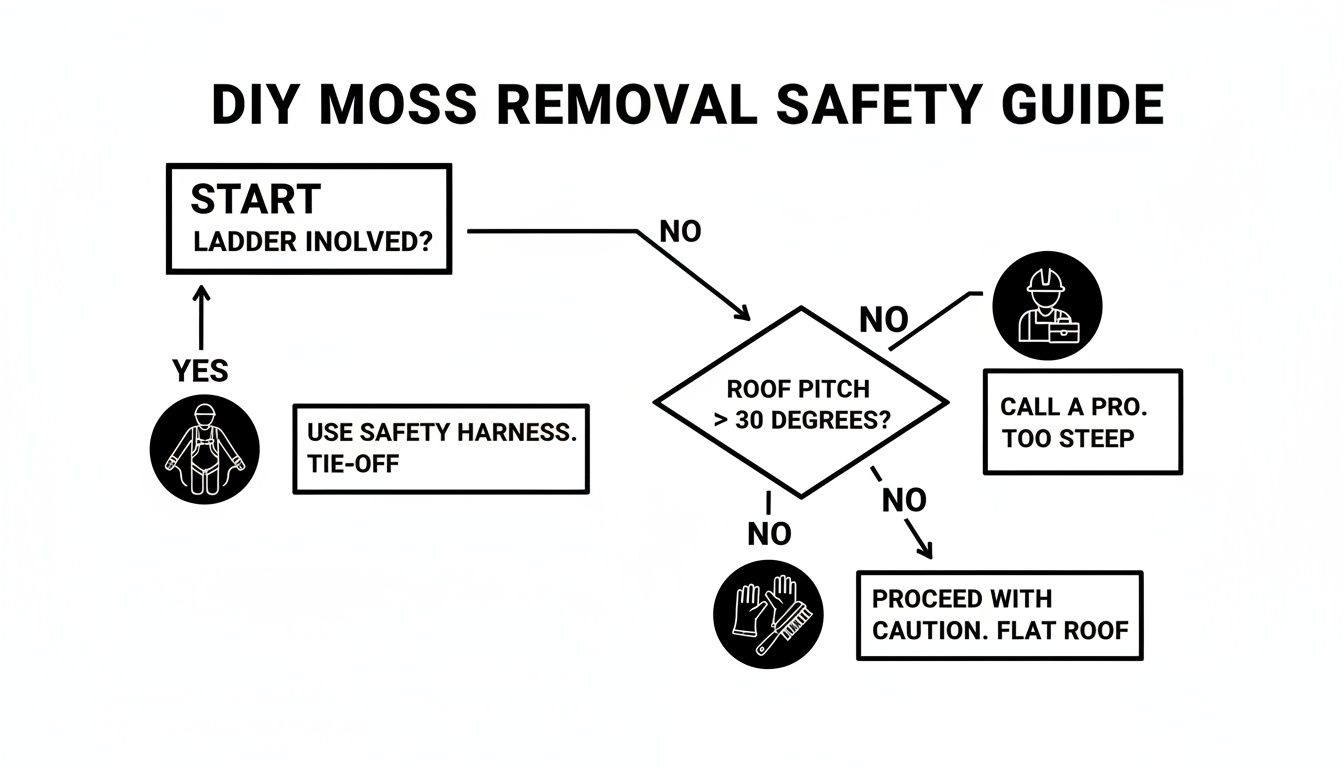
As you can see, if you're not comfortable or properly equipped for working at heights, your safest bet is to call in a professional. It’s just not worth the risk.
For Light Moss Growth: The Gentle Scrub
Caught it early? Great. If you’re only dealing with small, thin patches of moss, you can often get away with a manual scrub. This just involves a soft-bristle brush and a low-pressure rinse. It takes some patience, but it's the least aggressive option for your roof.
The most important part of this technique is the direction you work. Always, always work from the top of the roof down. If you brush or spray water upwards, you’ll force it directly under your shingles. This can break their factory seal and cause the exact kind of water damage you're trying to prevent.
Think of your shingles like fish scales—you only want to brush them in the direction they lay flat. A gentle, downward sweep with the brush will dislodge the moss without lifting the shingle edges. Once the moss is loose, just use a regular garden hose with a low-pressure nozzle to rinse the gunk down into your gutters.
For Heavier Moss Growth: Effective Killing Solutions
When you're up against a thick carpet of moss, scrubbing alone isn't going to solve the problem. That moss has put down roots, and you'll need a proper treatment to kill it off for good. In the pro roofing world, we talk about soft washing versus pressure washing. For a DIYer with an asphalt shingle roof, a soft wash approach is the only safe way to go. You can discover in more detail from industry reports how pros choose methods based on roof materials, but for our purposes, it’s all about gentle but effective chemicals.
You basically have two choices for a DIY soft wash: a store-bought cleaner or a homemade mix.
Commercial Cleaners: Go for a product made specifically for roof moss, preferably one that is sodium percarbonate-based. When you mix it with water, it becomes hydrogen peroxide and soda ash, a combination that kills moss effectively without being harsh on asphalt shingles. These are often sold as "oxygen bleach" and are a great biodegradable option.
Homemade Solutions: For more moderate moss, a simple mix of dish soap and water can work wonders. I’ve seen it work plenty of times. Just mix about 8 ounces of blue Dawn dish soap into a 2-gallon garden sprayer filled with water. The soap works by breaking down the moss’s waxy coating, which causes it to dry out and die off.
Pro Tip: Whatever you use, apply it on a cool, overcast day. If the sun is beating down, your cleaning solution can evaporate before it has time to work its magic. Let the solution sit for at least 20-30 minutes (or follow the product's directions) before you give it a gentle rinse.
Methods and Products to Avoid at All Costs
Sometimes, what you don't do is even more important. Using the wrong tool or chemical can cause thousands of dollars in damage, void your roof's warranty, and take years off its life. Stay away from these.
Pressure Washers: Do not, under any circumstances, use a pressure washer on an asphalt shingle roof. That high-pressure jet will strip the protective granules right off your shingles. Those tiny granules are what protect your roof from UV rays and fire. Using a pressure washer is like taking a sandblaster to your roof—it causes immediate and irreversible damage.
Chlorine Bleach: Standard household bleach (sodium hypochlorite) will definitely kill moss. The problem is, it also corrodes metal roofing components like your flashing, gutters, and vent pipes. It can also discolor your shingles and is toxic to any plants or landscaping it runs off onto.
To help you choose, here's a quick comparison of your options.
Comparing DIY Moss Removal Solutions
Deciding on a cleaning agent can feel overwhelming, but it boils down to matching the product's strength and risks to the severity of your moss problem. This table breaks down the most common options you'll encounter.
| Cleaning Agent | Best For | Pros | Cons / Risks |
|---|---|---|---|
| Water & Soft Brush | Very light, new moss growth | – No chemicals involved – Inexpensive |
– Labor-intensive – Ineffective on thick moss |
| Sodium Percarbonate | Moderate to heavy moss | – Highly effective killer – Eco-friendly; biodegradable – Safe for most roof types |
– More expensive than DIY – Requires proper mixing |
| Dish Soap Solution | Light to moderate moss | – Very affordable – Gentle on shingles – Readily available |
– Slower acting – May require a second application |
| Chlorine Bleach | NEVER USE | – Kills moss quickly | – Corrodes metal flashing – Discolors shingles – Toxic to plants |
| Pressure Washer | NEVER USE | – Removes moss fast | – Voids roof warranty – Strips shingle granules – Forces water under shingles |
Ultimately, finding the best way to kill moss on your roof is about using the right tool for the job. A gentle scrub for minor spots and a targeted, roof-safe chemical for anything more serious is the formula for a successful—and safe—DIY project.
How to Keep Moss from Coming Back
You’ve put in the work to get that moss off your roof, which is a great first step. But the job isn't truly done until you make sure it doesn't return. Winning the war against moss is all about long-term prevention—turning your roof from a moss-friendly haven into a place where it just can't get a foothold.
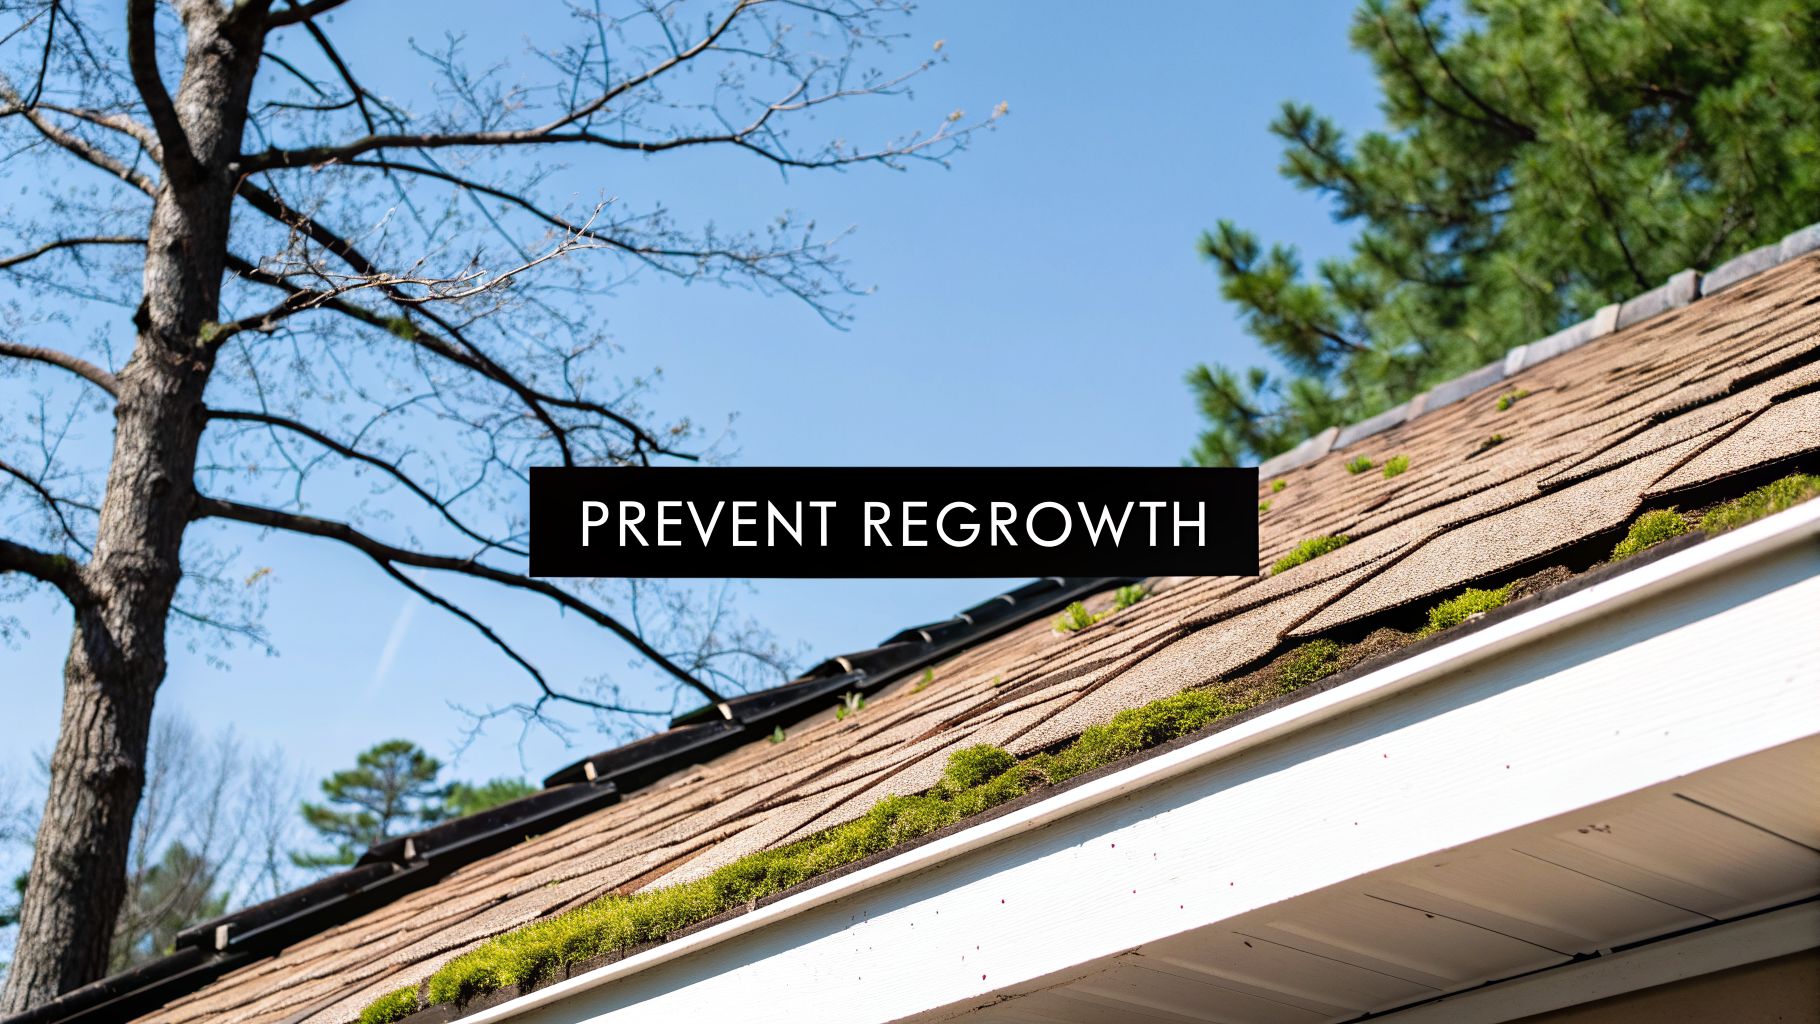
Create a Sunnier, Drier Environment
Moss thrives in damp, shady spots with a supply of organic debris to feed on. The single best thing you can do is take away those conditions. It's really that simple: let the sun do the work for you.
Those overhanging tree limbs casting shadows on your roof are the biggest culprit. By trimming them back, you allow sunlight to hit the shingles directly. That sun will quickly burn off morning dew and dry up rainwater, making the surface completely inhospitable to moss.
Clean gutters are just as important. When gutters get clogged, water has nowhere to go but up and over the edge, constantly soaking the lower part of your roof. That persistent dampness is an open invitation for a new patch of moss to start growing.
Install Proactive Prevention Systems
Beyond just keeping things tidy, you can install hardware that actively fights moss growth for you. These systems offer fantastic, low-maintenance protection that works every single time it rains.
Zinc or Copper Strips
Having a professional install metal strips along the peak of your roof is one of the most effective long-term solutions out there. It’s a clever bit of chemistry.
- When rain hits the roof, it flows over the zinc or copper strips first.
- The water picks up tiny metal particles, which are toxic to moss, algae, and mold.
- This treated water then runs down your entire roof, creating a protective shield that stops new growth in its tracks.
This method essentially gives your roof an automatic cleaning treatment with every storm.
I like to think of it as a permanent protective shield for your roof. The metal strips release just enough ions to make the environment hostile for moss, but they’re completely harmless to your shingles and the yard below. It's a true set-it-and-forget-it solution.
Reinforce Your Roof's Defenses
At the end of the day, a healthy, moss-free roof comes down to how well it manages water. Your gutters are the star player, but other small details matter, too. For example, a properly installed gutter apron can make a big difference by ensuring water flows into the gutter instead of wicking back under the shingles.
Putting a little effort into prevention now is always more cost-effective than dealing with a big moss problem later. Regular maintenance also helps you notice other potential issues, like the dark streaks caused by algae. That’s a different beast altogether, and if you’re seeing those, it’s worth learning more about how to handle the black stains on your roof.
When to Skip the DIY and Call a Professional
Knowing your own limits is probably the single most important skill in any home improvement project. It’s one thing to be enthusiastic about DIY, but your roof is no place for trial and error.
While cleaning moss off a roof might seem simple enough, there are definite times when putting down the sprayer and picking up the phone is the smartest—and safest—move. The line between a successful weekend project and a costly disaster is often just knowing when to call for help.
Clear Signs It’s Time for a Pro
Some situations just scream "this is a job for a professional." If your house ticks any of these boxes, it's a huge red flag that the project is bigger and more dangerous than it looks.
- A Steep Roof Pitch: This is a big one. Any roof with a sharp angle is incredibly risky to walk on. The chance of a slip-and-fall goes up exponentially. Pros have the training and safety gear for this, but for a homeowner, it's just not worth the risk.
- A Multi-Story Home: Working on a second or third-story roof multiplies the danger. The heights are serious, and a fall could be devastating. It requires specialized ladders and fall protection systems that most of us simply don't own.
- Widespread or Thick Moss Growth: If your roof is starting to look more like a chia pet than a protective shield, the job has moved beyond a simple cleaning. Heavy, thick moss can hide some nasty surprises underneath and needs a much more intensive removal process.
- Signs of Existing Damage: This is the most critical warning sign. If you see curling or missing shingles, notice soft spots on the roof deck, or find water stains in your attic, the moss isn't your main problem anymore. These are symptoms of deeper issues that only a professional roofer can properly diagnose. You can learn more about what to look for by checking out these common signs of roof damage.
The Value a Professional Roofer Brings
Hiring a pro isn't just about convenience; it’s about getting expertise and peace of mind. A seasoned roofer brings a trained eye that can spot underlying problems you’d likely miss. They know the difference between simple algae staining and the granule loss that signals your shingles are nearing the end of their life.
You're hiring a roofer for their experience, but also for their equipment and insurance. They have the proper safety harnesses, specialized low-pressure cleaning systems, and liability coverage that protects you from any accidents. This ensures the job is done safely and correctly, protecting your home’s biggest asset.
Bringing in a professional also gives you a clear understanding of the costs involved. While prices vary, roof cleaning generally runs from $0.20 to $0.70 per square foot. For a typical 1,500-square-foot roof, that means a complete cleaning could cost between $300 and $1,050. If you have significant moss, a specialized treatment might add another $150 to $250 to the total. This investment is often a fraction of what it would cost to repair damage from an improper DIY attempt.
When the moss is out of control or you'd simply rather not climb a ladder, it's wise to look into residential pressure washing services that handle exterior cleaning. Just make absolutely sure they specialize in soft washing for roofs. Your roof is too important to risk damaging it with the wrong technique.
Answering Your Top Roof Moss Questions
Even when you feel ready to get started, a few questions always come up. It's a big job, and you want to get it right. We get it. Here are the answers to the questions we hear most often from homeowners trying to figure out the best way to kill moss on their roofs.
Can I Just Use a Pressure Washer to Get Rid of Moss?
This is the first question I always get, and the answer for nearly every roof out there is a hard no. Taking a pressure washer to asphalt shingles is one of the fastest ways to destroy them. That high-pressure spray is powerful enough to literally blast away the tiny, protective granules that act as your roof's sunscreen.
Once those granules are gone, the underlying asphalt is exposed to the elements, and UV rays will start to break it down. You’ll drastically shorten your roof’s lifespan and almost certainly void your warranty. Worse, it forces water up and under the shingles, which is a recipe for rot in the sheathing below. A gentle, low-pressure rinse with a garden hose is the most force you should ever use.
How Long Does It Take for the Moss Killer to Work?
This is where you need a little patience. The moss won't just vanish the second you spray it. How long it takes really depends on the product you chose, how thick the moss is, and the current weather.
You should see the moss start to turn from green to a sad-looking yellow or brown within a few hours or days. That’s your sign it's working. From there, it can take anywhere from one to three weeks for the dead moss to let go of the shingles. Only then can it be gently rinsed or brushed off. If you're dealing with a really thick, spongy mat of moss, you might even need a second round of treatment.
A huge mistake we see people make is getting impatient and trying to scrub the moss off a few days after treating it. You have to let the moss killer do the work. The root-like structures, called rhizoids, need time to decay and detach on their own. If you rush it, you'll just end up scraping off shingle granules with the dead moss.
Will the Moss Treatment Discolor My Shingles?
That’s a great question, and it’s why picking the right product is so critical.
- Sodium Percarbonate-Based Cleaners: These are your "oxygen bleach" products. They are widely considered the safest bet for asphalt shingles and are very unlikely to cause any discoloration. They work by breaking down into hydrogen peroxide and soda ash—effective cleaners that are still gentle on your roof.
- Chlorine Bleach: Your standard household bleach is a different beast entirely. It’s a harsh chemical that can absolutely discolor and lighten asphalt shingles, leaving them looking blotchy. It’s also corrosive and will eat away at metal flashing, gutters, and downspouts over time.
No matter what you use, it’s always smart to test the solution on a small, hidden spot on your roof first. But as a rule, if you stick with products made specifically for cleaning roofs, you should be in the clear.
How Often Should I Clean My Roof to Prevent Moss?
An ounce of prevention is worth a pound of cure, especially with roofs. How often you need to clean really comes down to your property's specific environment.
As a general guideline, get in the habit of visually inspecting your roof at least once a year—spring and fall are perfect times. If your house sits under a heavy canopy of trees or is in a damp, shady spot, you might need to do a light preventative cleaning every 18 to 24 months. On the other hand, if your roof gets a ton of direct sun all day, you could go years without seeing a problem.
The trick is to be proactive. The moment you see that first hint of green, it's time to act. A light spray treatment then is a hundred times easier than tackling a full-blown moss invasion later. Consistent maintenance is truly the best long-term strategy for a healthy roof.
If your roof is too steep, the moss problem is more than you want to handle, or you'd just rather trust the job to insured professionals, Penn Ohio Roofing & Siding Group is here to help. We have the proper soft washing equipment and the hands-on expertise to safely bring your roof back to life. Contact us today for a free, no-obligation estimate.