The best way to get moss off your roof for good is a two-pronged attack: start with a gentle manual scrub, then follow up with a targeted cleaning solution. This method is the safest bet for getting rid of the green stuff without harming delicate materials like asphalt shingles. But first, let's talk about why this is one chore you can't afford to ignore.
The Hidden Dangers Lurking in Your Roof Moss
That velvety green blanket on your roof might look kind of quaint, but don't be fooled. It’s actually a silent menace to your home’s structure. Moss is basically a big sponge, soaking up rain and holding it right against your shingles, and that constant dampness is where the real trouble starts.
For asphalt shingles in particular, this trapped moisture leads to a cascade of problems. It speeds up the erosion of the protective granules that are your roof's first line of defense against UV rays and bad weather. Once those granules are gone, the asphalt underneath is left exposed, which quickly leads to cracking, brittleness, and a much shorter lifespan for your roof.
From Minor Growth to Major Damage
As moss gets thicker, its little root-like structures (called rhizoids) dig in and start working their way under the edges of your shingles. Over time, they can actually pry the shingles up, breaking the watertight seal. This gives rainwater a perfect entry point, leading to attic leaks and eventually rotting the wood of the roof deck itself.
This is how a simple cosmetic issue snowballs into serious structural damage. A small green patch can easily become a five-figure problem that compromises your entire roofing system. Learning to spot the early https://pennohiorc.com/signs-of-roof-damage/ can literally save you thousands of dollars down the road.
Unchecked moss growth does more than just damage shingles; it creates a perpetually damp environment that can weaken the underlying roof decking, leading to spongy spots and a loss of structural support.
The Financial Impact of Neglect
Putting off a moss problem isn't saving you money—it's just delaying a much bigger bill. The longer moss sits up there, the more likely you are to face expensive repairs or even a full roof replacement years before you should have to. If your home is in a damp, shady climate, you're especially at risk for this kind of rapid decay.
Letting moss take over leads to leaks, mold, and even attracts pests. The best defense is a good offense. Regular roof inspections, especially in the spring and fall, help you catch problems early. Getting rid of moss isn't just about curb appeal; it's a smart investment in protecting your property's value and structural health. For a deeper dive into the removal process, this informative guide from Window Genie is a great resource.
Getting Your Safety and Cleaning Gear in Order
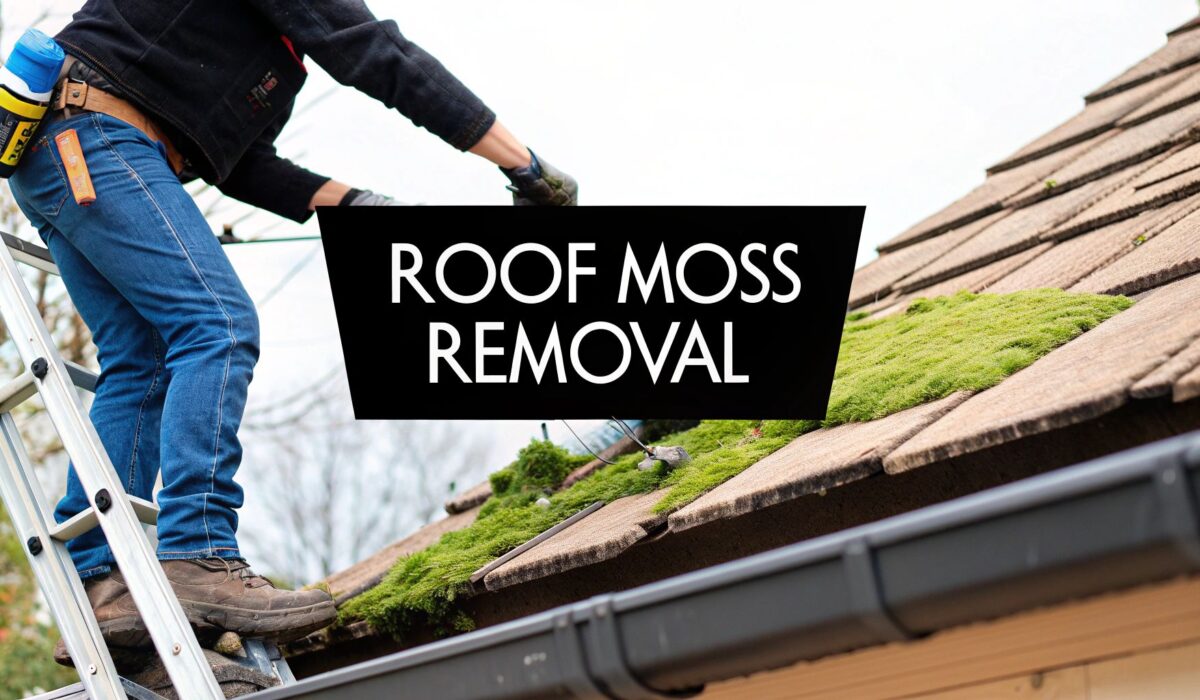
Before you even think about propping a ladder against your house, let’s talk safety. I can't stress this enough: working on a roof is dangerous, and a slick, moss-covered surface dials that risk way up. The right approach to getting moss off your roof starts on the ground, by gathering the right protective equipment.
Think of it like this: your safety harness is just as important as the cleaner you're about to use. It's your lifeline. Make sure you have a harness that fits you well, a solid extension ladder (ideally with stabilizers), and, crucially, slip-resistant footwear. Good grip is non-negotiable up there. Also, grab some safety glasses to keep dislodged gunk and solution out of your eyes.
Picking the Right Tools for the Job
Okay, with safety covered, let's move on to the actual cleaning tools. I’ve seen a lot of homeowners reach for a pressure washer, and it makes me cringe every time. This is a huge mistake that can blast the protective granules right off your shingles, shortening your roof's lifespan and voiding warranties. The best tools are actually far gentler.
Your number one tool will be a long-handled, soft-bristle brush. The key here is "soft." You need bristles firm enough to dislodge the moss but not so aggressive that they damage the shingles underneath. A long handle is a lifesaver, as it lets you reach more area from one spot, meaning less risky movement on the roof.
For rinsing, forget the high-pressure nonsense. A simple garden hose with a spray nozzle is all you need. A gentle, sweeping spray is more than enough to wash away the moss you've loosened and any remaining cleaning solution.
Pro Tip: Steer clear of pressure washers. The combination of a soft-bristle brush and a standard garden hose is the professional-grade method for cleaning a roof without causing costly damage.
Lastly, you'll want some buckets and a few large, heavy-duty tarps or plastic sheets. Use these to cover your garden beds, shrubs, and any decking below. Trust me, spending a few minutes protecting your landscaping will save you a massive cleanup headache later. Having all this gear laid out and ready to go makes the whole process smoother, safer, and far more effective.
How to Properly Clean Moss Off Your Roof
Alright, you've got your safety gear on and your tools are ready to go. Let's get that moss off your roof. The key here is a methodical and patient approach—this isn't a job you want to rush. The best way to get it done right involves a one-two punch: gentle manual removal followed by a good cleaning solution. This combo ensures the moss is gone without wrecking your shingles in the process.
First things first, prep the area below. Grab some heavy-duty plastic sheeting or tarps and cover everything you don't want the runoff to touch. This means your flower beds, shrubs, deck, or patio furniture. This simple step saves your plants and makes the final cleanup a whole lot easier.
Gently Loosening Thick Moss Growth
Always, and I mean always, start at the top of the roof and work your way down. This is a critical safety rule. Working from the top down means you're never standing on wet, slippery, loosened moss that's just waiting to send you for a ride.
Take your long-handled, soft-bristle brush and start scrubbing gently. You want to move the brush in a downward motion, going with the grain of the shingles, not against it.
The goal here isn't to obliterate every speck of green. You're just trying to dislodge the big, thick clumps and break up the main root systems. If you get too aggressive and start scraping, you'll strip the protective granules right off your shingles, and that's the kind of damage that leads to much bigger problems. Let the brush do the work with light, steady strokes.
If you hit a really stubborn patch, a light mist of water from your garden hose can help soften things up. Again, think gentle mist, not a power washer jet.
Remember, this initial scrubbing is just about getting rid of the bulk. Don't stress about the thin green film left behind. The cleaning solution will take care of that.
Applying Your Cleaning Solution Effectively
Once you've brushed away the heavy stuff, it's time to bring out the cleaner. The most effective techniques almost always pair a gentle rinse with a targeted moss-killing solution. For a DIY approach, a mix of 1 to 3 cups of bleach in 2 gallons of water works well, but you have to be careful. Always pre-rinse and post-rinse any nearby plants to protect them from the bleach. You can find more detailed instructions for this kind of mix on reputable home improvement sites like This Old House.
Grab your pump or garden sprayer and apply the solution evenly across the roof. Start at the ridge and work your way down, making sure you completely saturate all the leftover moss and any green-stained spots.
Now for the most important part: patience.
Let that solution sit and do its job for at least 15-20 minutes. On a cool, overcast day, you can probably let it sit even longer. The key is to not let it dry out. This "dwell time" is when the cleaner seeps into the moss's root structure (the rhizoids) and kills it for good.
The Final Rinse and Follow-Up
After the solution has had plenty of time to work its magic, it's time for the final rinse. Using your garden hose on a low-pressure setting, rinse the entire roof from top to bottom. You'll see the dead moss, dirt, and leftover cleaner wash right off.
Don't forget to give your gutters, downspouts, and the surrounding landscaping another good rinse to dilute any solution that ran off the roof. While we're using a gentle method here, it's interesting to see what the pros charge. Looking up the average power washing prices can give you some perspective on the value of doing a careful DIY job. For a deeper dive into what professional care looks like, our guide to roof cleaning services covers all the details.
Once the roof is clean, just let it air dry. It's totally normal to see a few flakes of dead moss wash away during the next rainstorm. That's just a sign that your hard work paid off.
Picking the Right Cleaner for Roof Moss
Choosing the right cleaner is a huge part of getting moss off your roof for good. The product you use doesn't just determine how well the job gets done; it also affects the health of your shingles and the safety of your yard below. You’ve really got two main roads to go down: a store-bought commercial formula or a homemade mix.
Commercial moss killers are specifically designed for this job. They’re packed with ingredients that kill moss, algae, and lichen right down to the root, which means you’ll get longer-lasting results. While they're a convenient, ready-to-go option, you absolutely have to read the label. Make sure the formula is safe for your specific roof, whether you have asphalt shingles, tile, or metal.
Understanding Your Cleaner Options
The best cleaner really depends on your specific situation. If your roof is constantly shaded by trees in a damp, rainy climate, you’ll probably need a stronger commercial solution to get the job done. On the other hand, if you're just dealing with a few small, patchy spots of green, a gentler homemade approach might be all you need.
No matter which cleaner you choose, the basic process stays the same.
This simple flow—prep, apply, rinse—is the foundation of any roof cleaning project. Nail these steps, and you're on your way to a moss-free roof.
Mixing Up a Homemade Moss Solution
For those who prefer a DIY or more budget-friendly route, some common household items work surprisingly well. One of the most popular and simple recipes is just a 1:1 ratio of water and distilled white vinegar. Throw in a few drops of dish soap, which helps the mixture cling to the moss instead of just running off.
This vinegar solution is acidic enough to kill moss but is much kinder to surrounding plants than many harsh chemicals. The best way to apply it is with a garden sprayer. Let it sit for about 20 minutes on a cloudy, cool day, then give the area a gentle scrub and rinse it clean.
Key Takeaway: Think about the environmental impact. You can find eco-friendly, biodegradable options at the store, but a simple vinegar solution is a great alternative if you're worried about runoff affecting your garden, pets, or local streams.
Another, more aggressive, approach uses chemical treatments like sodium hypochlorite. A solution with a concentration of 5-6% can be very potent for the first assault on heavy moss growth. To get the most out of it, apply it during colder weather when the moss isn't actively growing and rain is less likely to wash it away before it's had a chance to work. You can find more details in some guides that offer effective moss treatment tips from AroconLLC.com.
Ultimately, picking the right cleaner is a balancing act between effectiveness and safety. You need to weigh the pros and cons of commercial products versus homemade solutions, considering your roof's condition, your budget, and how comfortable you are handling the different ingredients.
Keeping Moss Away for Good
Getting all that moss off your roof feels great, but the job isn't truly done until you have a plan to keep it from coming back. The real win is shifting from a one-time cleaning project to a long-term prevention strategy. Luckily, a few proactive steps can make a world of difference in protecting your roof.
It all starts with changing the environment up there. Moss absolutely loves damp, shady spots. So, your main goal is to let the sun in and get the air moving. The biggest culprits are often the beautiful trees surrounding your home.
Control Your Roof's Environment
Overhanging tree limbs are a moss-magnet. They cast long shadows that keep your shingles damp and drop a constant supply of leaves and needles that trap moisture. To really get ahead of the problem, you need to manage this.
You might want to look into professional tree pruning and removal services to get some expert help. Trimming back those branches does two critical things:
- Boosts Sunlight: More direct sun means your roof dries out much faster after rain, creating an environment where moss simply can't get a foothold.
- Cuts Down Debris: Fewer falling leaves and twigs means less organic gunk piling up and holding moisture against your roof.
Install Proactive Moss Inhibitors
Another fantastic long-term solution is to install metal strips along the peak of your roof. These are usually made of either zinc or copper, and they work passively to stop moss before it ever has a chance to grow.
Here’s how it works: every time it rains, water washes over the metal strips and picks up a small number of metallic particles. As this water runs down your roof, it distributes those particles, which are toxic to moss, algae, and lichen. It’s like creating an invisible shield that protects your entire roof.
Installing zinc or copper strips is a classic "set it and forget it" solution. It’s a one-time installation that provides continuous, low-maintenance protection against moss regrowth every time it rains.
This method is a game-changer, especially for homes in perpetually damp or overcast climates. The strips are installed just below the ridge cap, so they're barely noticeable but work around the clock.
Commit to Routine Maintenance
Finally, nothing beats simple, consistent upkeep. A little bit of effort a couple of times a year will save you from ever having to do a massive moss removal job again. This really just comes down to keeping your roof clean and dry.
A huge piece of the puzzle is keeping your gutters clear. When gutters get clogged, water backs up and soaks the edges of your roof, creating the perfect breeding ground for moss spores. Learning how to clean downspouts and gutters is a must-have skill for preventing moss. A quick inspection and clean-out in the spring and fall can stop new growth dead in its tracks.
Common Questions About Roof Moss Removal
Even with the best plan in hand, you're bound to have a few questions when you're staring up at a mossy roof. Let's tackle some of the most common things homeowners wonder about before they start. Getting these details right can be the difference between a successful cleaning and an expensive mistake.
Can I Just Pressure Wash the Moss Off?
Absolutely not. I can't stress this enough: never use a pressure washer on an asphalt shingle roof. It's one of the fastest ways to destroy it.
That high-pressure jet of water will blast the protective granules right off your shingles. Those little granules are what protect your roof from UV rays and the elements. Once they're gone, your roof's lifespan plummets, and you risk forcing water underneath the shingles, which is a recipe for leaks and wood rot. A gentle rinse from a garden hose is all the pressure you'll ever need.
When Is the Best Time of Year to Tackle This Job?
Timing is crucial. You want to pick a cool, overcast day to do the work. If it's too hot and sunny, the cleaning solution you spray on will evaporate before it has a chance to soak in and kill the moss.
On the flip side, you don't want to do it on a rainy day, as the rain will just wash your cleaner right off the roof. For most people, late spring or early fall usually offers that perfect window of calm, overcast weather.
Pro Tip: An overcast, non-windy day is your best friend here. It lets the cleaning solution sit and do its job properly, meaning you get better results without having to go back for a second round.
How Often Will I Need to Clean Moss Off My Roof?
This really comes down to your property's environment. If your house is surrounded by tall trees that cast a lot of shade or you live in a damp climate, you might find yourself doing a light treatment every year or two to keep things in check.
For most other homes, a deep clean every 3 to 5 years is a good rule of thumb. A great habit is to do a quick visual inspection when you're cleaning your gutters twice a year. That way, you can spot any new growth early and deal with it before it becomes a major project.
Is It Really Safe to Use Bleach on My Roof?
Yes, but you have to do it right. A diluted bleach solution is incredibly effective at killing moss, but you need to be careful. It’s all about the right mix and protecting your surroundings.
A good, safe ratio is one part regular household bleach to three or four parts water. Before you spray a single drop on the roof, soak all your nearby plants, flowerbeds, and shrubs with plain water from your hose. After you’ve rinsed the cleaner off the roof, douse them all again. This simple step washes away any bleach runoff and keeps your landscaping safe.
Dealing with a stubborn moss problem can feel like a lot to take on. If you'd rather hand the job over to the pros, our team offers professional roofing services to get it done safely and correctly. Feel free to contact us for a free estimate.