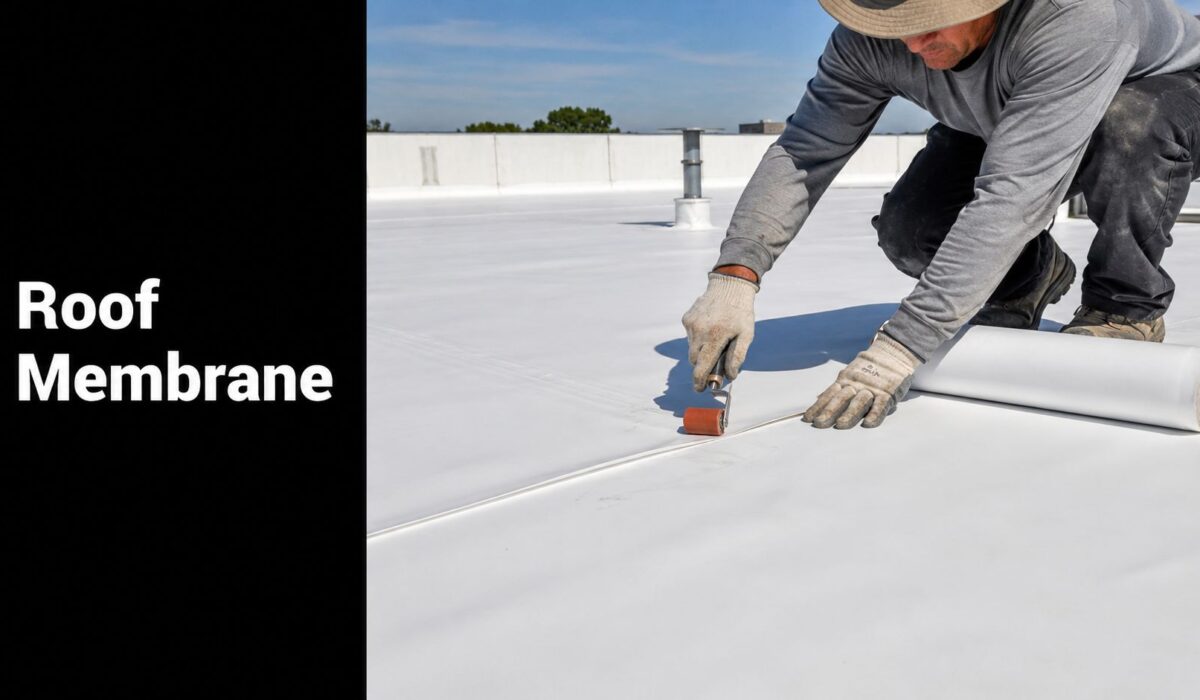
You usually start looking into roof membrane installation after something has already gone wrong. A stain shows up on the ceiling. Water starts dripping near a parapet wall after a hard rain. Snow melts off a low-slope section in Hermitage, Sharon, or Pittsburgh, and a leak appears where the roof looked fine from the ground.
That's the point where a lot of property owners learn an uncomfortable truth. A membrane roof doesn't fail all at once. It fails at seams, edges, corners, penetrations, and transitions long before the whole field looks bad. The material matters, but the install matters more.
In Western Pennsylvania, roofs deal with rain, freeze-thaw cycling, snow load, wind, and long stretches of damp weather. Erie sees lake-effect conditions. Pittsburgh gets wide seasonal swings. Sharon and Hermitage properties often have low-slope sections over additions, offices, retail spaces, and apartment buildings that need watertight detailing, not shortcuts. If you're trying to decide whether to patch, replace, or install a new membrane system, the details below are what determine whether the roof lasts.
Table of Contents
- Why Proper Membrane Installation is Critical
- Choosing Your Roof Membrane System
- Pre-Installation Assessment and Preparation
- The Core Roof Membrane Installation Process
- Mastering Critical Details and Quality Checks
- DIY Installation vs Calling a Professional
Why Proper Membrane Installation is Critical
A low-slope roof can look fine on Friday and start dripping into insulation or tenant space by Monday if one seam was rushed or one wall tie-in was left loose. We see that in Hermitage and Sharon after hard rain, freeze-thaw swings, and wind push water into places a dry-day walkthrough never reveals.
Membrane roofing succeeds or fails at the details. Brand matters, but field execution matters more. A loose edge, damp substrate, contaminated seam, or sloppy transition at a curb can turn a new roof into the source of the leak. On Western Pennsylvania buildings, where weather loads and temperature swings are hard on low-slope assemblies, small installation mistakes do not stay small for long.
Analysts at Mordor Intelligence note in their roofing membranes market analysis that membrane systems make up a large share of commercial roofing work. This reflects what the trade already sees every day. These roofs are standard on commercial properties, and performance comes down to attachment, seam quality, and detail work done right the first time.
Why Western Pennsylvania roofs expose bad workmanship fast
Hermitage, Sharon, Pittsburgh, and the surrounding area put membrane roofs under real stress. Snow sits. Ice backs water up. Wind-driven rain finds weak laps and terminations. Summer heat expands the assembly, then cold nights pull it back tight.
That cycle is hard on seams, flashing, and edge securement. A detail that might hold in a mild climate can open up here within a season. Local code requirements matter too, especially on recover jobs, edge metal, drainage conditions, and how the assembly handles uplift. If an owner is already dealing with stains or active water entry, our guide on how we track roof leaks on occupied buildings helps sort out whether the problem is one failed detail or a larger installation issue.
Practical rule: If a crew treats seams, penetrations, and terminations like cleanup work, the roof will leak sooner than it should.
What proper installation means
A sound membrane installation comes from discipline at every stage:
- Dry, sound substrate: Adhesives, tapes, and welds do not perform well over trapped moisture, rot, or unstable cover board.
- Correct sheet handling: The membrane has to be laid out, aligned, and allowed to relax before it is fastened, adhered, or welded.
- Clean seam preparation: Dust, moisture, and rushed prep are enough to compromise a seam that initially appeared fine.
- Precise detail work: Drains, inside and outside corners, walls, parapets, curbs, and penetrations are where roofs earn their keep.
- Weather-aware installation: Temperature, humidity, and wind affect adhesives, welding, and cure time. In our area, that changes how the crew should schedule the work.
Most membrane roof failures are not caused by the idea of membrane roofing. They come from crews skipping steps, forcing the material, or treating a precision system like a quick cover job.
Choosing Your Roof Membrane System
The first big decision isn't how to install the roof. It's which roof you're installing. For most low-slope applications, the conversation usually comes down to EPDM, TPO, or PVC.
Each one can work in Western Pennsylvania. Each one also has conditions where it makes more sense than the others. The wrong choice usually isn't the membrane with the worst brochure. It's the membrane that doesn't match the building, the exposure, the traffic level, or the installation window.
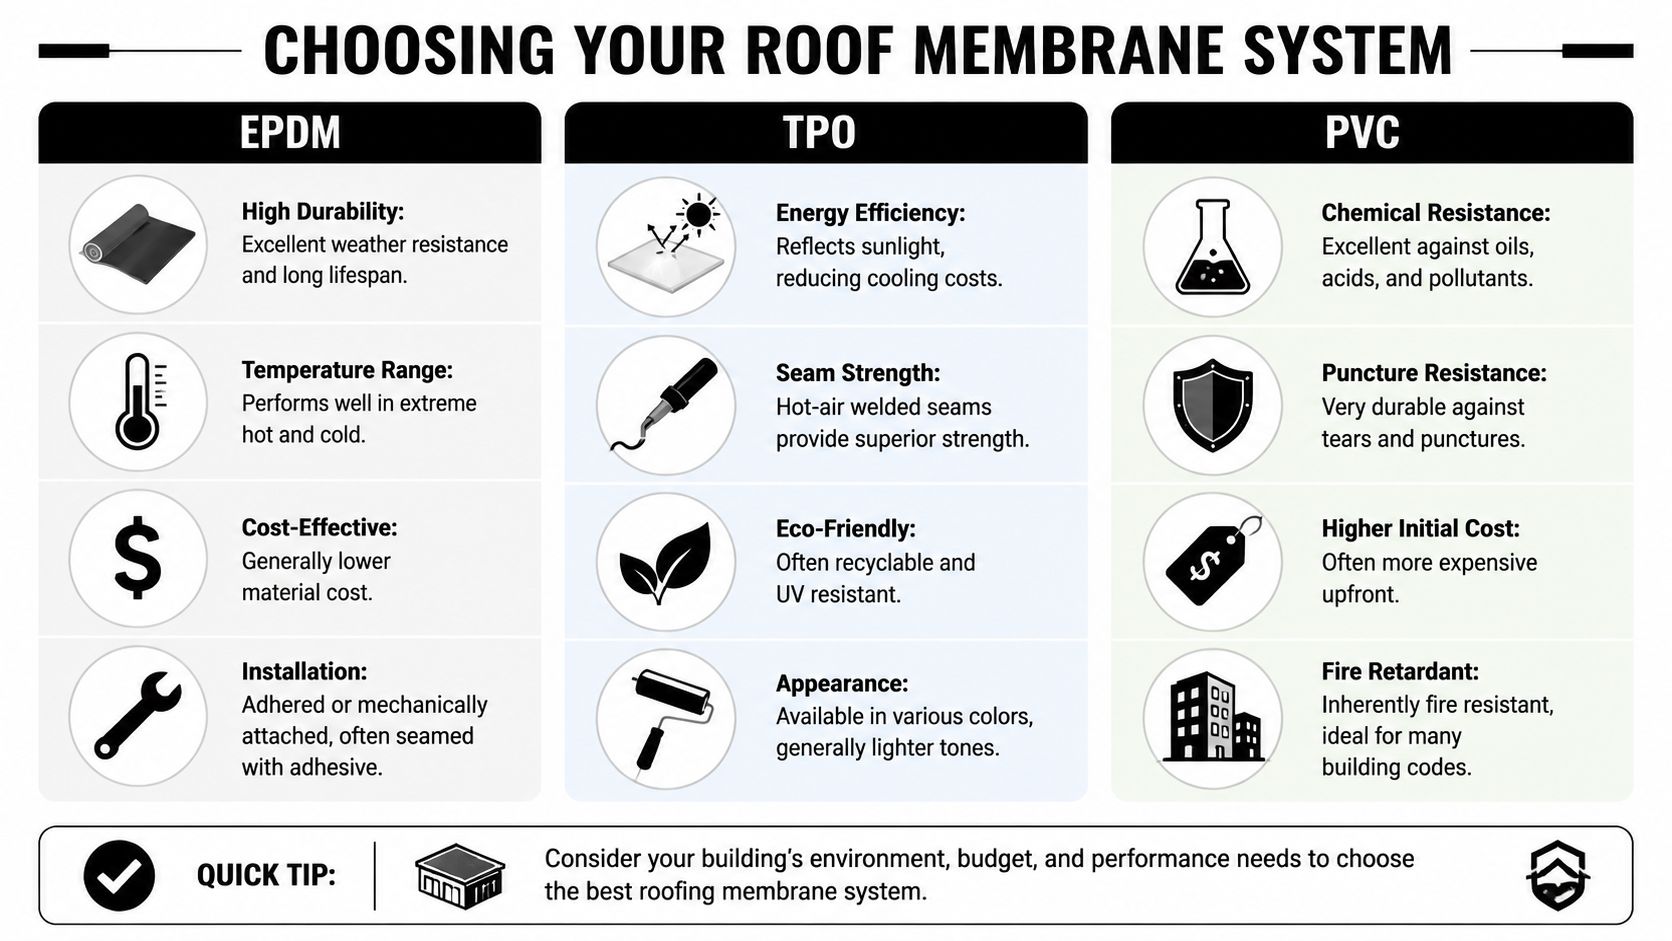
What the main membrane types mean in the field
EPDM is the old reliable option on many low-slope roofs. It handles weather swings well and has a long service history. On buildings in Sharon or Hermitage where freeze-thaw movement is a real concern, that flexibility is useful. The trade-off is seam work. Depending on the system, EPDM seam execution depends heavily on prep, alignment, and adhesive or tape technique.
TPO gets attention for reflective surfaces and welded seams. On buildings that heat up hard in the sun, especially larger commercial properties around Pittsburgh, TPO can be a practical fit. If you want more background on system design and use cases, this overview of what TPO roofing membrane is is a helpful starting point. The catch is that TPO installation still depends on skilled welding and weather awareness. A bad weld isn't fixed by a good spec sheet.
PVC is often chosen where chemical resistance and tougher service conditions matter more. It's common on certain commercial buildings where rooftop exposure is harsher. It can be an excellent system, but owners should expect a different cost conversation and a crew that knows the material well.
Roof membrane comparison
| Feature | EPDM (Rubber) | TPO (Thermoplastic Olefin) | PVC (Polyvinyl Chloride) |
|---|---|---|---|
| Typical strength in use | Flexible and weather-tolerant | Reflective and weldable | Chemical-resistant and durable |
| Seam approach | Often adhesive or tape-based | Hot-air welded | Hot-air welded |
| Cold-weather handling | Can be workable, but sheet handling and adhesive conditions matter | Welding quality depends on crew setup and conditions | Welding quality depends on crew setup and conditions |
| Common fit | Residential low-slope roofs, additions, many commercial roofs | Commercial roofs, larger low-slope buildings | Demanding commercial environments |
| Budget position | Often lower material cost | Mid-range in many applications | Often higher upfront cost |
The weather and adhesive trade-off
Generic articles typically fall short because material choice and installation method aren't separate decisions.
A self-adhered membrane can be appealing because it sounds cleaner and faster. In practice, it can be less forgiving when the weather window is tight. Professional guidance notes that installation quality can hinge on ambient conditions and technique. Self-adhered systems require controlled release film removal, firm rolling pressure to activate the bond, and close attention to temperature and adhesive tack time, as noted in this installation guidance on adhesive application and bond activation.
That matters in places like Erie and Pittsburgh, where mornings can be cold, surfaces stay damp, and wind shifts the job from manageable to risky.
If the membrane doesn't bond under the conditions you have, it doesn't matter how fast the crew worked.
A few real-world trade-offs to keep in mind:
- Adhesive-applied systems: Useful when the deck and weather support proper flash-off and bonding.
- Self-adhered systems: Clean and efficient when conditions are right, but less forgiving if release film handling and rolling pressure are sloppy.
- Mechanically attached systems: Often practical on larger areas, but seam and fastener layout become critical.
For owners, the right question isn't “Which membrane is best?” It's “Which membrane and attachment method fit this building, this season, and this crew?”
Pre-Installation Assessment and Preparation
Most membrane failures are set up before the first sheet is rolled out. If the deck is dirty, damp, soft, uneven, or unstable, the roof is already headed in the wrong direction.
Preparation work doesn't look dramatic, so owners sometimes underestimate it. We don't. In roof membrane installation, prep is where you avoid callbacks, trapped moisture, telegraphed fasteners, and adhesion failure.

Start with the deck, not the membrane
A proper assessment starts at the substrate. The crew needs to know whether the roof deck is dry, sound, and fit for the system being installed. If there's wet insulation, deteriorated wood fiber, rusted metal decking, loose cover board, or leftover debris from tear-off, the membrane can't make up for it.
Before installation starts, check these basics:
- Moisture condition: Any wet area has to be removed or corrected. Bonding over moisture is asking for failure.
- Surface cleanliness: Dust, granules, old adhesive residue, and loose fasteners interfere with adhesion and seam work.
- Flatness and support: Soft spots and ridges telegraph through the membrane and stress seams.
- Drainage setup: Low areas, blocked drains, and poor slope planning need attention before the membrane hides them.
What to have on site before work starts
Crews lose quality when they're improvising. A clean setup matters.
Typical jobsite needs include membrane rolls, insulation or cover board as specified, fasteners, seam tape or welding equipment depending on system, rollers, primers, brooms, cutters, termination bars, flashing materials, sealant, and safety gear. On a decent-sized roof, organization matters almost as much as labor skill. If materials are scattered, contaminated, or staged poorly, the seam work usually tells the story later.
A membrane roof goes on better when the site is laid out like a controlled workspace, not a scramble.
Code-driven prep matters more than most owners expect
Building code affects membrane quantity and layout. It's not just paperwork.
Guidance tied to the International Residential Code says ice barriers should extend from the roof edge to at least 24 inches inside the exterior wall line, and on a 9-pitch roof with a 12-inch overhang, that can mean extending the membrane nearly four feet up the roof deck, according to Fine Homebuilding's discussion of IRC-based ice barrier sizing. That's a useful reminder for Western Pennsylvania homes and mixed-use buildings with low-slope transitions. Steeper roofs and overhang details can drive membrane coverage farther upslope than many owners expect.
That code-driven sizing matters in Hermitage and surrounding areas where snow and ice backup aren't theoretical. If the prep work ignores geometry, overhangs, and wall position, the installed membrane may look complete while still falling short where protection is needed.
The Core Roof Membrane Installation Process
A membrane roof can look finished by 3 p.m. and still fail by the first hard freeze if the sheets were set under tension, the seams were contaminated, or the terminations were rushed. In Western Pennsylvania, that is not a small risk. Hermitage, Sharon, and Pittsburgh roofs deal with wind, ponding, freeze-thaw movement, and long wet stretches that expose sloppy installation fast.
Once the deck is ready, the job turns into sequence and control. Every membrane system has its own rules, but the field work follows the same logic. Get the sheet in place, let it relax, secure it the way the manufacturer requires, and treat every seam like a future leak test.

Lay it out and let it settle
Single-ply sheets have memory. Unroll them and force them straight into adhesive or fastening, and they will try to pull back, wrinkle, or bridge over low spots.
We lay sheets out on a clean, dry surface and give them time to relax before final attachment. That short pause helps the membrane lie flatter and reduces fishmouths, edge curl, and stress at the seams. On a cold morning in Mercer County, that matters even more because stiff material does not forgive rough handling.
This part gets skipped on rushed jobs. The roof usually shows it later.
Secure the field without forcing the sheet
After layout, the field gets attached based on the system design and the wind requirements for the building. A fully adhered system needs even adhesive coverage and steady pressure so the membrane bonds without trapped voids. A mechanically attached system depends on straight fastening rows, correct plate placement, and keeping the sheet square as each run is installed.
Good field installation usually comes down to a few habits:
- Keep alignment true: A sheet that starts slightly out of square creates problems on every run after it.
- Use pressure the right way: Rollers and brooms need to press the membrane into contact, not shove wrinkles across the roof.
- Protect overlap areas: Dirt, wet boots, and adhesive overspread in seam zones create avoidable failures.
- Match attachment to conditions: Wind exposure at corners and perimeters often requires tighter fastening than the open field.
The mistakes are predictable too:
- Dragging a sheet after part of it is bonded
- Installing over damp substrate or trapped condensation
- Stretching the membrane to remove wrinkles
- Letting traffic cross seam areas before they are prepped
- Ignoring transitions near walls, curbs, and roof flashing details
Each one can shorten the life of the roof before the building owner sees the first stain.
Build the seam like it is the roof
On single-ply systems, seams are where workmanship shows up. The open field can look clean from the ground and still hide bad overlap, weak welds, or poor tape contact.
Manufacturer instructions for systems such as Carlisle EPDM lay out the basics clearly: seam areas have to be clean, dry, properly overlapped, and installed with the specific tape, primer, or welding method required for that membrane, as shown in Carlisle's EPDM installation guide. The exact dimensions and attachment pattern depend on the assembly, but the principle does not change. A seam needs enough material, proper surface prep, and consistent pressure or heat to stay closed through thermal movement and weather cycles.
A rushed crew usually leaves one of these problems behind:
- Dirty mating surfaces: Dust, chalk, moisture, or residue prevent a proper bond.
- Weak overlap control: The seam may cover the edge visually but still miss the target width needed for a reliable bond.
- Crooked fastener lines: Poor plate placement can telegraph stress right under the seam.
- Incomplete edge checks: The center of the seam may be sound while the ends are open, fishmouthed, or underworked.
We tell owners the same thing on inspections. If you want to judge the quality of a membrane roof, look at the seams, not just the field. On TPO and PVC, that means consistent welds without skips or burn-through. On EPDM, it means proper primer, tape contact, and edge pressure. Different systems, same standard. Clean work, correct sequence, and no shortcuts.
Mastering Critical Details and Quality Checks
A roof can have a clean-looking field and still be a bad installation. That usually shows up at penetrations, corners, wall transitions, and perimeter terminations.
These are the places where flat material has to change direction, wrap a shape, or terminate against another building component. That's where water pressure, movement, and workmanship all meet. In our experience, these points warrant the most attention from sharp property owners in Hermitage, Sharon, and Pittsburgh during any final walkthrough.

Where most leaks actually start
Professional standards make it clear that failures are far more likely at details than in the open field. Guidance for self-adhered transitions includes extending a base sheet at least 12 inches past a slope change and a cap sheet at least 18 inches beyond it, as shown in Polyglass installation guidance for low-slope transitions. That tells you something important. Detail zones need extra reach and extra care.
That same mindset applies to:
- Pipe penetrations: Boots, wraps, and sealant have to match the shape and movement at the penetration.
- Inside and outside corners: These areas tend to pucker if the material is cut or folded badly.
- Parapet transitions: The roof-to-wall turn has to be clean, supported, and properly terminated.
- Equipment curbs and vents: Every curb adds edges, corners, and potential failure points.
If you want a plain-language primer on how those edge conditions work, this guide to roof flashing and why it matters helps connect the membrane work to the metal and termination details around it.
The final inspection that separates solid work from risky work
A membrane roof isn't done when the last sheet is down. It's done when the details are checked.
A serious final inspection includes looking at seams, corners, terminations, wall flashings, vent bases, drain areas, and parapet connections. The crew should be checking for voids, fishmouths, loose edges, poor adhesion, missed sealant points, and any place where movement could open the system later.
A practical quality checklist looks like this:
- Seam review: Confirm the overlap is consistent and bonded or welded correctly.
- Perimeter review: Check edge securement and all termination points.
- Penetration review: Look closely at pipes, curbs, vents, and supports.
- Drainage review: Make sure the finished roof sheds water properly and doesn't trap it at details.
Good field work is visible. Good detail work is what keeps the building dry.
DIY Installation vs Calling a Professional
Some roofing work is realistic for a capable owner. Full roof membrane installation usually isn't.
That's not because property owners can't learn. It's because this work combines fall risk, code requirements, product-specific methods, weather judgment, seam control, and detail execution. A lot of DIY membrane jobs look acceptable for a short time. Then the first real weather cycle exposes the weak points.
When DIY can make sense
A small repair on an accessible low-slope surface can be manageable if the issue is limited, the product is compatible, and the owner understands the repair method. Cleaning a drain area, checking a visible termination, or applying a manufacturer-appropriate patch to a known defect can be reasonable in some cases.
DIY usually makes the most sense when:
- The area is small: One isolated issue is different from a whole-roof system install.
- Access is safe: A simple garage roof is not the same as a commercial building with edges, penetrations, and height exposure.
- The problem is known: If the leak source is uncertain, DIY often turns into guesswork.
When it's time to call a roofer
Professional help makes sense fast when the roof is large, the membrane system is unfamiliar, or the details are dense. Multiple penetrations, parapet walls, rooftop equipment, wet insulation, and structural concerns all raise the risk level.
It also makes sense when the owner needs documentation, warranty support, or a clear scope for an insurance or property transaction file. That's one reason roofing companies invest in visibility and search strategy. If you want to understand how property owners find service providers online, this overview of transactional search for roofers explains the intent behind those searches in a useful way.
How we look at projects in Western Pennsylvania
In Hermitage, Sharon, Erie, and Pittsburgh, the deciding factor is usually exposure. The more weather, drainage complexity, and rooftop detail the building has, the less forgiving the installation becomes.
We tell owners to call a professional when any of these are true:
- You're replacing a full membrane field, not patching one area
- The roof has several vents, curbs, drains, or wall transitions
- You suspect wet insulation or deck damage
- The roof needs code-aware edge or ice-barrier planning
- The install window is cold, damp, or windy
For projects in Mercer, Beaver, and Lawrence counties, Penn Ohio Roofing & Siding Group handles residential and commercial roofing work, including low-slope membrane systems, with licensed, bonded, and insured crews and experience built over more than 25 years. That matters when the job needs more than material. It needs judgment.
If your building in Hermitage, Sharon, Pittsburgh, Erie, or the surrounding area needs membrane roofing work, Penn Ohio Roofing & Siding Group can inspect the roof, identify failure points, and recommend the right repair or replacement approach for the structure and the season.