A lot of Western PA homeowners start this process the same way. A stain shows up on the ceiling after a hard rain. A piece of siding cracks after a cold snap. Wind lifts a few shingles, and suddenly a job you hoped to put off turns into a decision that affects your house, your insurance, and your budget.
That’s why choosing a roofing and siding contractor Western PA isn’t a simple price-shopping exercise. Our homes take a beating from snow, ice, wind, freeze-thaw movement, and older construction details that don’t forgive shortcuts. The right fix protects the structure. The wrong one can leave you paying twice.
Protecting Your Home in Western PA Starts Here
In Pennsylvania, the roofing contractor market is crowded. The industry supports 3,759 businesses as of 2026, and market size has grown at an average annual rate of 4.4% from 2021 to 2026, according to IBISWorld’s Pennsylvania roofing contractors data. That gives homeowners options, but it also means you need to sort real professionals from companies that are good at selling and weak at executing.
Western PA adds another layer to the decision. A roof and siding system here has to handle moisture, temperature swings, and winter stress without letting small defects turn into rot, mold, insulation damage, or interior leaks. If your home has older flashing details, patched valleys, or mixed exterior materials, the contractor’s judgment matters as much as the product itself.
A smart first step is to treat the roof and siding as one exterior system, not two separate jobs. Water doesn’t care which trade caused the gap. It follows the opening. If you’re also thinking about future energy upgrades, this Florida solar roof guide is useful because it explains how roof condition affects later improvements, even though the climate is very different from ours.
Practical rule: Don’t hire from panic. Slow down enough to inspect, document, and compare. Urgency is real after a storm, but rushed decisions usually favor the contractor, not the homeowner.
The goal isn’t to become a roofer overnight. It’s to understand enough to ask sharper questions, spot weak proposals, and protect the investment sitting under that roof.
Assess Your Damage Like a Pro
Start from the ground. Walk around the house with your phone and take clear photos of every slope you can see, all siding elevations, downspouts, fascia lines, and any debris that landed after the storm. You’re looking for changes, not perfection.
In Western PA, damage often hides in plain sight. A roof can look mostly intact from the driveway and still have lifted tabs, bruised shingles, worn pipe boots, or flashing separation where the roof meets a sidewall or dormer. Siding can show only a hairline split at first, but once water gets behind it and freezes, the problem grows.
What to check on the roof
Asphalt roofs in snowy climates age faster than many homeowners expect. NRCA data says asphalt shingles in snowy climates like Pennsylvania can fail 20-30% faster than in milder regions because of ice damming, as cited in this Western PA roofing article discussing NRCA data. That’s one reason a roof that seemed “fine last winter” can suddenly show trouble now.
Look for these signs:
- Missing or creased shingles from wind exposure.
- Granule loss collecting in gutters or at downspout exits.
- Dark streaks or uneven patches that suggest wear patterns or moisture retention.
- Bent or loose flashing around chimneys, walls, skylights, and vents.
- Sagging roof lines that may point to deeper deck or framing concerns.
- Ice dam clues, including water stains near exterior walls, peeled paint, or damp insulation in the attic.
If you want a more complete homeowner checklist, Penn Ohio Roofing & Siding Group has a page on common signs of roof damage that lines up with what contractors look for during an initial exterior review.
What to check on the siding
Siding problems are often easier to miss because they don’t always leak immediately. Walk each side of the house and look at it from different angles in natural light.
Pay attention to:
Cracks near corners and trim
Freeze-thaw stress shows up where panels are already under tension.Warping or buckling
That can indicate trapped moisture, poor fastening, or movement behind the wall.Loose pieces after wind
One loose panel usually means the attachment system needs a closer look.Staining below windows or roof edges
Water often enters higher than the stain appears.
If roof damage and siding damage happen in the same storm, document both together. Adjusters and contractors need the full exterior picture, not isolated snapshots.
Age-related wear versus storm damage
Not every problem came from the last weather event. Some roofs are worn out, and some siding failures happen because water has been entering for years. That distinction matters for insurance, but it also matters for repair strategy.
A recent storm may create the opening. Long-term neglect makes the damage spread. The more organized your photos and notes are at the start, the easier it is to explain what changed and when.
How to Find and Vet Your Contractor Shortlist
The fastest way to get burned is to call one contractor, hear a convincing pitch, and sign that day. Build a shortlist first. For most homeowners, that means narrowing the field to a few local companies that can prove they do this work properly and carry the right coverage.

I’d approach it the same way you’d approach any skilled trade on a major home system. If you’ve ever had to compare garage door repair quotes, you already know the basic lesson. A polished ad doesn’t tell you how the work gets done, who shows up, or what happens when there’s a problem.
What belongs on your shortlist
A solid candidate should be able to discuss both roofing and siding transitions, not just one trade in isolation. In Western PA, leak problems often show up where systems meet: sidewalls, kickout flashing areas, chimney edges, window trim, rake details, and step flashing behind siding.
Use these filters early:
Local operating footprint
You want a company that regularly works in Western PA and understands winter exposure, older housing stock, and insurance paperwork common in this market.Licensed, bonded, and insured status
Ask for proof, not verbal reassurance. Liability coverage and workers’ compensation matter because one injury or property damage claim can become your problem if the contractor isn’t properly covered.Manufacturer certifications
Certifications can indicate training and access to stronger warranty options, but only if the installation follows manufacturer specifications.Service mix
A company handling repairs, replacements, and storm work usually gives more grounded advice than one that only wants full replacements.
One factual example of a local option is Penn Ohio Roofing & Siding Group, which provides roofing and siding services in Western PA and lists residential, commercial, repair, replacement, and storm-related work. That kind of scope is worth noting because many homes need a mixed solution, not a one-size-fits-all sales pitch.
How to read reviews without getting fooled
Don’t just count stars. Read the wording.
A useful review mentions details such as communication, cleanup, schedule, change orders, leak follow-up, and whether the company handled a difficult flashing or insurance issue well. Weak reviews sound generic and tell you almost nothing about the actual project.
Use this quick screen:
| What to look for | What it usually means |
|---|---|
| Mentions of specific work performed | The reviewer likely hired the company |
| Notes about cleanup and property protection | The crew had real site procedures |
| Comments on warranty follow-up | The relationship didn’t end at payment |
| Repeated vague praise with no details | Less useful for decision-making |
Field note: The best contractor isn’t always the one with the slickest estimate. It’s often the one that answers direct questions clearly and doesn’t dodge details.
Questions worth asking before you invite estimates
Ask each candidate the same core questions so the answers are easier to compare.
- Who supervises the crew on site
- Do you replace flashing as needed or only if it’s visibly failed
- How do you protect landscaping, driveways, decks, and HVAC equipment
- What happens if you find deck rot or hidden wall damage
- How do you document storm damage for insurance
A good contractor won’t act annoyed by these questions. They’ll expect them.
Comparing Estimates to Find True Value
Once the estimates come in, most homeowners go straight to the total. That’s understandable, but it’s also where expensive mistakes start. A lower number can mean a cleaner, more efficient operation. It can also mean missing steps, reused flashing, thinner scope, weak ventilation planning, or vague cleanup terms.
Use the estimate to judge how the contractor thinks.
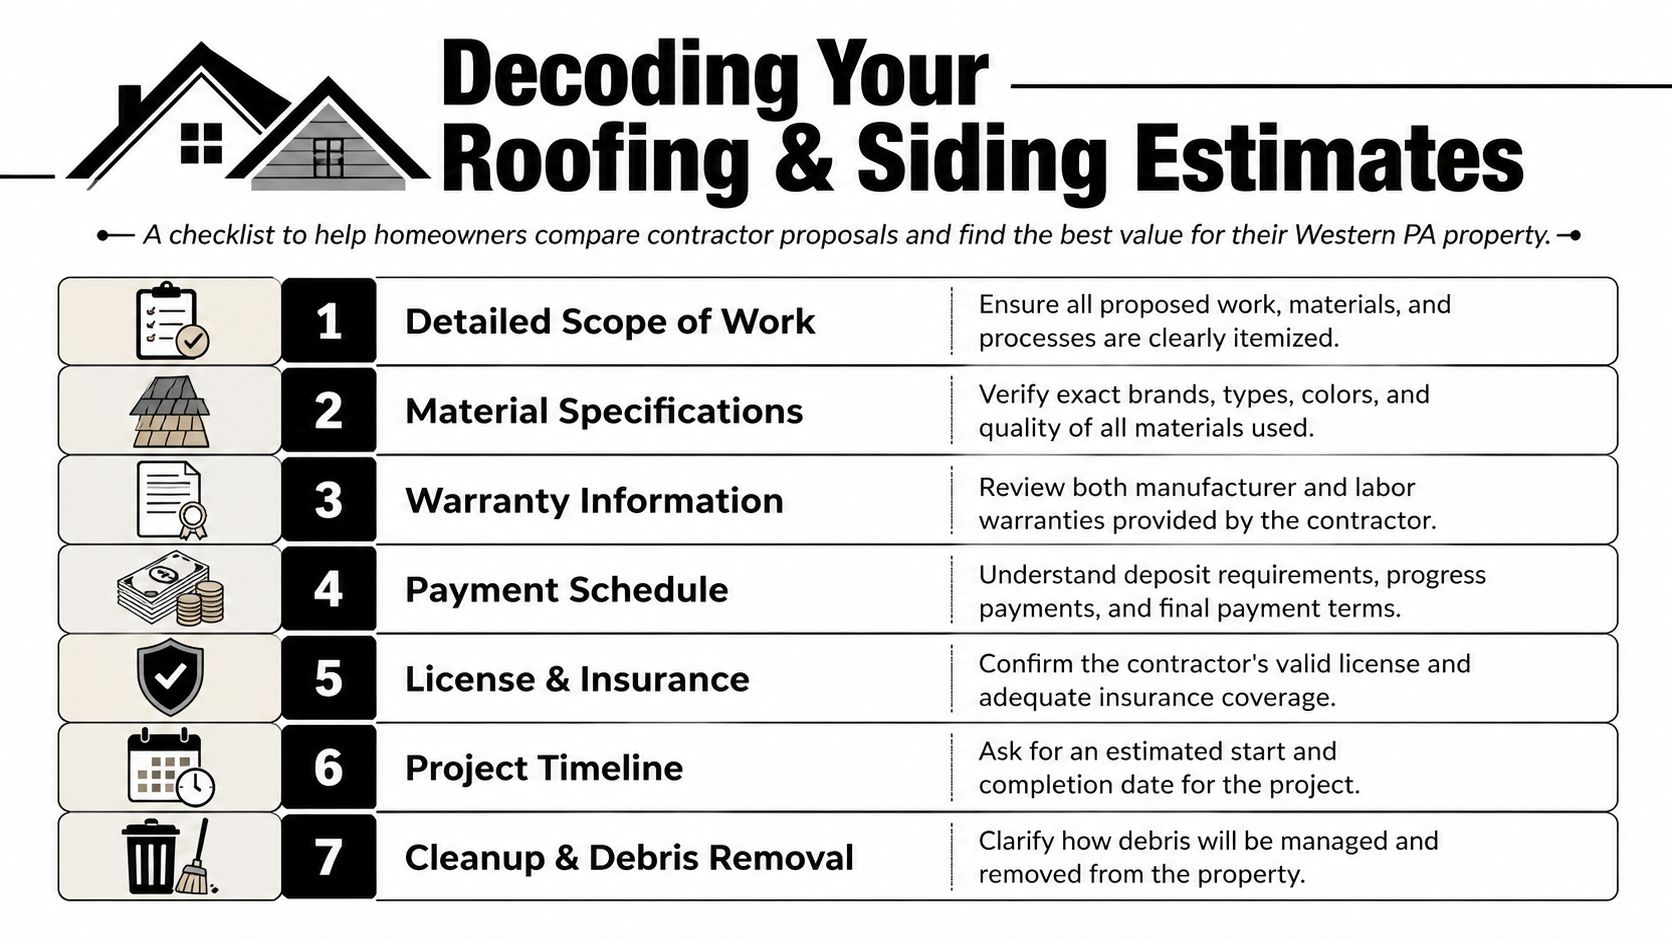
What a serious estimate should spell out
At a minimum, the proposal should identify the material type, what gets removed, what stays, what gets replaced, and how transitions are handled. If roof and siding work overlap, the estimate should also explain the sequencing. That matters because one trade can easily compromise the other if details are skipped.
A strong estimate usually covers:
Material specifications
Brand, product line, color, and accessory components should be named clearly.Underlayment and waterproofing
If the proposal stays vague here, ask what goes in valleys, eaves, penetrations, and vulnerable wall intersections.Flashing details
Many leak problems frequently originate or persist due to flashing details.Ventilation plan
A roof system is more than shingles. Intake and exhaust need to work together.Tear-off and disposal
You should know whether the quote includes full removal, haul-away, and magnetic cleanup.
Why flashing details matter so much
One line item tells you a lot about whether the estimator understands exterior water management. Professional estimates should detail flashing at roof-siding junctions because that step prevents up to 70% of common water intrusion failures, according to this construction industry report on roofing and siding integration.
If that detail is missing, ask specifically:
- Will step flashing be replaced where siding meets the roof?
- Will counterflashing or wall flashing be addressed if needed?
- Are kickout flashing details included at roof-to-wall terminations?
- Will siding be loosened or removed where proper flashing access is required?
A vague estimate usually leads to a vague scope. A vague scope is where surprise charges and callbacks start.
Compare bids side by side
Here’s a practical way to review proposals without getting lost in line items:
| Estimate item | Good sign | Red flag |
|---|---|---|
| Scope of work | Specific and itemized | Broad phrases like “roof work as needed” |
| Materials | Exact products listed | “Standard shingles” or “standard siding” |
| Flashing | Junction details included | No mention of wall intersections |
| Cleanup | Disposal and daily cleanup stated | Silent on debris handling |
| Warranty | Labor and manufacturer terms explained | “Warranty included” with no detail |
| Payment terms | Clear schedule tied to work stages | Large upfront demand with little detail |
Suspiciously low bids usually have a reason
Sometimes the missing cost isn’t visible until the job starts. The contractor may be excluding rotten decking, flashing replacement, permit coordination, or siding removal needed to do the roof correctly. Then the “cheap” estimate becomes the expensive one.
The best value is rarely the lowest or the highest. It’s the estimate that explains the work plainly, accounts for the actual conditions on your house, and leaves the fewest openings for confusion.
Navigating Storm Damage Insurance Claims
Storm claims frustrate homeowners because the process feels simple on paper and messy in real life. You call the carrier, open the claim, meet the adjuster, and wait. Then the paperwork comes back short, incomplete, or based on an inspection that missed part of the damage.

That’s why contractor involvement matters. A 2025 Insurance Information Institute study found that 40% of Pennsylvania storm claims are initially underpaid, and contractor involvement can help recover an average of $5,000 more per claim in the Pittsburgh area, as cited in this Western PA insurance claim overview. That’s not a small paperwork difference. It can decide whether the approved scope properly fixes the house.
What to do right after the storm
Start with documentation before temporary conditions change.
Take wide and close photos
Capture roof slopes visible from the ground, siding elevations, gutters, screens, dented metal, fallen branches, and interior stains.Write down the timeline
Note when the storm happened, when you noticed the damage, and what changed afterward.Prevent further interior damage
Move valuables, collect water, and use temporary protection if it’s safe to do so.
For homeowners dealing with winter-related damage, these ice dam prevention tips are useful because they explain the kind of roof-edge conditions that often lead to hidden moisture problems and later claims.
Where homeowners lose money
The biggest problem isn’t always denial. It’s incomplete scope. Adjusters may document the obvious field damage and miss accessories, flashing, starter materials, siding match issues, or collateral damage tied to the same event.
That’s where a contractor helps most. A qualified roofing and siding contractor Western PA should be able to:
- inspect the exterior thoroughly,
- organize photos and notes,
- explain what was damaged,
- meet the adjuster if needed,
- request supplements when the approved scope leaves out necessary work.
Penn Ohio Roofing & Siding Group outlines a local version of that process in its roof insurance claim process guide, which is worth reviewing before your adjuster visit.
Bring your contractor into the claim early enough to document conditions before temporary fixes, weather exposure, or cleanup erase the evidence.
Don’t confuse speed with resolution
Insurers move on timelines that don’t always match your roof’s needs. If active leaking is involved, protect the home first, then stay organized. Save every email, claim summary, estimate, photo set, and adjuster note.
If the initial settlement doesn’t match the documented damage, ask for a supplement based on missing items. The goal isn’t to argue for the sake of arguing. It’s to make sure the approved work can restore the property correctly.
Your Final Checklist Before Work Begins
By the time you’re ready to sign, most of the big decisions should already be made. What’s left are the details that determine whether the project runs cleanly or turns into a string of small disputes. This is the stage where homeowners should slow down again and read every line.
A contract should match the estimate. If the estimate promised flashing replacement, cleanup, ventilation work, or siding tie-ins, the contract should say so. If it doesn’t, ask for the revision before any deposit changes hands.
Check the contract line by line
Look for plain language, not broad promises.
Use this checklist before signing:
Scope matches the proposal
The contract should list the actual work, not a shortened version.Materials are identified clearly
Product names, colors, and major accessories should appear in writing.Payment schedule is defined
You should understand when deposits are due, what triggers progress payments, and what must happen before final payment.Change-order process is written down
Hidden damage happens. The contract should explain how extra work gets approved.Timeline language is included
Weather can delay work, but there should still be a stated start window and completion expectation.Cleanup responsibilities are spelled out
You want to know who handles debris, nail sweeps, and disposal.
Homeowner check: If a contractor says “we’ll figure that out later,” ask for it in writing now. Verbal promises disappear fast once tear-off starts.
What a professional job site should look like
The crew doesn’t need to be quiet, but they do need to be organized. Good site management shows up early in the project.
You should expect to see:
| Job site area | What good practice looks like |
|---|---|
| Material delivery | Staged neatly and placed with care for driveway and access |
| Tear-off phase | Controlled debris handling and property protection |
| Landscaping protection | Covering or shielding vulnerable areas as needed |
| Daily cleanup | Noticeable effort, not end-of-job-only cleanup |
| Communication | A clear point of contact for questions or changes |
A sloppy site often predicts sloppy detail work. Crews who don’t protect siding, shrubs, patios, or window wells usually aren’t paying close attention to less visible parts of the assembly either.
Know the key installation details
Most homeowners won’t stand on the roof and inspect nailing, but you should still understand the basics of proper installation. A professional installation follows manufacturer guidelines, including using six nails per shingle in high-wind zones and proper ridge venting, which can reduce attic heat by up to 50°F, according to Loveland Innovations’ roofing sales and installation guidance.
That matters because shortcuts don’t always fail right away. They fail during the next hard wind, the next heavy thaw, or the next season of attic moisture buildup.
Watch for signs that the crew is taking the process seriously:
Preparation
Materials arrive before the work starts. Access paths are planned. Sensitive areas are identified.Tear-off and inspection
Once the old materials come off, the crew checks the decking or wall condition instead of covering over damage.Water management details
Flashing, underlayment, penetrations, and roof-to-wall transitions get attention. Quality craftsmanship becomes evident here.Ventilation and finishing
Ridge vent, intake paths, caps, trim details, and seal points should look intentional, not improvised.
Ask what happens if hidden damage appears
This question separates experienced contractors from sales-driven ones. In Western PA, older homes often reveal soft decking, stained sheathing, failed trim boards, or water damage around sidewalls once materials come off.
You don’t need a contractor to promise there will be no surprises. You need one who can explain how surprises get documented, priced, approved, and repaired without derailing the entire job.
A good answer includes photos, a written change order, a pause for approval, and a clear explanation of why the repair is necessary.
Prepare your home before the crew arrives
A little prep on your end makes the project smoother.
Move vehicles away from the work zone
Give the crew room for materials, dumpsters, and debris control.Take down wall décor in upper rooms
Vibrations from tear-off can shake loose pictures and shelves.Protect valuables in attic or top-floor storage
Dust and movement can affect stored items.Secure pets and plan for noise
Roofing and siding work is disruptive. That’s normal.Tell the contractor about known problem areas
Mention past leaks, drafts, ice buildup spots, or rooms that smell musty after storms.
Final walk-through items
Before final payment, walk the property and ask direct questions. Look at the roof from all sides. Check siding lines, trim fit, flashing appearance, gutter reconnection, and cleanup quality. Ask for warranty paperwork and any color or product documentation you may need later.
You’re not being difficult by checking the work. You’re doing what a careful homeowner should do after a major exterior project.
If something feels unfinished, say it before the last check is written.
If you need help from a local team that handles roof replacement, repairs, siding, and storm-related assessments in Mercer, Beaver, and Lawrence counties, Penn Ohio Roofing & Siding Group is available for homeowners who want a clear inspection process, written estimates, and practical guidance before work begins.