
A commercial roof is one of your building's most critical and expensive assets. Proactive maintenance, centered around a thorough inspection, is the key to maximizing its lifespan and preventing catastrophic failures that disrupt operations and drain budgets. However, a quick visual scan is not enough. To truly safeguard your investment, you need a systematic approach that covers every component, from the membrane surface to the underlying structural deck. A detailed checklist ensures no critical element is overlooked.
At the core of any comprehensive commercial roof inspection checklist is the crucial process of effective hazard identification. Recognizing potential risks, whether they are structural weaknesses, membrane degradation, or faulty drainage, is the first step toward mitigation. This definitive guide breaks down the eight most crucial areas you must evaluate to protect your property.
This article provides an actionable, step-by-step framework for a complete inspection. We will move beyond a simple surface-level check to cover membrane integrity, flashing seals, drainage functionality, structural condition, and more. Following this guide will empower you to identify potential issues early, schedule preventative maintenance, and ensure your facility remains secure and watertight for years to come.
1. Membrane Condition Assessment
The roof membrane is your building's primary line of defense against the elements, acting as the principal waterproofing layer. A thorough membrane condition assessment is the cornerstone of any effective commercial roof inspection checklist. This step involves a meticulous visual and physical examination of the entire roof surface to identify any signs of wear, damage, or potential failure points before they escalate into costly leaks and structural problems.

During this evaluation, an inspector methodically looks for specific types of degradation that can compromise the membrane's integrity. These include punctures from dropped tools, tears from foot traffic, blisters where moisture is trapped, and wrinkles or "alligatoring" caused by UV exposure and age. The goal is to catch these issues early, as even a small breach can allow significant water intrusion.
Key Focus Areas for Membrane Inspection
- Surface Damage: Systematically scan for punctures, tears, and abrasions, paying close attention to high-traffic zones around HVAC units and access points.
- Deterioration Signs: Look for blistering (raised bubbles), ridging, and cracking, which often indicate moisture infiltration or material breakdown.
- Seam Integrity: Carefully check all seams, as these are the most common points of failure. Look for any lifting, gaps, or deteriorated sealant.
Pro Tip: For a deeper analysis beyond a visual check, advanced tools can be invaluable. For example, using multispectral imaging for roof assessments can detect hidden moisture or material degradation beneath the surface that is not yet visible, allowing for truly proactive maintenance.
A real-world example includes the regular TPO membrane inspection at large fulfillment centers, which often reveals early signs of UV degradation from constant sun exposure. Identifying these issues allows for timely application of protective coatings, significantly extending the roof's service life and preventing widespread material failure. This proactive approach is essential for any facility manager aiming to maximize their roofing asset's longevity.
2. Flashing and Penetration Sealing
Flashing and penetration seals are the critical transition points that connect the main roof membrane to other structural elements like walls, curbs, pipes, and vents. Statistically, these are the most vulnerable areas on a commercial roof and the most frequent source of leaks. A comprehensive inspection of these components involves a detailed examination of every point where the roof plane is interrupted, ensuring a continuous, watertight seal is maintained.
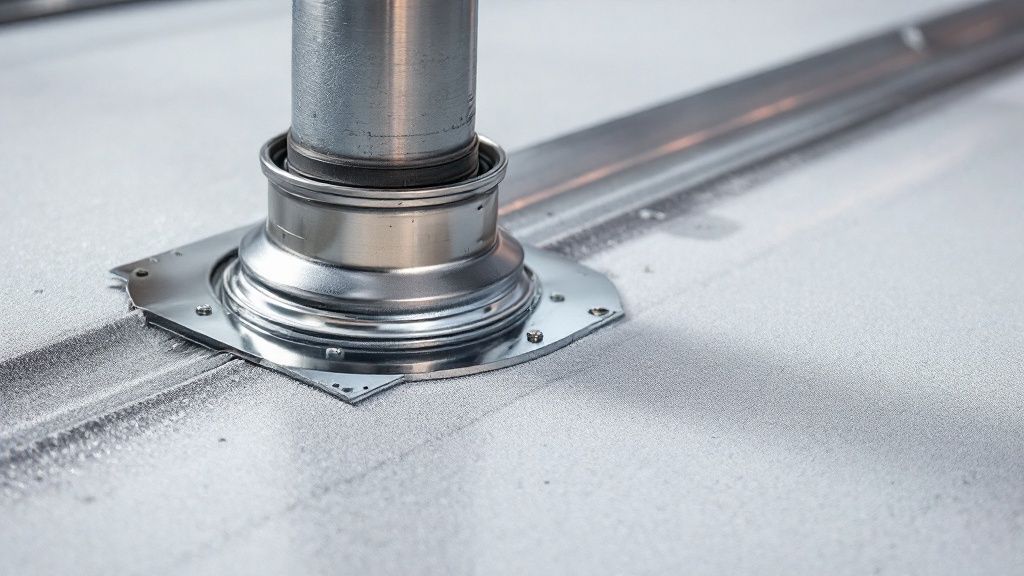
During this part of the commercial roof inspection checklist, an inspector focuses on the integrity of the materials and their installation. They look for signs of pulling away, cracking, rust on metal components, or deteriorated sealant. Because these areas experience significant stress from thermal expansion and contraction, they require meticulous attention to prevent water from bypassing the primary membrane.
Key Focus Areas for Flashing and Penetration Inspection
- Sealant Condition: Examine the caulk and sealant around all penetrations for cracking, shrinking, or gaps. This includes pipes, vents, skylights, and HVAC curbs.
- Flashing Adhesion: Verify that all flashing is securely fastened and fully adhered to both the roof membrane and the vertical surface without any lifting or "fish mouths."
- Component Integrity: Check for physical damage such as rust on metal flashing, punctures in membrane boots, or improperly terminated seams that could channel water into the building.
Pro Tip: When possible, inspect penetrations from both the exterior and the interior of the building. Signs of moisture staining or drips on the underside of the roof deck can pinpoint the exact location of a subtle flashing failure that might be difficult to spot from the topside alone.
A practical example is a hospital roof inspection that revealed failed sealant around several HVAC unit curbs. Left unchecked, this could have led to water intrusion, impacting sensitive equipment and sterile environments. Identifying this during a routine check allowed for targeted repairs, preventing a potential operational crisis and costly interior damage. This proactive focus on flashing is essential for any building manager.
3. Drainage System Functionality
A commercial roof's drainage system is its primary mechanism for shedding water, making its proper function non-negotiable for protecting the building's structural integrity. This part of a commercial roof inspection checklist involves a comprehensive evaluation of all water management components, including drains, scuppers, gutters, and downspouts. An effective system prevents ponding water, which can add excessive weight, accelerate membrane deterioration, and eventually lead to catastrophic leaks.
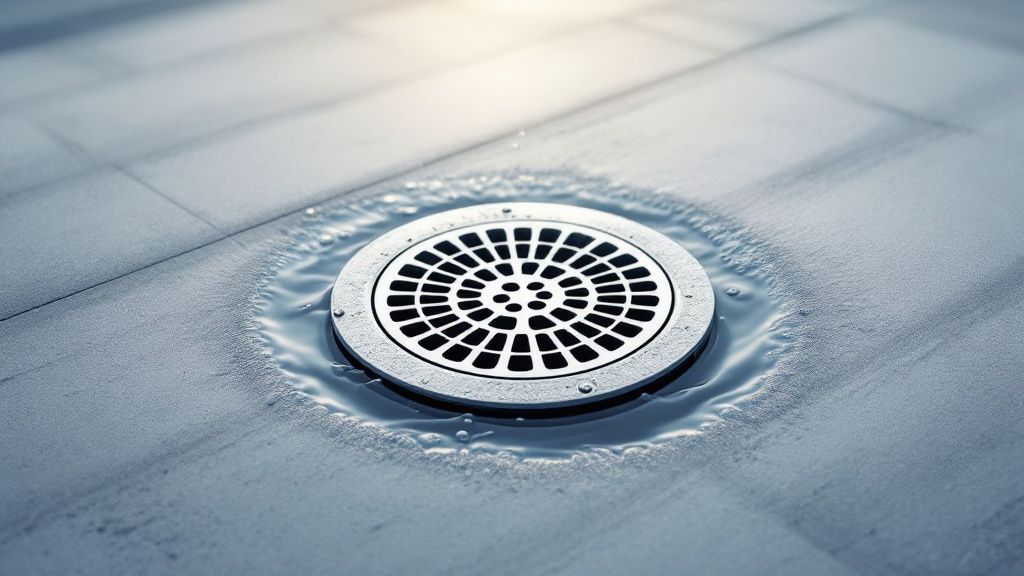
During this assessment, an inspector checks for blockages, damage, and proper installation. Clogged drains and gutters are a common culprit behind major roof problems, as they force water to pool or find alternative, often destructive, paths into the building. The goal is to ensure water is evacuated from the roof surface quickly and efficiently, safeguarding both the roofing materials and the structure below.
Key Focus Areas for Drainage Inspection
- Debris and Blockages: Thoroughly inspect all drains, scuppers, and gutters for leaves, dirt, and other debris that could impede water flow. Ensure drain baskets and scupper grates are intact and clear.
- Component Integrity: Check for cracks, rust, or loose connections in downspouts and gutters. Verify that all components are securely attached to the building.
- Proper Slope: Confirm that the roof has a positive slope toward all drainage points, typically a minimum of 1/4 inch per foot, to prevent ponding water.
Pro Tip: Don't just rely on a visual check. Perform a controlled water test by running a hose on the roof to observe drainage performance in real-time. This can reveal hidden blockages or areas with improper slope that aren't apparent during a dry inspection.
A practical application of this principle is seen in large hospital complexes, which often install redundant drainage systems for critical areas to guarantee water removal even if a primary drain fails. By ensuring their gutters, soffits, and fascia are in optimal condition, they protect sensitive equipment and patient areas. This proactive approach to drainage maintenance is a critical investment for any commercial property manager. You can learn more about the importance of these components by reading this detailed guide to gutters, soffits, and fascia.
4. Structural Integrity and Decking Condition
While the membrane provides waterproofing, the structural deck is the foundation of the entire roofing system. An assessment of its integrity is a critical, non-negotiable part of any commercial roof inspection checklist. This step involves evaluating the roof deck for any signs of physical compromise that could jeopardize the entire assembly, from the insulation to the membrane, and even the safety of the building's occupants.

During this evaluation, the inspector looks beneath the surface layers to examine the deck itself, which could be made of steel, concrete, or wood. The goal is to identify issues like sagging, deterioration from moisture, fastener withdrawal, and other weaknesses that affect its load-bearing capacity. Ignoring a compromised deck can lead to catastrophic failure, turning a repairable issue into a complete roof replacement or a structural disaster.
Key Focus Areas for Deck Inspection
- Visual Deflection: Look for any noticeable sagging, ponding water, or uneven surfaces that indicate the deck is losing its ability to support its intended load.
- Material Condition: Check for corrosion on steel decks, spalling (flaking) on concrete, or rot and moisture damage on wood decks. These are direct signs of material breakdown.
- Fastener Security: Examine how the insulation and membrane are attached. Fastener withdrawal, where screws back out of the deck, is a clear indicator of structural movement or deck deterioration.
Pro Tip: For a precise assessment of structural movement, document any visible deflection using laser measurement tools. This provides quantitative data that is far more reliable than a visual estimate alone and is crucial when coordinating with structural engineers for complex evaluations.
A real-world example is a big-box retailer that discovered significant steel deck corrosion during a routine inspection, hidden beneath intact insulation. This early detection allowed them to perform targeted repairs before the rust led to a structural failure under the weight of a heavy snow load. This proactive check prevented a potential roof collapse and significant operational downtime.
5. Insulation Performance and Condition
The roof insulation is a critical, yet often unseen, component responsible for a building's thermal performance and energy efficiency. Evaluating the insulation's condition is a key step in a comprehensive commercial roof inspection checklist, as its failure can lead to soaring energy costs, condensation issues, and premature roof system degradation. This assessment involves checking for moisture saturation, compression, and gaps that undermine its effectiveness.
During an inspection, professionals investigate the insulation layer, which lies beneath the primary membrane. Saturated insulation loses its thermal resistance (R-value) and becomes a heavy, moisture-laden liability that can stress the roof deck. Similarly, compressed or improperly installed insulation creates thermal bridges, allowing energy to escape and reducing the system’s overall performance.
Key Focus Areas for Insulation Inspection
- Moisture Detection: Use thermal imaging cameras during early morning or evening hours to detect temperature anomalies that indicate wet insulation beneath the surface.
- Physical Integrity: Check for signs of compression, particularly in high-traffic areas, which can significantly reduce R-value and create low spots where water ponds.
- Installation Gaps: Verify that insulation boards are tightly butted together without significant gaps, as these voids compromise the continuous thermal barrier.
- Core Sampling: In suspect areas identified by thermal scans or soft spots underfoot, take core samples to physically verify moisture content and material integrity.
Pro Tip: Wet insulation rarely dries out on its own and acts like a sponge, holding moisture against the roof deck and fasteners. This can lead to corrosion and structural decay, making its timely identification and replacement crucial for the long-term health of the entire roofing system.
A real-world example is a corporate headquarters that discovered its energy costs had spiked. A thermal scan revealed large sections of wet insulation, which had reduced the roof's energy efficiency by an estimated 40%. Replacing the compromised sections not only resolved the energy loss but also prevented further damage to the roof deck. This highlights how an insulation check is vital for both asset protection and operational cost management. While insulation is key, understanding all layers, including the protective barrier directly above the deck, is also important; you can learn more about roof underlayment here to see how different components work together.
6. Edge Detail and Perimeter Security
The roof edge system is arguably the most critical component for a roof's defense against wind uplift and severe weather. This perimeter detailing, which includes fascia, coping, and edge metal, secures the entire roofing assembly to the building structure. A comprehensive inspection of these details is a vital part of any commercial roof inspection checklist, as failures here can lead to catastrophic, progressive damage across the entire roof.
During this evaluation, an inspector focuses on the security and integrity of all perimeter components. This involves checking for loose or missing fasteners, open joints in the metal coping, and proper membrane termination at the roof's edge. Even a small section of unsecured edge metal can be caught by high winds, creating a peeling effect that can tear off large sections of the roof membrane and insulation.
Key Focus Areas for Edge Inspection
- Fastener and Attachment Security: Systematically check all fasteners on coping caps and edge metal to ensure they are tight and secure. Look for signs of back-out or corrosion that could weaken the attachment.
- Sealant and Joint Condition: Inspect all sealant joints between sections of coping and at corners. Look for cracking, deterioration, or loss of adhesion, which can allow water to penetrate behind the system.
- Membrane Termination: Verify that the roof membrane is properly secured under the edge metal according to manufacturer specifications, with no gaps or voids that could allow wind or water entry.
Pro Tip: When evaluating edge details, it's crucial to confirm that the system meets or exceeds local building code requirements for wind uplift. Codes, especially in coastal or high-wind zones, are frequently updated, and an older roof may no longer be in compliance, posing a significant risk.
A practical example is a high-rise office building in a hurricane-prone region. After a storm caused significant damage to nearby properties, a proactive inspection revealed that its original coping system did not meet the latest, more stringent wind uplift codes. By upgrading the edge metal and fastening pattern, the building owner fortified the roof's most vulnerable area, preventing a potential multi-million dollar failure in a future weather event.
7. Equipment Support and Mounting Systems
Roof-mounted equipment like HVAC units, vents, and solar panels are essential for modern commercial buildings, but they also create significant vulnerabilities in the roofing system. Each penetration and support structure is a potential entry point for water. A thorough inspection of equipment support and mounting systems is a critical part of any commercial roof inspection checklist, focusing on both the structural integrity of the mounts and the quality of their weatherproofing.
This evaluation involves a close examination of how equipment is attached to the roof deck and integrated with the membrane. Inspectors look for signs of stress on the roofing material around the supports, such as stretching or tearing, as well as degraded seals, loose flashings, and evidence of corrosion on the mounting hardware itself. Improperly supported equipment can also cause membrane damage from vibrations, making this a high-risk area for leaks.
Key Focus Areas for Equipment Support Inspection
- Structural Integrity: Check all support curbs, sleepers, and posts for signs of rust, shifting, or physical damage. Ensure all hardware is secure and that the equipment's weight is properly distributed.
- Weatherproofing and Penetrations: Meticulously inspect the flashing and sealant around every penetration point. Look for gaps, cracks, or deteriorated materials that could compromise the waterproof seal.
- Vibration and Movement: Assess the area for signs of damage caused by equipment vibration. Ensure vibration isolation pads are in good condition and that there is no direct contact between moving parts and the roof membrane.
Pro Tip: Always cross-reference the installed equipment with the building’s original structural design documents if available. Verifying that the roof structure was designed to handle the specific weight and type of equipment can prevent long-term structural fatigue and potential collapse.
A real-world example is the inspection of HVAC units on large retail stores. Constant vibration can slowly degrade sealant and work fasteners loose over time. By coordinating the roof inspection with scheduled HVAC maintenance, technicians can identify and address failing seals or loose supports before they lead to significant water intrusion, protecting both the expensive equipment and the building's interior.
8. Weather Damage and Environmental Impact Assessment
Your commercial roof is constantly exposed to the elements, making a weather damage and environmental impact assessment a critical part of any comprehensive commercial roof inspection checklist. This process involves a systematic evaluation of the entire roofing system to identify damage caused by specific weather events like hail, high winds, or heavy rain, as well as the cumulative effects of long-term environmental exposure such as UV radiation and temperature fluctuations. This targeted assessment helps prioritize immediate repairs and informs long-term maintenance strategies to mitigate future risks.
During this evaluation, an inspector searches for both obvious and subtle signs of weather-related stress. This can range from visible dents and cracks from hailstones to uplifted flashing and displaced membrane sections caused by strong winds. The goal is to accurately document the extent of the damage immediately following an event, which is crucial for safety, operational continuity, and insurance claims.
Key Focus Areas for Damage Assessment
- Impact Damage: Systematically search for circular bruises, punctures, or cracking on the roof membrane, particularly after hailstorms. Check metal components like vents and flashing for dents.
- Wind Damage: Inspect the roof perimeter, corners, and all seams for signs of lifting, peeling, or "scouring" where gravel ballast may have been blown away. Look for loose or missing flashing.
- Water Intrusion: Check for signs of ponding water, clogged drains, and evidence of recent water infiltration inside the building after heavy rainfall.
Pro Tip: Immediately after a severe weather event, conduct a preliminary assessment from the ground with binoculars if it is unsafe to access the roof. Documenting damage as soon as safely possible provides a clear timeline for insurance adjusters and helps prevent secondary damage from water intrusion.
A real-world example is how coastal commercial properties conduct post-hurricane assessments to document wind and water damage for insurance claims. Inspectors follow FEMA and NRCA protocols to identify everything from compromised membrane seams to damaged rooftop equipment, creating a detailed report that facilitates rapid and accurate claim processing. This methodical approach ensures the facility can secure the necessary funds for timely, high-quality repairs. To better prepare for this process, you can learn more about the common signs of roof damage to look for before an inspector arrives.
8-Point Commercial Roof Inspection Checklist Comparison
| Item | Implementation Complexity 🔄 | Resource Requirements ⚡ | Expected Outcomes 📊 | Ideal Use Cases 💡 | Key Advantages ⭐ |
|---|---|---|---|---|---|
| Membrane Condition Assessment | Moderate – requires skilled inspectors | Moderate – inspection tools, dry weather | Early detection of membrane damage, extended roof life | Routine roof maintenance, early damage detection | Cost-effective, prevents major water damage |
| Flashing and Penetration Sealing | High – detailed, access challenges | Moderate – inspection, thermal imaging | Prevents majority of leaks, maintains envelope integrity | Leak-prone penetrations and transitions | Inexpensive early repairs, protects equipment |
| Drainage System Functionality | Moderate – water tests, debris clearing | Low to moderate – equipment for water tests | Prevents ponding, reduces structural stress | Roof water management, ice dam prevention | Reduces membrane degradation, maintains slope |
| Structural Integrity and Decking Condition | High – specialized testing, engineering support | High – testing tools, engineering consultation | Prevents catastrophic failure, ensures support capacity | Structural assessments after visible sagging or loads | Protects building safety, code compliance |
| Insulation Performance and Condition | Moderate – thermal imaging, moisture testing | Moderate – IR cameras, moisture meters | Maintains energy efficiency, prevents condensation | Energy audits, insulation performance issues | Reduces energy costs, supports membrane lifespan |
| Edge Detail and Perimeter Security | Moderate to high – specialized access and testing | Moderate – tools for uplift tests | Wind uplift resistance, perimeter waterproofing | Wind-prone areas, roof perimeter protection | Prevents water infiltration, protects membrane |
| Equipment Support and Mounting Systems | High – coordination, safety measures | High – safety gear, multi-trade coordination | Prevents equipment-related roof failures | Roof equipment installations and maintenance | Maintains warranties, ensures load safety |
| Weather Damage and Environmental Impact Assessment | Moderate – timely, thorough documentation | Moderate – camera, GPS, weather data | Accurate damage documentation, prioritizes repairs | Post-storm assessments, insurance claims | Supports claims, identifies hidden damage |
Partnering with Professionals for Comprehensive Roof Asset Management
Navigating the complexities of a commercial roof system requires diligence, foresight, and a detailed plan of action. The comprehensive commercial roof inspection checklist we've outlined provides a powerful framework for this process. It transforms the overwhelming task of roof maintenance into a series of manageable, targeted assessments, from the condition of the membrane and flashings to the integrity of drainage systems and structural decking. By systematically evaluating each component, you move from a reactive, emergency-driven approach to a proactive strategy of asset preservation.
This detailed checklist empowers you to identify potential vulnerabilities before they escalate into catastrophic failures and costly operational disruptions. Understanding the state of your roof’s insulation, edge details, and equipment supports allows you to make informed decisions about maintenance schedules and capital expenditure budgets. It is the foundational tool for protecting your building, its contents, and its occupants from the elements.
From Checklist to Action: The Value of Expert Partnership
While this checklist is an invaluable guide for in-house facility managers and property owners, its true power is unlocked when paired with professional expertise. Identifying a potential issue like blistering on a TPO membrane or a clogged scupper is the critical first step; implementing a safe, effective, and code-compliant solution requires specialized knowledge and equipment. A professional roofing contractor can interpret the nuanced signs of wear and tear, distinguishing between minor cosmetic issues and indicators of deeper, systemic problems.
Furthermore, integrating advanced technologies can elevate the accuracy and safety of your inspections. To ensure a comprehensive assessment without compromising personnel safety, consider leveraging top drone inspection services as part of your overall roof asset management strategy. These services can provide high-resolution imagery and thermal data, revealing hidden moisture intrusion and subtle defects that are invisible to the naked eye.
Creating a Long-Term Roof Asset Management Program
Ultimately, a one-time inspection is just a snapshot in time. The goal is to build a continuous, long-term roof asset management program. This involves:
- Establishing a Regular Cadence: Performing documented inspections at least twice a year (spring and fall) and after major weather events.
- Detailed Record-Keeping: Maintaining a dedicated log of all inspections, findings, repairs, and warranty information.
- Proactive Maintenance: Scheduling routine upkeep, such as debris removal and sealant touch-ups, based on inspection findings.
- Strategic Budgeting: Using inspection data to forecast future capital needs for major repairs or eventual roof replacement.
By embracing this structured approach, you transform your commercial roof from a potential liability into a well-managed, reliable asset. This proactive stance not only extends the functional lifespan of your roofing system but also enhances property value, ensures tenant satisfaction, and provides invaluable peace of mind. Your commitment to a thorough inspection process is a direct investment in the longevity and resilience of your entire commercial property.
Ready to turn your checklist findings into a professional action plan? An experienced team can specialize in translating detailed inspections into effective, long-lasting commercial roofing solutions. Contact us today to schedule a comprehensive assessment and build a robust maintenance strategy for your property.