
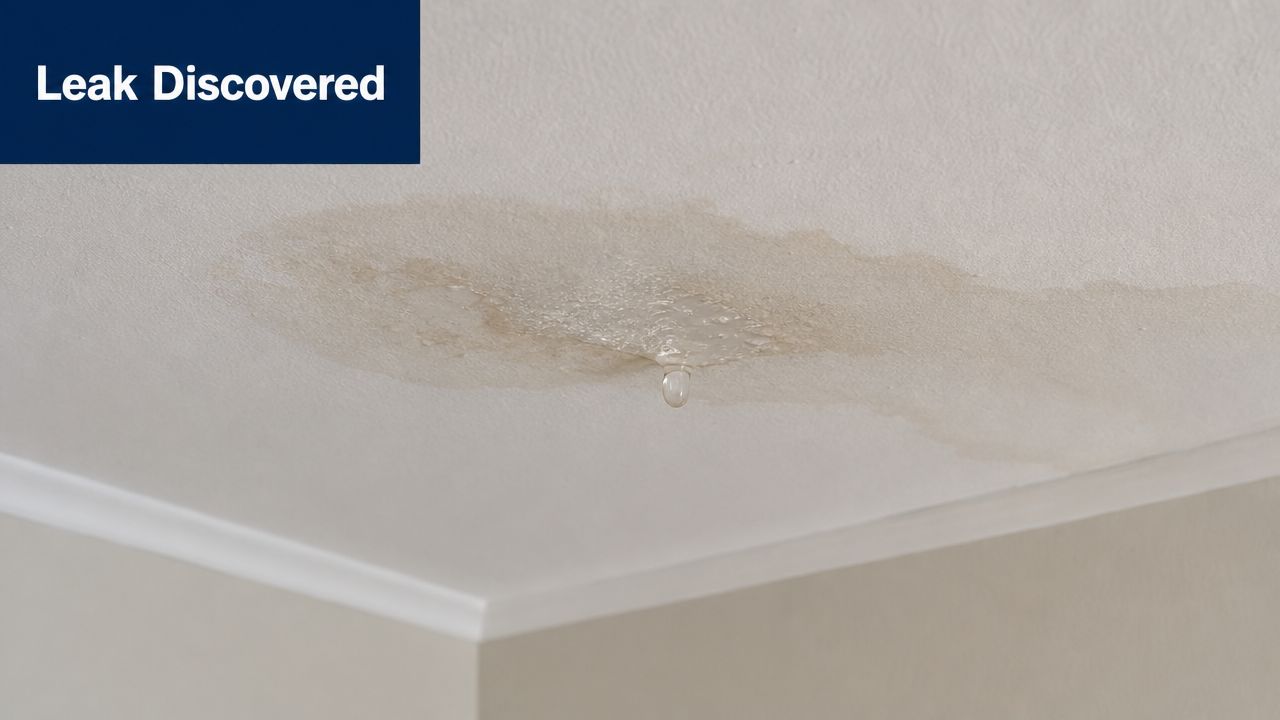
You hear the drip before you see it. Then you notice the ceiling stain, or the wet spot around a vent, or the line of water running down a wall after a hard Pennsylvania rain. If your metal roof is leaking, the first reaction is usually the same in Sharon, Pittsburgh, Erie, or anywhere else nearby. Panic. Then frustration, because metal roofs are supposed to be tough.
They are tough. But a leak doesn't usually mean the whole roof has failed. In many cases, the problem is smaller and more specific than homeowners expect. A loose fastener, a failed seam, cracked flashing around a chimney, or a roof penetration that has started to open up can all let water in. The key is to stay calm, control the interior damage first, and find the actual entry point instead of guessing.
Table of Contents
- That Unsettling Drip Finding Your Metal Roof Is Leaking
- First Steps When You Discover a Roof Leak
- Diagnosing the True Source of the Leak
- Repair Options DIY Patch vs Professional Fix
- Understanding Repair Costs and Insurance Claims
- Your Next Steps for a Leak-Free Roof in Pennsylvania
That Unsettling Drip Finding Your Metal Roof Is Leaking
You hear it in the middle of the night. One drip in the ceiling, then another. By morning, there is a stain on the drywall and a bucket on the floor, and the first question is usually the same. Is the whole metal roof failing?
Usually, no.
Most metal roof leaks start at a weak point such as a fastener, seam, flashing joint, vent boot, skylight curb, valley, or roof transition. The broad panel area may still be in good shape while one small detail is letting water in. That is why a leak can feel sudden even on a roof that still looks solid from the yard.
In Pennsylvania, freeze-thaw cycles, wind-driven rain, and older flashing repairs tend to expose those small failures. A little movement around a pipe boot or a backed-out screw can be enough. On low-slope sections and complicated rooflines, the odds of trouble go up because water has more places to slow down, back up, or slip under a joint.
Homeowners get misled by the ceiling stain all the time. The stain marks where the water showed up, not where it got in.
I have seen water appear over a hallway ceiling when the opening was several feet higher at a vent penetration. Water can follow rafters, decking, and insulation before it finally drips into living space. You should also rule out indoor sources such as attic condensation or plumbing lines nearby, but on a metal roof, the leak often traces back to a roof detail rather than the panel itself.
A serious leak needs fast attention, especially if water is near wiring, insulation, or finished ceilings. Early action often keeps the job in the repair category instead of turning it into drywall, insulation, paint, and trim work too. If active water is getting in and you need to buy time before a full repair, a properly installed emergency roof tarping service for storm and leak damage can help protect the home until the roof can be inspected and fixed correctly.
The main thing is to stay calm and avoid guessing. Metal roof leaks are usually fixable, but the right fix depends on finding the true entry point first.
First Steps When You Discover a Roof Leak
When water is entering the house, don't start by climbing onto a wet metal roof. Start inside, where you can reduce damage safely.
What to do in the first half hour
Catch the water. Put a bucket, pan, or plastic tote under the drip. If the leak is splashing, lay down old towels or a plastic sheet to protect flooring.
Move what can be damaged. Pull furniture, electronics, rugs, and anything stored below the leak out of the area.
Relieve bulging drywall carefully. If the ceiling is bubbling badly, water may be pooling above it. In some cases, carefully draining that pocket into a bucket can prevent a wider ceiling collapse. If you're not comfortable doing that, leave it alone and keep the area clear.
Shut off power to the affected area if needed. If water is near a light fixture, ceiling fan, or outlet, treat it as an electrical hazard.
Check the attic before you check the roof
A practical field protocol is to inspect from the attic first, then trace downward from likely entry points such as penetrations, seams, flashing, and valleys, because water often travels along framing members before it becomes visible indoors, as outlined in this attic-first leak inspection process from NV Roofing.
Use a flashlight. Look for darkened wood, damp insulation, shiny water trails, or drips hanging from nails or rafters. Mark suspicious areas with painter's tape if you can do it safely.
Practical rule: The wet spot inside the house is rarely your full answer. Follow the water uphill.
If rain is still coming in
If active weather is involved and the leak is getting worse, a temporary cover may be necessary until repair work can begin. If you need help containing the problem fast, emergency roof tarping services are one way to limit interior damage while the source is being confirmed.
What not to do
- Don't walk a wet metal roof. Metal gets slick fast.
- Don't smear sealant everywhere. Random caulk usually hides the problem rather than fixing it.
- Don't run a hose over the whole roof at once. That only creates confusion later.
If conditions are dry and safe, a controlled hose test can help, but it should be done one area at a time, not as a full-roof soak.
Diagnosing the True Source of the Leak
A ceiling stain gives you a symptom. It does not tell you where the roof failed.
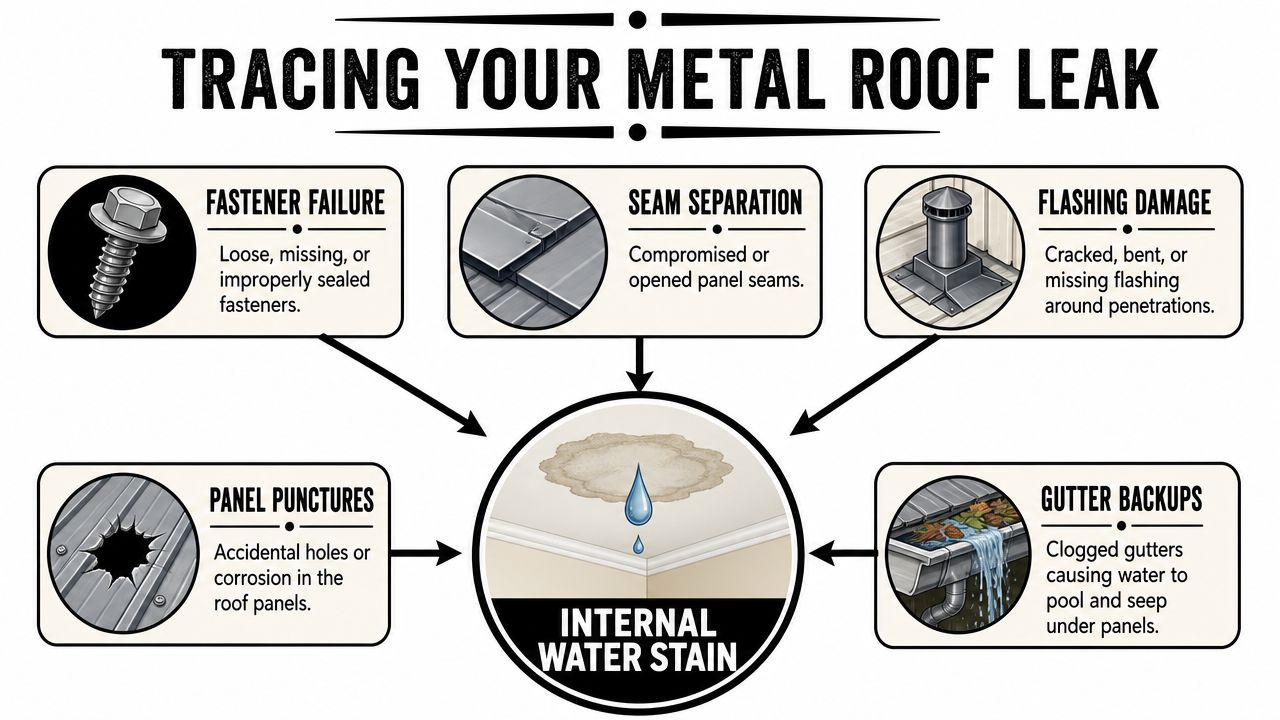
On metal roofs, the leak usually starts at a detail, not in the middle of a sound panel. The usual suspects are fasteners, panel laps, flashing, roof penetrations, and transition points where water has to change direction. That matters because a stain in the living room can trace back to a screw line, a vent boot, or a wall flashing several feet uphill.
Failed fasteners
Exposed-fastener metal roofs rely on every screw and washer doing its job. When one backs out, goes in crooked, or crushes its washer, water gets a path inside. A single failed fastener can create a leak that looks much bigger indoors than it is on the roof.
Watch for these signs:
- Raised or backed-out screw heads
- Washers that look split, brittle, or smashed flat
- Rust staining around a fastener
- A leak trail in the attic that lines up with a fastener row
From the ground or a ladder at the eave, you may spot an obvious problem. The trade-off is that visible screw issues sometimes point to a larger pattern, such as widespread fastener fatigue or panel movement, and that changes the repair.
Compromised seams
Seams and laps fail differently. They may hold through a light rain, then leak during a hard storm with wind pushing water uphill or sideways. Homeowners in Pennsylvania see this a lot during wind-driven summer rain and winter weather cycles that stress older roof details.
That kind of intermittent leak fools people. If it only shows up in certain storms, the roof still has a defect. It just needs the right conditions to expose it.
Failing flashing around penetrations
Flashing is where leak diagnosis gets serious. Plumbing vents, chimneys, skylights, furnace flues, wall intersections, and HVAC curbs all interrupt the roof system. If the flashing was bent, patched poorly, installed by another trade, or aged out, water can get behind the metal and travel before it drips inside.
This is one of the spots we check carefully at Penn Ohio Roofing because repeated leak calls often come back to the same few details. Fasteners, seams, and flashing cause a large share of the trouble.
When the problem might not be the roof
You should also rule out indoor plumbing when the stain sits below a bathroom, near a second-floor shower, or under supply lines. A roof leak and a plumbing leak can leave similar marks on drywall, especially if the ceiling cavity hides the source. If that possibility fits what you are seeing, this guide on how to fix a leaking shower ceiling can help you separate a roof issue from a plumbing problem before you approve roof work.
How roofers narrow it down
A good inspection follows the water path instead of guessing. That usually means matching what showed up in the attic to a specific roof detail outside, then checking whether the leak fits the weather pattern, the roof type, and the age of the materials. If needed, a controlled water test can confirm the entry point, but only when done methodically, one area at a time.
If you want a clearer picture of how leaks travel before you schedule repairs, our guide on finding a roof leak walks through the common paths we see on homes across Pennsylvania.
Repair Options DIY Patch vs Professional Fix
You have two goals once the leak source is narrowed down. Stop more water from getting in today, and avoid a patch that turns a manageable repair into a larger one later.
On a metal roof, a temporary fix can be reasonable in a very small number of situations. A permanent fix usually depends on what is leaking, how safely you can reach it, and whether the problem is isolated to one fastener or tied to flashing, panel movement, or a failed seam.
What DIY can handle
A homeowner can sometimes manage a short-term patch if all of the following are true. The roof surface is dry. The area is low and easy to reach. The leak point is visible. The repair is limited to one obvious issue, such as a backed-out exposed fastener or a tiny gap that can take a compatible metal-roof sealant.
Keep that patch narrow and deliberate. Metal roofs expand and contract, so repairs need to allow for movement. Guidance in this metal roof leak repair discussion from Butler Manufacturing Parts explains why overtightening fasteners can deform washers and create a new leak path.
I see that mistake often. A homeowner finds one loose screw, bears down on it, and the leak gets worse at the next rain.
What DIY usually gets wrong
The failure pattern is predictable:
- Too much sealant: Caulk gets smeared across the surface instead of fixing the entry point.
- Damaged fasteners: Screws get overdriven, washers split, or the wrong replacement fastener gets used.
- Wrong target: The drip inside gets patched instead of the roof detail above it where water is entering.
- Rigid repairs at moving joints: A hard patch gets applied where the roof needs to expand and contract.
- Flashing shortcuts: Cement gets used where the flashing should be removed and rebuilt correctly.
If the leak involves a chimney, skylight, vent boot, valley, or roof-to-wall transition, that is usually the line where DIY should stop. Those details fail because of installation sequence and water flow, not because they need more caulk.
DIY vs Professional Metal Roof Repair
| Factor | DIY Repair | Professional Repair |
|---|---|---|
| Scope | Best for a small temporary patch on an obvious leak point | Best for finding the source and making a lasting repair |
| Safety | Unsafe on steep, high, or slick metal surfaces | Proper access equipment and fall protection |
| Tools | Limited to basic hand tools and sealant | Tools and methods for fasteners, flashing, seams, and panel replacement |
| Diagnosis | Easy to miss the real entry point | Better chance of tracing the leak path correctly |
| Durability | Short-term at best | Built to correct the cause, not just cover it |
| Fastener work | Small errors can damage washers or miss surrounding wear | Fasteners can be replaced and adjacent components checked at the same time |
| Flashing repair | Difficult for the average homeowner to do correctly | Flashing can be rebuilt to shed water properly |
| Warranty | Usually none | May include workmanship coverage depending on the repair |
When to stop and call a roofer
Call a roofer right away if the roof is steep, high, or still wet. Call if the same leak has returned, if water is showing up around a penetration, or if insulation and drywall are already soaked. Those are the cases where guessing costs money.
If you are still sorting out whether the water is from the roof or somewhere else in the house, this guide to identifying household water issues can help you separate the possibilities before you approve repair work.
For Pennsylvania homeowners, the practical decision is usually this. Use DIY only to buy a little time when the problem is small, obvious, and safe to reach. Bring in a professional when the leak involves flashing, seams, recurring water, or any repair that needs the roof system taken apart and rebuilt correctly. If you want a clearer sense of what that kind of service can involve, review these metal roof repair cost factors in Pennsylvania.
A temporary patch should buy time. It should not hide the real problem.
Understanding Repair Costs and Insurance Claims
Most homeowners want two answers right away. What will this cost, and is insurance going to help?
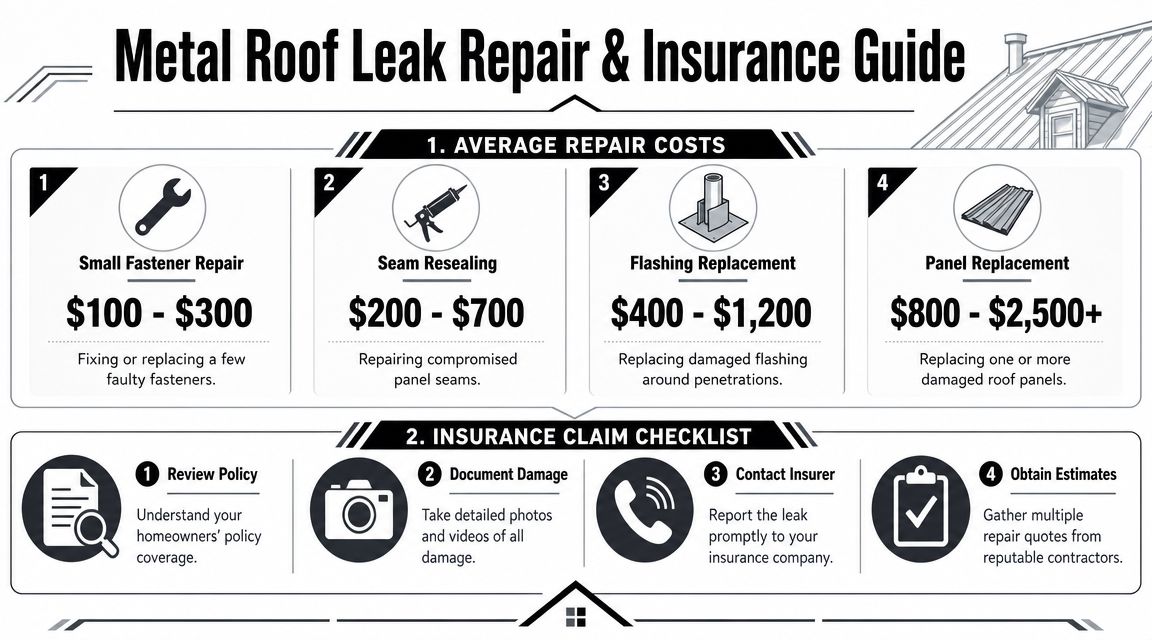
According to HomeAdvisor's metal roof repair cost guide, metal roof repair averages about $1,917 nationwide, with most homeowners spending between $639 and $3,195. Leak repairs specifically often fall in the $400 to $1,000 range, averaging about $700, and metal roof repair commonly runs $6 to $20 per square foot depending on the metal type.
What changes the final repair bill
Price usually moves based on:
- Type of repair needed
- Metal type
- Roof access and height
- Whether flashing or panel sections must be replaced
- How much interior damage occurred before the leak was caught
A simple isolated fix is one thing. A leak that has spread into multiple roof details or damaged interior finishes is another.
What insurance may cover
Insurance often depends on cause, not just damage. Sudden storm-related events may be treated differently than leaks caused by wear, deferred maintenance, or long-term deterioration. That's why documentation matters.
Take clear photos of the ceiling stain, attic moisture, wet insulation, visible roof issue if safely observable, and any damaged belongings. Write down when you first noticed the leak and whether it followed wind, hail, or a specific storm.
If you're sorting through insurance paperwork, this plain-language explanation of an insurance binder can help clarify one of the documents homeowners sometimes encounter when reviewing coverage details.
Keep your paperwork organized
Use one folder, digital or physical, for:
- Photos and videos
- Notes on dates and weather
- Communication with your insurer
- Inspection findings
- Repair estimates
If you want a local overview before calling contractors, this page on metal roof repair cost gives added context around what can affect pricing on metal systems.
Your Next Steps for a Leak-Free Roof in Pennsylvania
A metal roof leaking today usually points to a detail that needs attention. Fix that detail correctly, and the roof can go back to doing its job. Ignore it, and the repair almost always grows from a roof issue into an interior issue.
For homeowners in Sharon, Pittsburgh, Erie, and the surrounding parts of Pennsylvania, the smart next step is straightforward. Protect the inside of the house, inspect safely from the attic if you can, document what you see, and get the leak traced to its true source before anyone starts guessing with sealant.
Ongoing prevention matters too. Look over the roof from the ground a couple of times each year, keep gutters flowing, and pay attention after storms. If you notice new stains, loose trim, or moisture around penetrations, don't wait for the next heavy rain to confirm it.
A permanent repair beats repeated patching every time.
If your metal roof is leaking and you want a clear diagnosis and a practical repair plan, contact Penn Ohio Roofing & Siding Group for a free, no-obligation estimate. They serve homeowners across western Pennsylvania and can help identify the cause, explain the repair options, and get the roof watertight again.