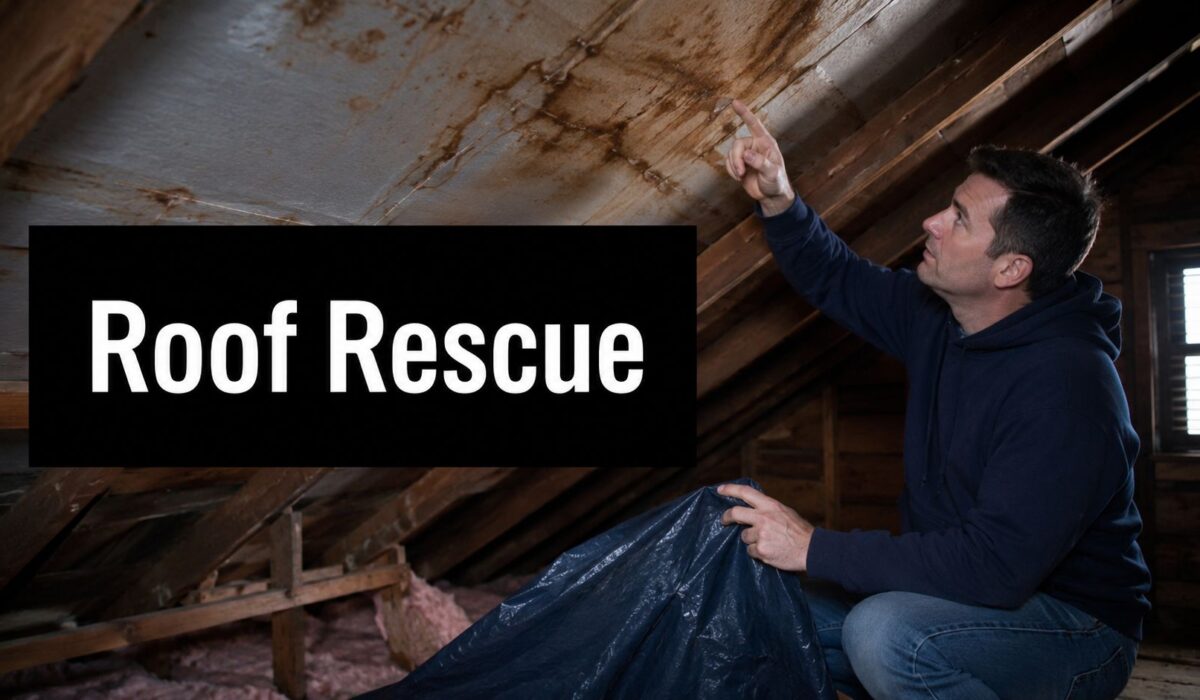
You notice the stain first. It's a yellow-brown ring on the ceiling, maybe over the hallway, maybe above the spare bedroom you hardly use. Then the weather shifts, the spot darkens, and now you've got an active drip hitting a bucket while you wonder whether the roof is failing, whether the insulation is soaked, and whether insurance will say this is your fault.
That's a common Pennsylvania call. Homeowners in Sharon, Pittsburgh, and Erie often expect a roof leak to look obvious from the outside. It often doesn't. Some of the worst water damage from a roof leak starts with shingles that still look decent from the yard and a ceiling stain that's nowhere near the actual opening. The right move is to slow the damage immediately, document the cause carefully, and avoid guessing at the leak location.
Table of Contents
- First Signs of Roof Leak Water Damage You Can't Ignore
- Your Immediate Action Plan to Minimize Damage
- How to Document Damage for Your Insurance Claim
- Temporary Fixes and Knowing When to Call a Pro
- The Professional Repair and Restoration Process
- Preventing Future Roof Leaks and Water Damage
First Signs of Roof Leak Water Damage You Can't Ignore
A lot of homeowners think a roof leak announces itself with a dramatic ceiling collapse. More often, it starts without much notice. You smell something musty in the attic. Paint begins to bubble near a window trim line. A wall picks up a faint shadow that doesn't look like a normal stain. Then one storm later, the problem becomes impossible to ignore.
What homeowners usually see first
The obvious signs still matter. Watch for these early clues:
- Ceiling spotting: Small tan or gray discoloration around seams, light fixtures, or corners.
- Trim and wall changes: Peeling paint, swollen baseboard, or drywall tape starting to lift.
- Attic warnings: Damp rafters, wet insulation, or a stale odor that gets stronger after rain.
- Soffit trouble: Moisture marks near soffits can point to water entering higher up and traveling before it appears indoors.

One detail trips people up all the time. Wind can lift shingles without creasing them, allowing rain to infiltrate while the roof appears intact. Homeowners often miss this, leading to delayed repairs and potential for over $25,000 in interior damage from just one inch of water, a common scenario behind claims from wind and hail, as discussed in this adjuster discussion on hidden roof leak scenarios.
Practical rule: If the ceiling stain showed up after wind-driven rain, don't assume the roof is fine just because you don't see missing shingles from the driveway.
Why the stain is often lying to you
Water follows framing, underlayment laps, nail lines, and gravity. It can enter near flashing, move along a decking seam, run down a rafter, and finally show itself several feet away inside the house. That's why homeowners patch the wrong spot so often.
The trick is to think uphill and outward. If the stain is on a ceiling near an exterior wall, look at roof penetrations above it. If the stain is near the middle of a room, check valleys, plumbing boots, chimneys, skylights, and transitions where one roof plane meets another. Dead valleys and soffit paths are common hidden routes.
In Pennsylvania homes, especially older ones, I'd pay close attention to these trouble areas:
- Flashing joints: Chimneys, dormers, sidewalls, and vent stacks
- Roof valleys: Places where water concentrates during heavy rain
- Gutters and edges: Clogs can push water back under the roofing
- Aged shingle fields: Granule loss and brittle tabs often let water in before they look catastrophic from the ground
When you're trying to identify water damage from a roof leak, don't chase the drip alone. Trace the pathway. That's the difference between calming the problem down and letting it come right back on the next storm.
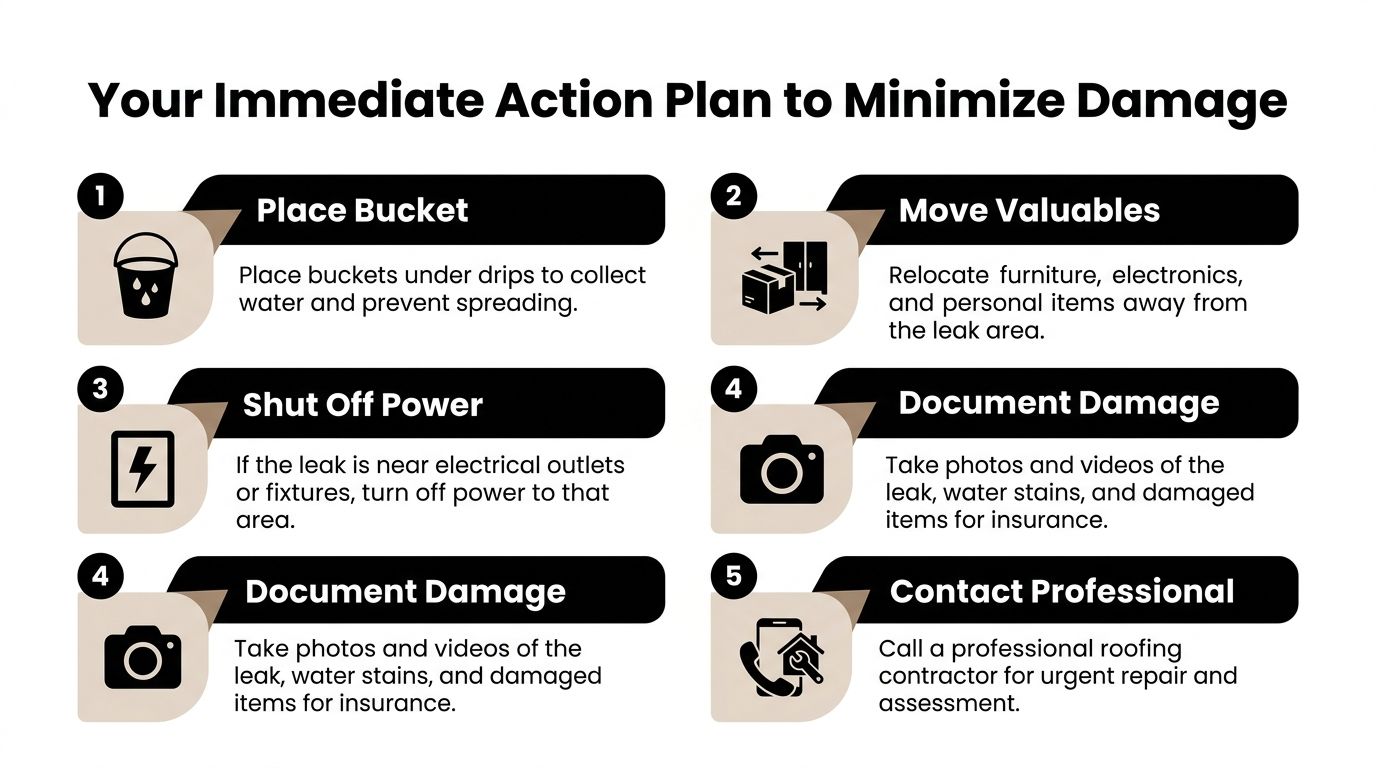
Your Immediate Action Plan to Minimize Damage
Once water is actively entering the house, this stops being a roofing problem alone. It becomes a contents, drywall, insulation, flooring, and electrical problem. The first half hour matters.
What to do in the first half hour
Start with safety, then containment.
- Put a bucket or deep container under the drip. Add a towel inside the bucket if the dripping is loud or splashing.
- Move furniture, electronics, rugs, and anything sentimental. Water spreads farther than people expect.
- Shut off power to the affected area if water is near a fixture, outlet, or ceiling fan. If you're not sure what circuit controls it, leave the area alone and call for help.
- Relieve ceiling pressure if drywall is bulging. A careful small puncture into the lowest point can release trapped water into a controlled bucket instead of letting the whole section drop unexpectedly.
- Start documenting before cleanup changes the scene. Take photos and short videos first.
In Pennsylvania, water damage from a roof leak worsens every hour, and professional emergency response teams are often capable of arriving within 60–90 minutes in cities like Sharon to tarp the affected area and stop active water infiltration, according to this roof leak emergency response note for Sharon.
What helps and what makes it worse
Homeowners usually mean well, but a few common reactions create bigger repair bills.
- Helpful move: Open the area, catch the water, and protect belongings.
- Bad move: Smearing random caulk on visible shingles from a ladder in the rain.
- Helpful move: Tarping by a trained crew once they identify the likely entry area.
- Bad move: Waiting until the storm passes for a few days because the leak “slowed down.”
Water that stops dripping isn't always gone. It may still be sitting in insulation, drywall cavities, or the attic floor.
If flooring is involved, it also helps to understand how water keeps affecting materials after the visible leak slows. This Richmond VA homeowner water damage guide is useful for understanding what moisture does to wood floors and why fast drying matters.
The main job right now isn't permanent repair. It's to stop additional intrusion and keep a manageable loss from turning into a much larger one.
How to Document Damage for Your Insurance Claim
A lot of claims are decided less by how bad the stain looks and more by whether the homeowner can show what caused it. That matters because insurers typically separate sudden storm-related events from long-term deterioration.
Prove cause, not just damage
Insurers typically deny claims for leaks from gradual deterioration but cover storm-induced leaks. Homeowners often struggle to document a "covered peril" as the cause, especially when there's no obvious roof damage, leading to claim denials. Properly photographing both roof and interior damage is a critical, yet often missed, step, as explained in this home insurance roof leak coverage guide.
That means your documentation needs two parts:
- Interior evidence: Ceiling stains, wet insulation, damaged drywall, flooring, furniture, and personal property
- Exterior context: Roof slope, flashing areas, gutters, downspouts, yard debris, fallen limbs, and any storm-related conditions you can safely capture from the ground
If it's safe, take wide shots first, then medium shots, then close-ups. Don't only photograph the worst stain. Show where it sits in the room. Show the path to the exterior wall. Show the roof plane above that room if you can do it without climbing.
Build a clean timeline
A simple written timeline helps more than people realize. Keep one page in your phone notes or a notebook.
Record:
- When you first noticed the issue
- What the weather was doing
- When the drip became active
- Who you called and when
- What temporary measures were taken
- What materials or belongings were affected
Save every voicemail, email, estimate, and text tied to the loss. Small details that feel unimportant on day one often become the missing link later.
If you need a structured place to organize claim information, the PIA Southern Alliance claims toolkit is a practical reference point for the paperwork side.
The biggest mistake is cleaning up so thoroughly that you erase the story of the loss. Dry what you can safely dry and protect the house, but preserve enough evidence to show a clear chain from event to damage.
Temporary Fixes and Knowing When to Call a Pro
There's a narrow lane where a temporary homeowner fix makes sense. Outside that lane, it's a gamble. The question isn't whether you're handy. The question is whether you can stop water safely without hiding the source, falling off the roof, or creating a worse repair.
A safe patch versus a bad gamble
A temporary fix can be reasonable when the issue is small, reachable, and obvious. A single exposed fastener on a detached shed roof is one thing. A leak around a chimney, wall flashing, valley, or low-slope section is another.
What usually works for a short-term hold:
- A secured tarp on an accessible area, installed when conditions are dry enough to work safely
- Roofing cement on a clearly identified minor opening, but only as a temporary hold
- Interior containment, which is often the smartest short-term move when outside access is risky
What usually doesn't work:
- Guess-patching the ceiling stain location
- Using spray foam or random sealants from the hardware aisle
- Climbing onto a wet or steep roof
- Trying to seal flashing blind without exposing the true defect
If the leak involves repeated staining, multiple rooms, a flat roof area, or any roof transition, call a roofer. Those are diagnostic jobs first, patch jobs second. If you're weighing whether the issue is repairable or part of a larger roof problem, a professional roof inspection is the right next step.
Comparison table
| Scenario | Recommended Action | Reasoning |
|---|---|---|
| Single active drip under a known minor roof puncture, dry conditions | Temporary tarp or limited exterior patch, then schedule repair | This can reduce immediate intrusion if the source is truly obvious and safely reachable |
| Ceiling bulge with no confirmed exterior source | Interior pressure relief and professional diagnosis | The visible damage may be far from the entry point |
| Leak near chimney, skylight, valley, or wall flashing | Call a professional immediately | These assemblies fail in ways that usually aren't solved by surface sealant |
| Flat or low-slope roof leak | Call a professional immediately | Water can travel under membranes or along seams before it shows inside |
| Post-storm leak with shingles that look normal from the ground | Document and call a professional | Hidden wind-related displacement is easy to miss |
| Repeated leak in the same area after prior patching | Stop patching and diagnose the whole assembly | Repeat leaks often mean the wrong area was sealed or a deeper detail was missed |
For homeowners around Sharon, Pittsburgh, and Erie, the right trade-off is usually this. Use temporary measures to reduce damage inside. Leave source diagnosis and roof-level repair to someone who can inspect the system safely and completely.
The Professional Repair and Restoration Process
Once the roof entry is controlled, the repair process should stop feeling chaotic. A proper response follows a sequence. That protects the structure, supports the claim file, and reduces the chance of trapped moisture getting buried behind new materials.
How a proper water intrusion response works
Professional restoration follows IICRC S500 guidelines, using moisture meters and thermal imaging to map saturation, followed by controlled demolition and structural drying. The success rate for this methodology exceeds 90% if the roof entry point is closed within 24 hours, according to this roof leak restoration methodology overview.
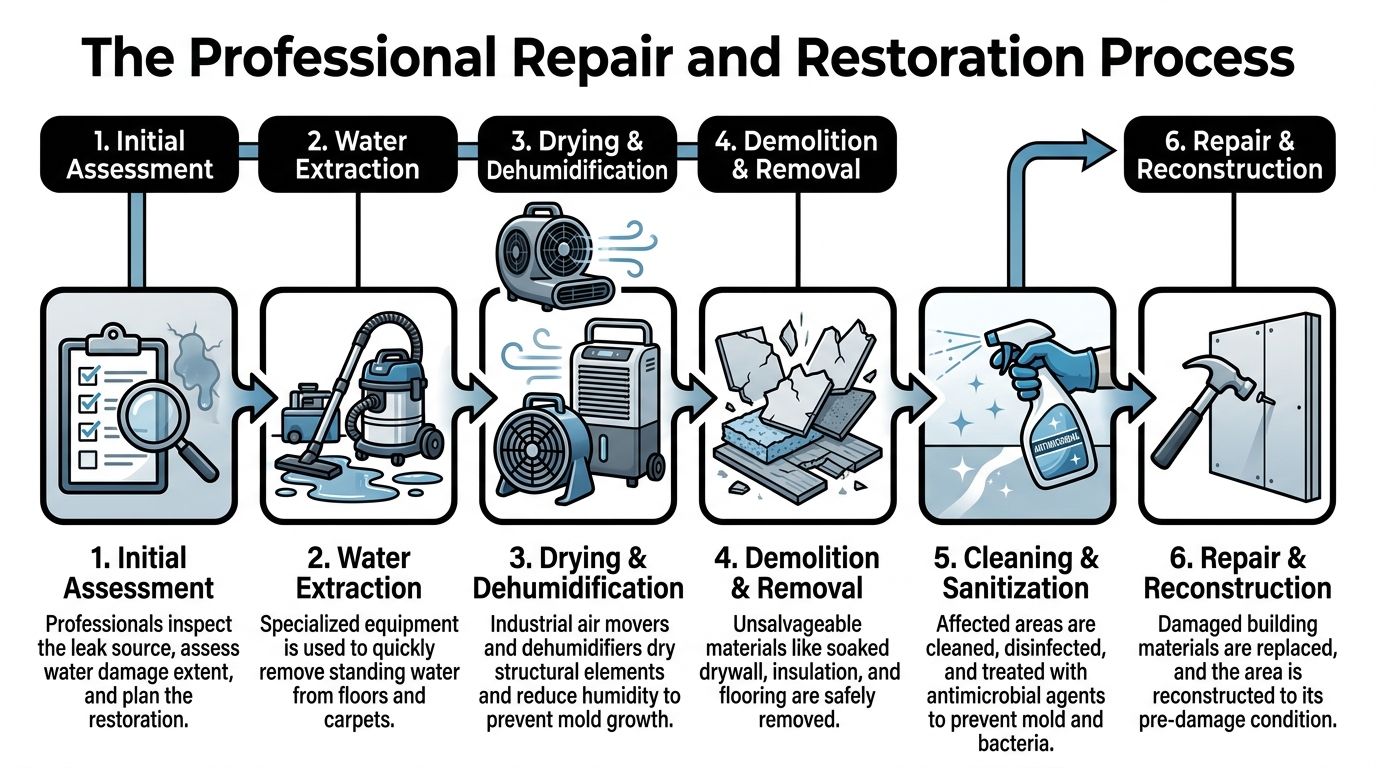
A disciplined process usually looks like this:
- Source control first. Emergency tarping, temporary flashing repair, or another immediate measure stops active intrusion.
- Moisture mapping. Crews use penetrating and non-penetrating moisture meters, thermal imaging, and humidity readings to find where the water went.
- Material decision-making. Wet drywall, insulation, or trim gets evaluated for salvageability.
- Controlled demolition. Damaged material is removed to a dry boundary instead of tearing out half the room blindly.
- Structural drying. Air movers and dehumidifiers run until readings hit drying goals.
- Verification. Final checks confirm the assembly is dry before reconstruction starts.
If a contractor wants to skip moisture mapping and jump straight to cosmetic repairs, that's a red flag.
What reconstruction usually involves
After drying, the rebuild side begins. That can include insulation replacement, drywall repair, texture matching, trim work, repainting, and sometimes flooring work if water traveled farther than expected. If the leak affected hardwood or other wood surfaces, this Savera Wood Floor Refinishing water damage repair resource gives useful examples of what moisture damage can look like in finished floors.
On the roofing side, the permanent fix may be localized or broader. If the issue is tied to a failing section, brittle shingles, or repeated leak history, the repair conversation can turn into a larger scope decision. That's where a comparison like roof replacement vs repair becomes helpful.
Penn Ohio Roofing & Siding Group handles roof repair and emergency service in this region, which is relevant when a Pennsylvania homeowner needs the roof opening secured before interior drying can succeed.
The key thing to expect is sequence. Roof first. Moisture mapping second. Drying before closing walls. Reconstruction after verification. That order is what keeps a “fixed leak” from becoming a hidden mold or repeat-stain call months later.
Preventing Future Roof Leaks and Water Damage
Prevention doesn't need to be complicated. It needs to be consistent. In Pennsylvania, weather swings, wind, snow load, freeze-thaw movement, and clogged drainage all work on the roof year-round.
A simple Pennsylvania maintenance rhythm
The top causes of roof leaks include age-related wear, broken or missing shingles, and cracked flashing. Hidden leaks alone can waste nearly 10,000 gallons of water annually in an average household, according to this water damage statistics summary from This Old House.
A workable routine for homeowners in Sharon, Pittsburgh, and Erie looks like this:
- Spring ground check: Use binoculars to look for missing shingles, lifted tabs, bent flashing, and sagging gutter lines.
- Summer attic check: Smell for mustiness, look for dark sheathing, and inspect around penetrations after heavy rain.
- Fall drainage cleanup: Clear gutters and downspouts so water doesn't back up at the roof edge.
- Winter vigilance: Watch for the conditions that create edge backup and interior staining. If that's a recurring issue at your house, this guide on what causes ice dams on roofs is worth reading.
The cheapest leak is the one you catch before it reaches drywall, insulation, and flooring.
Don't wait for a brown circle on the ceiling to tell you the roof needs attention. If a storm came through and something feels off, trust that instinct and inspect early. That's how you avoid the invisible leak that turns into a visible mess.
If you're dealing with water damage from a roof leak in western Pennsylvania, Penn Ohio Roofing & Siding Group can help you sort out the next step, whether that means emergency roof containment, leak diagnosis, or figuring out if the issue calls for repair or a larger roofing solution.