If you're standing in your driveway in Sharon, Pittsburgh, Erie, or anywhere else in western Pennsylvania looking at a wall that needs new siding, you're probably thinking about boards, colors, and how hard the cuts around windows are going to be. That's normal. But wood siding installation usually fails for a different reason. Water gets behind it, can't dry, and starts working on the wall long before the outside looks bad.
That's the part a lot of DIY guides rush past. In Pennsylvania, with wet springs, humid summers, wind-driven rain, and freeze-thaw swings, wood siding isn't just trim for your house. It's part of a moisture-management system. If you treat it like boards nailed to a wall, you're taking a real gamble.
Table of Contents
- Planning Your Wood Siding Project
- Essential Surface Preparation and Moisture Control
- Gathering Your Tools and Materials
- The Core Installation Process Step by Step
- Finishing Touches and Avoiding Common Pitfalls
- Long-Term Care and When to Call Penn Ohio
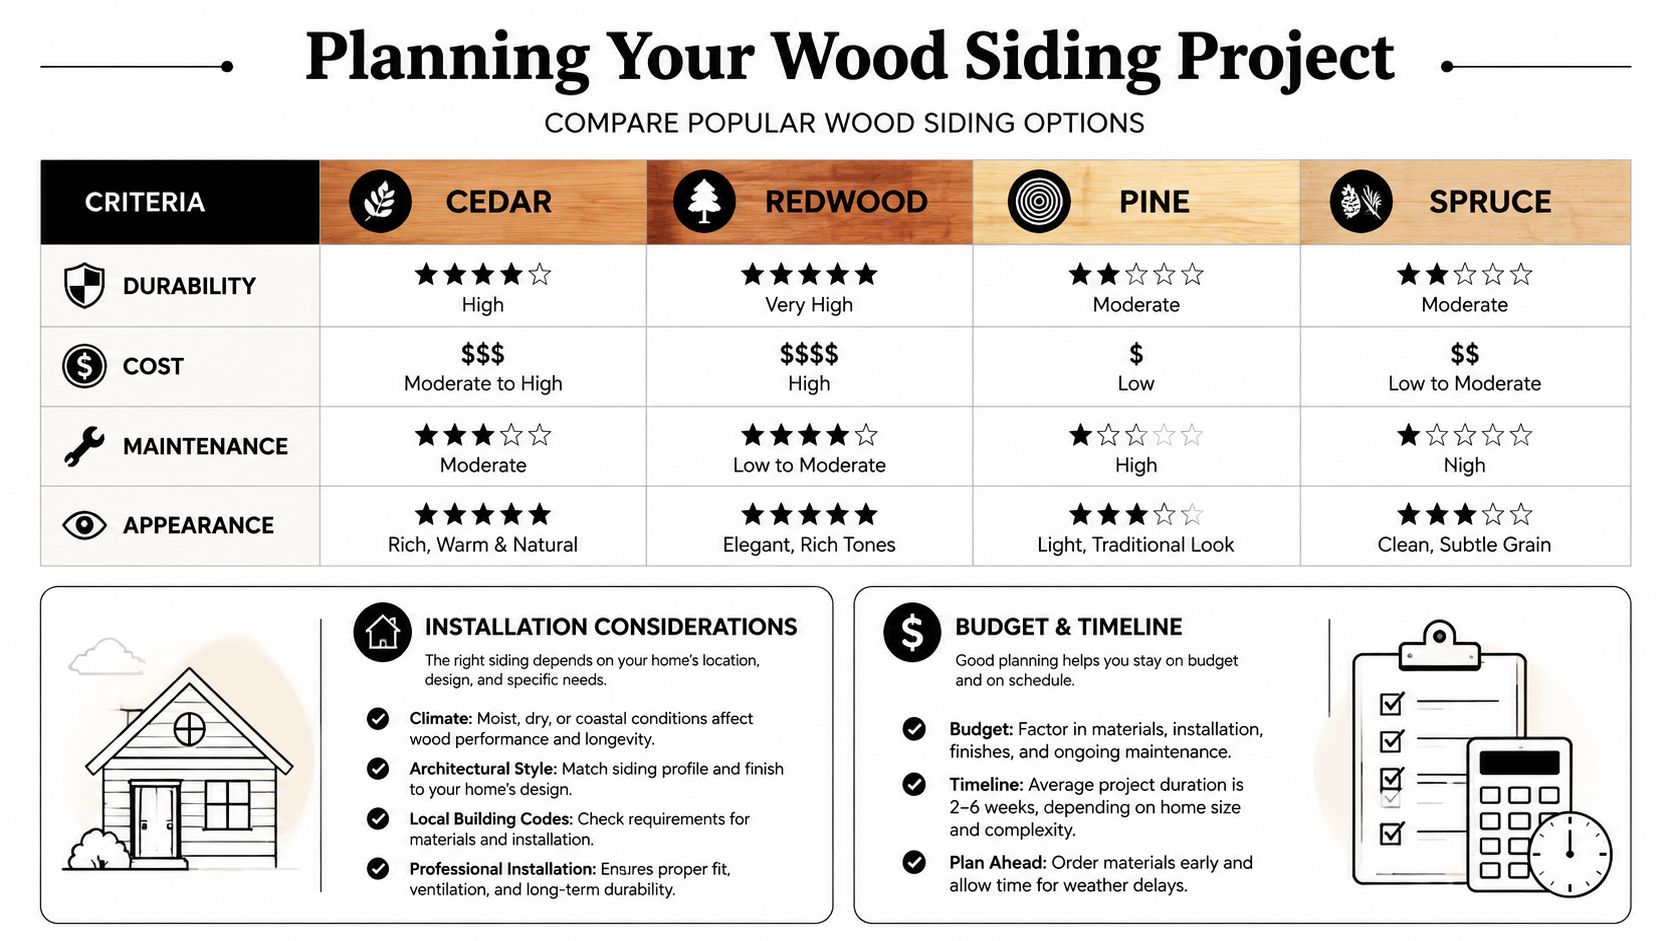
Planning Your Wood Siding Project
Wood siding is always a trade-off between appearance, maintenance, and budget. Homeowners choose it because it looks right on a house in a way many factory-finished products don't. They also choose it without always realizing that good-looking wood on a bad wall assembly won't stay good-looking for long.
Choose the wall system first
Before you settle on cedar, redwood, pine, spruce, or engineered wood, decide how the wall is going to shed water and dry out. That's the essential foundation of the project. The boards matter, but the wall behind them matters more.
A few planning points are worth settling early:
- Profile choice: Horizontal lap siding is familiar and forgiving to lay out. Other profiles can look excellent, but they often ask for tighter layout control and better detailing.
- Species and product choice: Natural wood gives you the classic look. Engineered wood can simplify some installation decisions, but it still needs a properly managed wall behind it.
- Exposure level: A protected wall under deep overhangs behaves differently than a wall that catches wind and rain all season.
- Height and access: A first-story repair is one thing. A full two-story install with gable cuts is another.
Practical rule: Pick the drainage and ventilation approach before you buy the siding. If you reverse that order, you usually end up making compromises on the wall assembly.
Build the budget around the full system
A lot of homeowners budget for boards and fasteners, then get surprised by prep, finish, and repair work. That's backwards. The wall prep and finish work are what keep wood siding from becoming an expensive lesson.
A mainstream estimate places wood siding at about $5 to $10 per square foot for materials and installation, with a two-story home landing around $14,000 to $23,000 depending on wood type and design complexity, and added protection such as paint, stain, moisture treatment, and insect protection can add $2,000 to $5,000 more. The same reference lists natural wood siding at 20 to 40 years of service life, which is why the installation details matter so much over time (wood siding cost and lifespan details).
That doesn't mean every house in Sharon or Pittsburgh will land neatly inside those numbers. It means you should expect the finish system, trim details, and repairs behind the old siding to shape the final cost just as much as the face material.
A simple planning table helps.
| Item | What drives cost |
|---|---|
| Siding material | Species, profile, grade, engineered vs natural wood |
| Wall prep | Rot repair, uneven sheathing, removal of old layers |
| Moisture control | House wrap, flashing, furring strips, drainage details |
| Finish | Paint, stain, treatment, labor to coat cut ends and exposed areas |
| Access | Second-story work, scaffolding, tight lot lines, porch roofs |
If you're doing this yourself, buy enough material to keep your layout clean and your joints intentional. Running short at the end leads to patched-in courses, odd seam placement, and rushed decisions. That's where a neat plan saves real money.
Essential Surface Preparation and Moisture Control
Most bad wood siding jobs don't fail because someone cut a board crooked. They fail because the installer skipped the wall science. In Pennsylvania, that mistake catches up fast.
Why the drainage plane matters more than the boards
Wood siding performs better when the wall behind it can drain and ventilate. That's the part many homeowners never hear clearly enough. If you fasten siding directly over a wall assembly that can't dry, you can trap moisture where you can't see it.
Industry guidance on modern wall systems points directly at this issue. Wood siding does better when installers use furring strips, drain wraps, or ventilated strips so water has a path to move and air has a path to circulate. That matters even more over newer wall assemblies where foam, wraps, and tighter construction can slow drying if the layers aren't detailed correctly (guidance on drainage and ventilation behind wood siding).

The common DIY idea is flawed: people think the wrap is the moisture plan. It isn't. The wrap is one layer. The essential plan is how water gets out after it gets past the siding, because some water always does.
Water will get behind wood siding. A durable wall gives it a place to drain and a way to dry.
What to inspect before you cover anything
Before new material goes up, strip the wall down enough to know what you're fastening into. If you're removing old cladding first, this guide on how to take siding off safely and cleanly can help you avoid tearing up trim, wrap, or sections you planned to keep.
Once the wall is exposed, check for these problems:
- Soft or stained sheathing: Probe suspicious spots around windows, doors, corners, and roof-to-wall intersections.
- Missing or sloppy flashing: Openings need water to shed outward, not behind the wrap.
- Uneven substrate: A wavy wall telegraphs through wood siding and makes reveals wander.
- Old fastener damage: Split sheathing and patched holes can weaken your nailing pattern.
- Low clearance conditions: Soil, mulch, decks, and walkways often sit too close to where the siding wants to finish.
On houses around Erie and Pittsburgh, I pay extra attention to the lower wall sections and any side that takes prevailing weather. Those are the areas where splash-back, wind-driven rain, and slow drying usually tell the truth about the wall.
If the sheathing is compromised, replace the bad sections before anything else. Then install the weather barrier cleanly, flash all openings correctly, and create the drainage gap the wall needs. That work doesn't show from the street, but it's what separates a job that ages normally from one that starts rotting from the inside.
Gathering Your Tools and Materials
A lot of DIY siding jobs start to slip here. The wall may be wrapped correctly, but if the cut station is shaky, the fasteners are wrong, or the trim package was guessed instead of planned, the installation slows down and mistakes stack up. In western Pennsylvania, that usually shows up first around joints, end cuts, and lower wall sections that stay damp longer.
Get the full material stack on site before you hang the first board. Wood siding is not just boards and nails. It is siding, trim, starter pieces, flashings, fasteners, coatings, and the parts that maintain the drainage gap you built into the wall. If any one of those is missing, people start forcing the assembly to fit the day instead of the house.
Cutting and layout tools
Keep your cutting and layout tools simple, accurate, and ready to use all day:
- Miter saw: Best for repeatable crosscuts on trim, corner boards, and siding pieces.
- Circular saw or track-capable saw: Useful for ripping starter strips, top courses, and narrow adjustments.
- Jigsaw or oscillating multi-tool: Good for vents, light blocks, and irregular cutouts.
- Tape measure, framing square, speed square: You will use these constantly.
- Level and chalk line: These keep courses straight and reveals consistent.
- Story pole: A homemade one saves time and helps hold layout around windows and across long runs.
If you are installing a profile with more exposed joints and irregular pieces, review this guide on installing cedar shake siding before you buy materials. Shake jobs need more sorting, more cuts, and better planning for coverage than many homeowners expect.
Set up a real cut station. Two solid sawhorses, stable support on both sides of the blade, and a clear spot to stack boards off the ground will do more for accuracy than another trip to the tool store.
Fasteners, moisture-management materials, and safety gear
The hardware matters because wood siding only performs as well as the parts behind and around it. Have these on site before you start:
- Corrosion-resistant nails: Use fasteners that will hold in wet conditions without bleeding rust onto the face of the siding.
- Flashing tape, metal flashing, and compatible weather barrier materials: These keep water moving out where it belongs.
- Furring strips or rainscreen components: Use them when your wall assembly includes a drainage and ventilation gap.
- Starter material, trim boards, and corner boards: These control alignment and finish quality.
- Primer, stain, or paint supplies: You need them for cut ends, field touch-ups, and exposed wood.
- Exterior sealant: Use it where the assembly calls for it. Do not use caulk to cover bad flashing work.
If you want another outside reference on assembly details, this overview of how to install timber cladding is a useful comparison point. The principles carry over, but Pennsylvania weather is harder on walls that cannot drain and dry.
Safety gear is basic, but skipping it is where small jobs turn into bad days:
- Safety glasses
- Hearing protection
- Work gloves
- Dust mask or respirator when cutting
- Stable ladders or proper scaffolding for height work
Height changes the job. So does wall repair. If you uncover rot, need custom flashing at tricky roof lines, or cannot maintain a consistent drainage space around openings, that is usually the point to bring in a contractor instead of pushing through with borrowed tools and a weekend plan.
The Core Installation Process Step by Step
A lot of Sharon homeowners get to this stage thinking the hard part is over. It usually is not. Once the wall is wrapped and flashed, the job shifts from carpentry to water control. The boards are the outer skin. The actual task involves keeping bulk water moving down and out, while giving the wall a way to dry after our wet springs, humid summers, and freeze-thaw winters.
Start by checking the material and the day's conditions. Wood siding needs time to adjust to the site before it goes on the wall. If boards come out of a dry garage and go straight onto a damp exterior, expect movement after fastening. Lowe's installation guidance also notes the basic layout rules that still matter in the field: install from the bottom up, maintain proper lap, and fasten into framing where required (wood siding installation sequence and spacing details).
Then lay out the wall with drainage in mind, not just appearance. Pioneer Millworks' installation guidance treats wood cladding as part of a ventilated assembly, calling for an air space behind the siding in many assemblies, along with clearance above grade and room at windows and doors for movement and drying (best-practice wood siding installation guidelines). In Pennsylvania, that approach matters. A wall that can drain and dry lasts longer than one that only looks straight on day one.
Set your layout in this order:
- Confirm the drainage plane is uninterrupted. Housewrap, flashing, and any rainscreen components should already be complete and lapped correctly.
- Snap a dead-level starter line. Every course follows it.
- Hold the bottom course high enough above grade and hard surfaces. Wood that sits too low stays wet and fails early.
- Dry-fit the first few boards at corners and trim. Small layout errors show up fast once courses start stacking.
If you want a broader cladding perspective, this guide on how to install timber cladding is a useful companion read because it helps you think in terms of the whole exterior assembly rather than just individual boards.
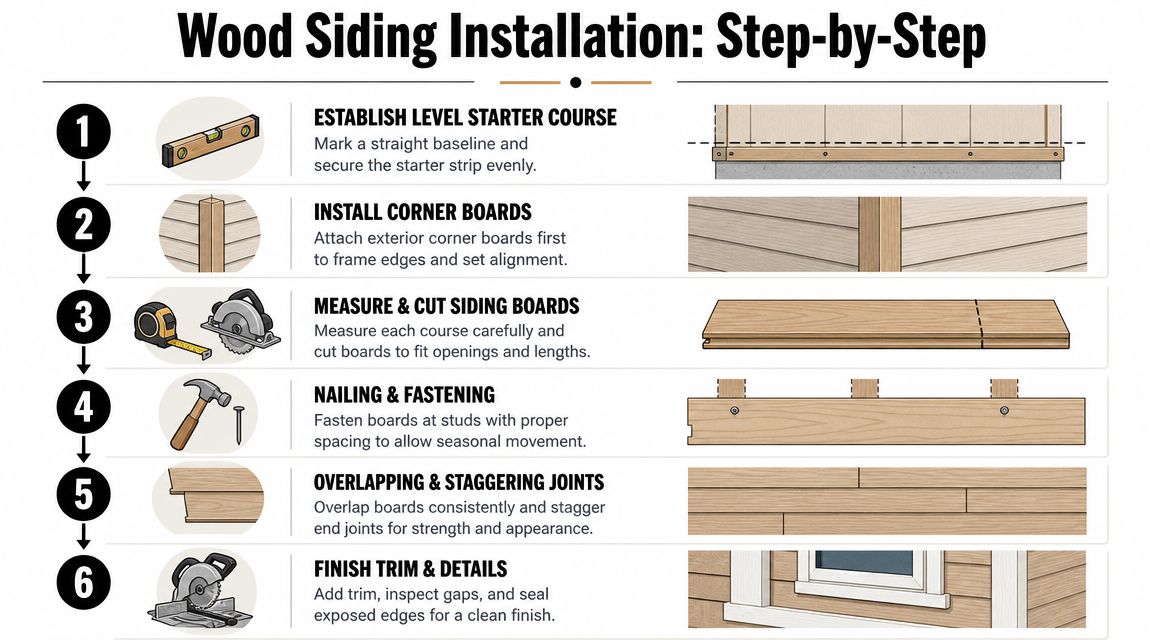
Install the field carefully
Once the starter course is set, build the wall from the bottom up and keep checking the reveal. Consistent overlap sheds water better and looks better. A level is faster than a repair.
Fastener placement matters more than many DIY installers expect. Keep nails back from board edges and ends so the siding can stay flat instead of splitting or cupping. Use corrosion-resistant fasteners and drive them snug, not buried. Overdriven nails distort the board, damage the surface, and make seasonal movement harder on the siding.
I tell homeowners to settle into a repeatable rhythm:
- Measure from a real reference point, not from the last cut.
- Cut cleanly and seal cut ends if the product requires it.
- Test-fit before nailing.
- Confirm the reveal and the joint location.
- Fasten with consistent placement.
- Recheck level every few courses, especially as you approach windows and corners.
For homes that use more textured wood products, this page on installing cedar shake siding is helpful if you're comparing how board layout differs from shake layout around corners and trim.
Handle joints, openings, and tricky areas
Joints are where a decent-looking job starts turning into a callback. Stagger butt joints so they do not stack up the wall, and leave the spacing the manufacturer calls for if the product needs room to move. A tight joint may look cleaner on install day, but it can swell, trap water, and telegraph stress later.
Around windows and doors, keep the siding clear of the trim where the assembly calls for it, and keep the flashing path open. Water should drop onto flashing and exit. It should never be forced into a caulked pocket with nowhere to go. That is one of the most common moisture mistakes I see on DIY jobs in western Pennsylvania.
The areas that slow people down are predictable:
- Inside and outside corners: If the corner boards or trim are off, the courses will advertise it all the way up.
- Window heads and sills: These spots need clean cuts, proper clearances, and respect for the flashing sequence.
- Top courses under eaves: Ripped pieces often need careful fitting, and they still have to look intentional from the ground.
- Transitions to brick, roofing, and other materials: These details need proper flashing and spacing because each material holds and sheds water differently.
Stop the job if the wall starts wandering out of level, if the drainage gap disappears behind trim, or if you uncover soft sheathing around an opening. Those are the points where a homeowner should seriously consider bringing in help. Nailing boards is the visible part of the project. Keeping the wall dry is the part that decides whether the installation holds up.
Finishing Touches and Avoiding Common Pitfalls
A lot of people think the job ends when the last board is nailed off. It doesn't. On wood siding, the finish details often decide whether the wall stays stable or starts asking for repairs early.
Finish work that actually protects the wall
Paint and stain aren't just cosmetic choices. They affect maintenance style, touch-up strategy, and how visible future wear will be. Some homeowners want the richer, more natural look of stain. Others want the broader color range and more uniform appearance of paint.
What matters most is consistency and coverage. Coat exposed areas properly, pay attention to cut ends, and seal the places that are supposed to be sealed without blocking intended drainage paths. That's the balance.
For homeowners comparing finish approaches on cedar products, this resource on cedar shingle staining practices is worth reviewing because it helps clarify what stain can and can't do on exterior wood surfaces.
Finishing protects the siding. It doesn't fix bad flashing, poor clearances, or trapped moisture.
The mistakes I see most often
Here are the failures that show up again and again on wood siding jobs across western Pennsylvania.
- Skipping flashing details: This is the big one. If water can't shed correctly at windows, doors, and transitions, the siding system is already compromised.
- Starting from a bad baseline: A crooked starter course creates a slow-motion mess. By the time you reach the top, the reveals are wandering and trim cuts look forced.
- Nailing too tight or in the wrong place: Boards need secure fastening, not strangulation. Bad placement can split ends or encourage cupping.
- Using caulk as a substitute for detailing: Caulk helps in the right joints. It does not replace flashing, drainage space, or proper trim relationships.
- Ignoring grade clearance: When siding sits too low, it gets hammered by splash-back, constant dampness, and debris.
- Forcing tight fits at openings: Wood moves. If you leave no room for that movement, the wall will make room for itself later.
A simple check at the end of each day helps. Walk the wall from a distance, then get close and inspect joints, reveals, and transitions. Most problems are easier to fix while the tools are still out than after the finish has gone on.
Long-Term Care and When to Call Penn Ohio
Wood siding rewards owners who pay attention early. It punishes neglect slowly, then all at once. The good news is that routine care usually catches small problems before they turn into wall repairs.
A maintenance routine that keeps problems small
The lifespan discussion only makes sense if the wall keeps drying, shedding water, and holding its finish. That means inspection matters just as much as installation.
Use a simple maintenance routine:
- Check the wall visually: Look for peeling finish, open joints, dark staining, or boards that are starting to move.
- Watch the problem zones first: Bottom edges, window trim, corners, and roof-to-wall intersections usually show distress earliest.
- Clean organic growth carefully: If you see mildew or mold on the surface, deal with it before it spreads. This guide on how to clean mold on siding is a practical starting point.
- Repair small failures quickly: Loose caulk in the right joint, a damaged board, or a finish breakdown is much easier to address early than after moisture gets behind the assembly.
For homeowners thinking ahead to repaint cycles, these pro tips for painting siding are useful because they focus on prep and application habits that make maintenance work last longer.

Signs the job has moved past DIY
Some wood siding work is realistic for a determined homeowner. Some isn't. The line usually becomes clear when the wall starts exposing structural or access problems instead of simple cladding issues.
Call for help when you run into conditions like these:
- You find widespread sheathing damage or hidden rot
- The house has multiple stories, steep grade changes, or difficult access
- Window and door flashing details are unclear or already compromised
- The wall assembly includes foam, rainscreen layers, or mixed-material transitions you aren't confident detailing
- Courses are drifting and you can't correct layout without removing installed sections
That judgment matters. A homeowner in Sharon might be comfortable replacing a small section on a garage wall. A full-height wall on a weather-exposed Pittsburgh house, or a lake-effect-beaten side in Erie, is a different level of risk.
If you want the wall checked, repaired, or finished by a crew that understands exterior systems in western Pennsylvania, contact Penn Ohio Roofing & Siding Group for a free estimate. When wood siding installation involves moisture damage, complex wall prep, or hard-to-detail transitions, getting experienced hands on the project can prevent expensive redo work later.